🧢 Beautiful ✨ Detailed πŸ’ Adorable

Simple Cozy Slippers Crochet Pattern

Simple Cozy Slippers Crochet Pattern
4.4β˜… Rating
1.5-2 Hours Time Needed
1.4K Made This
βœ‚οΈ

Beginner Friendly Level

Perfect for those just starting their sewing journey, with clear instructions and simple techniques

⏱️

Bite-Sized Project

Complete in under 2 hoursβ€”quick, fun, and perfect for a little creative escape.

🧣

Snug Essential

Everyday comfort with practical charm, designed for both functionality and style through changing seasons.

About This Simple Cozy Slippers Crochet Pattern

This Simple Slippers pattern is designed for anyone who loves quick, practical crochet projects that deliver maximum coziness. Using basic stitches like half double crochet and single crochet, you'll create comfortable slippers that mold perfectly to your feet. The pattern includes four different sizes (6, 7, 8, and 9) with clear adjustments for each, making it easy to customize the fit. Whether you're new to crochet or an experienced crafter looking for a speedy project, these slippers are perfect for using up your bulky yarn stash while creating something truly useful.

Simple Cozy Slippers Crochet Pattern crochet pattern - detailed view of completed project

The beauty of this pattern lies in its simplicity and versatility. Each slipper begins with a magic circle and builds up through easy-to-follow rounds before transitioning to rows for the heel section. The finished edge adds a professional touch while keeping the opening secure and comfortable around your foot.

Why You'll Love This Simple Cozy Slippers Crochet Pattern

I absolutely love this pattern because it's the perfect solution for those moments when you need a quick, satisfying project. There's something magical about transforming leftover bulky yarn into something as practical and cozy as house slippers. I appreciate how forgiving this pattern is - if you need to adjust the size, it's as simple as adding or removing a row or two. The fact that you can whip up a pair in an evening while watching your favorite show makes it even better. Plus, these slippers make fantastic last-minute gifts that people actually use and appreciate. I find myself reaching for this pattern whenever I want the satisfaction of completing something useful without a huge time commitment.

Simple Cozy Slippers Crochet Pattern step 1 - construction progress Simple Cozy Slippers Crochet Pattern step 2 - assembly progress Simple Cozy Slippers Crochet Pattern step 3 - details and accessories Simple Cozy Slippers Crochet Pattern step 4 - final assembly and finishing

Switch Things Up

I love experimenting with this slipper pattern because it's so versatile and forgiving. One of my favorite variations is creating colorful striped slippers by changing yarn colors every few rounds - it's a fantastic way to use up those single skeins sitting in your stash. I've also tried working the main slipper body in one color and the finished edge in a contrasting color for a fun pop that really makes them stand out.

For extra coziness during winter months, I sometimes use two strands of bulky yarn held together, which creates an incredibly thick and warm slipper. Just be aware this will make them larger, so you might need to adjust down a size. I've also experimented with adding embellishments like pom-poms on the toe area or crocheted flowers on the side for a more feminine touch.

If you want to make these slippers more durable for heavy use, I highly recommend adding a leather or suede sole. You can find pre-cut slipper soles at craft stores or cut your own from an old leather jacket. Another modification I enjoy is working a taller ankle cuff by adding several more rounds of single crochet at the finished edge - this creates more of a bootie style that stays on better and provides extra warmth.

Common Mistakes & How to Fix Them

βœ— Not maintaining consistent tension throughout rounds can result in uneven slipper shapes and uncomfortable fit around the foot βœ— Forgetting to count stitches at the end of each round leads to incorrect stitch counts and slippers that don't match in size βœ— Making the heel section too long or too short affects overall comfort - always measure against your foot as you work βœ— Skipping the finished edge creates an opening that stretches out quickly and loses its shape after minimal wear

Simple Cozy Slippers Crochet Pattern

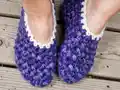
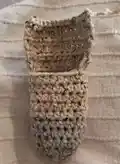
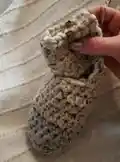
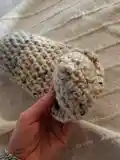
Create your own cozy pair of handmade slippers with this simple and beginner-friendly crochet pattern. Perfect for using up bulky yarn scraps, these slippers work up quickly using basic half double crochet and single crochet stitches. Available in sizes 6 through 9, this versatile pattern allows you to craft comfortable, custom-fit slippers for yourself or as thoughtful handmade gifts. With straightforward instructions and minimal materials needed, you'll have a warm, snug pair of slippers ready to wear in just a couple of hours.

Beginner Friendly 1.5-2 Hours

Materials Needed for Simple Cozy Slippers Crochet Pattern

β€” Main Fabric

  • 01
    Bulky weight 5 yarn (approximately 90 to 110 yards per pair)
  • 02
    Any bulky yarn scraps in your preferred colors

β€” Tools Required

  • 01
    Size 9mm (N) crochet hook
  • 02
    Scissors
  • 03
    Yarn needle for weaving in ends

Progress Tracker

0% Complete

β€” Size 6 :

RND 1 :

10 HDC in magic circle, SL ST to the 1st ST

RND 2 :

CH 1, 2 HDC in the same ST as CH 1, HDC in next ST, *2 HDC in next ST, HDC in next ST, RPT from * all around, SL ST to 1ST HDC, (15)

RND 3 :

CH 1, 2 HDC in the same ST as CH 1, HDC in next 2 STs, *2 HDC in next ST, HDC in next 2 STs, RPT from * all around, SL ST to 1ST HDC, (20)

RND 4 :

CH 1, HDC each ST around, SL ST to 1ST HDC (20)

RND 5-9 :

RPT RND 4

RW 10 :

CH 1, HDC into the next 14 (14)

RW 11 :

CH 1, turn your work so you are now working back across your work, HDC across (14)

RW 12-15 :

RPT RW 13

Info :

Cut yarn leaving 10 – 12 inch tail. Flip slipper inside out and SL ST the end together. Weave in all ends.

β€” Finished Edge (Size 6) :

RND 1 :

Starting at the back of the slipper SL ST yarn on SC 23 STs evenly around, SL ST to 1ST SC (23)

RND 2 :

SC in each ST around, SL ST to 1ST SC, Cut yarn, weave in end (23)

β€” Size 7 :

RND 1 :

10 HDC in magic circle, SL ST to the 1st ST

RND 2 :

CH 1, 2 HDC in the same ST as CH 1, HDC in next ST, *2 HDC in next ST, HDC in next ST, RPT from * all around, SL ST to 1ST HDC, (15)

RND 3 :

CH 1, 2 HDC in the same ST as CH 1, HDC in next 2 STs, *2 HDC in next ST, HDC in next 2 STs, RPT from * all around, SL ST to 1ST HDC, (20)

RND 4 :

CH 1, HDC each ST around, SL ST to 1ST HDC (20)

RND 5-10 :

RPT RND 4

RW 11 :

CH 1, HDC into the next 14 (14)

RW 12 :

CH 1, turn your work so you are now working back across your work, HDC across (14)

RW 13-17 :

RPT RW 13

Info :

Cut yarn leaving 10 – 12 inch tail. Flip slipper inside out and SL ST the end together. Weave in all ends.

β€” Finished Edge (Size 7) :

RND 1 :

Starting at the back of the slipper SL ST yarn on SC 24 STs evenly around, SL ST to 1ST SC (24)

RND 2 :

SC in each ST around, SL ST to 1ST SC, Cut yarn, weave in end (24)

β€” Size 8 :

RND 1 :

10 HDC in magic circle, SL ST to the 1st ST

RND 2 :

CH 1, 2 HDC in the same ST as CH 1, HDC in next ST, *2 HDC in next ST, HDC in next ST, RPT from * all around, SL ST to 1ST HDC, (15)

RND 3 :

CH 1, 2 HDC in the same ST as CH 1, HDC in next 2 STs, *2 HDC in next ST, HDC in next 2 STs, RPT from * all around, SL ST to 1ST HDC, (20)

RND 4 :

CH 1, HDC each ST around, SL ST to 1ST HDC (20)

RND 5-11 :

RPT RND 4

RW 12 :

CH 1, HDC into the next 14 (14)

RW 13 :

CH 1, turn your work so you are now working back across your work, HDC across (14)

RW 14-19 :

RPT RW 13

Info :

Cut yarn leaving 10 – 12 inch tail. Flip slipper inside out and SL ST the end together. Weave in all ends.

β€” Finished Edge (Size 8) :

RND 1 :

Starting at the back of the slipper SL ST yarn on SC 25 STs evenly around, SL ST to 1ST SC (25)

RND 2 :

SC in each ST around, SL ST to 1ST SC, Cut yarn, weave in end (25)

β€” Size 9 :

RND 1 :

10 HDC in magic circle, SL ST to the 1st ST

RND 2 :

CH 1, 2 HDC in the same ST as CH 1, HDC in next ST, *2 HDC in next ST, HDC in next ST, RPT from * all around, SL ST to 1ST HDC, (15)

RND 3 :

CH 1, 2 HDC in the same ST as CH 1, HDC in next 2 STs, *2 HDC in next ST, HDC in next 2 STs, RPT from * all around, SL ST to 1ST HDC, (20)

RND 4 :

CH 1, HDC each ST around, SL ST to 1ST HDC (20)

RND 5-13 :

RPT RND 4

RW 14 :

CH 1, HDC into the next 14 (14)

RW 15 :

CH 1, turn your work so you are now working back across your work, HDC across (14)

RW 16-20 :

RPT RW 13

Info :

Cut yarn leaving 10 – 12 inch tail. Flip slipper inside out and SL ST the end together. Weave in all ends.

β€” Finished Edge (Size 9) :

RND 1 :

Starting at the back of the slipper SL ST yarn on SC 26 STs evenly around, SL ST to 1ST SC (26)

RND 2 :

SC in each ST around, SL ST to 1ST SC, Cut yarn, weave in end (26)

Assembly Instructions

  • After completing all heel rows, cut yarn leaving a 10-12 inch tail for seaming.
  • Turn the slipper inside out so the right sides are facing each other.
  • Using the long tail and yarn needle, slip stitch or whipstitch the heel opening closed, working from one edge to the other.
  • Make sure the seam is secure and reinforced at both ends to prevent it from coming undone with wear.
  • Turn the slipper right side out and check that the heel seam lies flat and comfortable.
  • Work the finished edge by starting at the back seam and working single crochet stitches evenly around the ankle opening.
  • Complete the second round of single crochet for a polished finish, then weave in all remaining ends securely.

Important Notes

  • πŸ’‘The chain 1 at the beginning of each row is NOT counted as a stitch, but you will work your first stitch in the chain 1 space
  • πŸ’‘If the size you're working is too big, remove 1 or 2 rows before starting the heel section or from the heel itself
  • πŸ’‘Different bulky yarns may require small adjustments to achieve the correct fit for your feet
  • πŸ’‘Keep your gauge consistent: 10 stitches = 4 inches in width, and 8 rows = 4 inches in length
  • πŸ’‘Try on your slipper as you work to ensure proper fit before completing both slippers
  • πŸ’‘Leave long enough tails (10-12 inches) for seaming the heel - shorter tails make assembly difficult

These Simple Slippers are the perfect go-to pattern for anyone who loves quick, practical crochet projects that deliver real comfort. Whether you're using up yarn scraps or creating a thoughtful handmade gift, this beginner-friendly pattern offers satisfaction in every stitch. With four size options and easy customization, you'll find yourself making pair after pair for friends and family. The best part? You can complete a cozy pair in just a couple of hours while enjoying your favorite show. Grab your hook and some bulky yarn, and get ready to create slippers you'll actually want to wear! 🧢✨

You ask,

we answer.

FAQs

What if I'm between sizes?

If you're between sizes, start with the larger size and try it on as you work. You can easily adjust by removing 1-2 rows from either the foot section or the heel. The slippers will also stretch slightly with wear, so a snug initial fit is better than too loose.

Can I use a different weight of yarn?

This pattern is specifically designed for bulky weight 5 yarn. Using a different yarn weight will significantly change the size and may affect the structure. If you want to use worsted weight yarn, you'll need to adjust your hook size and stitch counts accordingly.

How do I prevent my slippers from slipping on smooth floors?

You can add non-slip soles using puffy paint dots on the bottom, sew on leather or suede patches, or attach grip pads designed for slippers. Some crafters also use hot glue to create textured dots on the sole for extra traction.

My heel seam is bulky and uncomfortable. What should I do?

Make sure you're turning the slipper inside out before seaming so the seam ends up on the outside. Use a whipstitch or mattress stitch for a flatter seam, and avoid pulling your stitches too tight. You can also flatten the seam by gently pressing it with your fingers.

Can I make these slippers for children?

Yes! For smaller sizes, reduce the starting stitches in the magic ring (try 8 HDC instead of 10) and work fewer rounds before starting the heel section. Always measure against the child's foot as you work to ensure proper fit.

How do I care for my finished slippers?

Hand wash in cool water with mild detergent and lay flat to dry. Avoid putting them in the dryer as this can cause shrinkage and distortion. If your yarn is machine washable, use a gentle cycle in a mesh laundry bag.