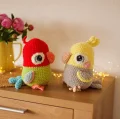
These chunky little birds are such a joy to work up! Using plush yarn makes them incredibly squishy and huggable, perfect for a nursery or a bright desk buddy. You'll love seeing their goofy personalities come to life as you add the oversized eyes and that characteristic beak. It's a fun way to play with vibrant colors while creating a high-quality handmade toy.
Progress Tracker
0% Complete
— 1. Left Eye :
Round 1 :
Using black yarn and your 2.0mm hook, work 6 sc into a MR (6)
Round 2 :
Work 1 inc into every stitch around (12)
Round 3 :
Repeat (1 sc, 1 inc) a total of 6 times (18)
Round 4 :
Switch to blue yarn and work 2 sc, 3 inc, 2 sc, then 1 sl st. Switch back to black yarn and work 10 sl st (21)
Round 5 :
Join white yarn and work 1 sl st, then repeat (1 sc, 1 inc) 3 times, followed by 1 sc and 3 sl st. Fasten off (14)
Round 6 :
Turn the eye so the wrong side is facing you. Work 10 sl st using black yarn, leaving the last 4 white stitches unworked.
— 2. Right Eye :
Round 1 :
Start with black yarn and create a MR, placing 6 sc inside (6)
Round 2 :
Place 2 sc in each stitch around (12)
Round 3 :
Complete a sequence of (1 sc, 1 inc) 6 times (18)
Round 4 :
Using blue yarn, work 1 sl st, 2 sc, 3 inc, 2 sc. Switch to black yarn and finish the round with 10 sl st (21)
Round 5 :
With white yarn, work 3 sl st, 1 sc, repeat (1 inc, 1 sc) 3 times, then 1 sl st. Fasten off (14)
Round 6 :
Identify the 5th stitch from the bottom in the white section and mark it. Turn the work to the wrong side and crochet 9 sl st in black starting from that marker.
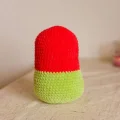
— 3. Main Body :
Info :
Use your 3.5mm hook and plush yarn for this section. For the lovebird, start with red. For the parrot, start with yellow.
Round 1 :
ch 2, then work 6 sc into the second chain from your hook (6)
Round 2 :
Work 1 inc in every stitch around (12)
Round 3 :
Repeat (3 sc, 3 inc) twice (18)
Round 4 :
Work 3 sc, then repeat (1 sc, 1 inc) 3 times, work 3 sc, then repeat (1 sc, 1 inc) 3 times (24)
Round 5 :
Work 3 sc, then repeat (2 sc, 1 inc) 3 times, work 3 sc, then repeat (2 sc, 1 inc) 3 times (30)
Round 6 :
Work 3 sc, then repeat (3 sc, 1 inc) 3 times, work 3 sc, then repeat (3 sc, 1 inc) 3 times (36)
Round 7 :
Work 3 sc, then repeat (4 sc, 1 inc) 3 times, work 3 sc, then repeat (4 sc, 1 inc) 3 times (42)
Round 8 :
Work 3 sc, then repeat (5 sc, 1 inc) 3 times, then work 21 sc (45)
Round 9-16 :
Work 1 sc in each stitch around (45)
Round 17 :
Work 15 sc, 1 inc, then 29 sc (46)
Round 18 :
Work 1 sc in each stitch around (46)
Round 19 :
Work 15 sc, 1 inc, then 30 sc (47)
Round 20 :
Work 15 sc in your starting color (red or yellow), then switch to your body color (green or grey) and work 32 sc (47)
Round 21 :
Work 16 sc, 1 inc, then 30 sc (48)
Round 22 :
Work 1 sc in each stitch around (48)
Round 23 :
Work 17 sc, 1 inc, then 30 sc (49)
Round 24 :
Work 1 sc in each stitch around (49)
Round 25 :
Work 18 sc, 1 inc, then 30 sc (50)
Round 26 :
Work 1 sc in each stitch around (50)
Round 27 :
Work 19 sc, 1 inc, then 30 sc (51)
Round 28 :
Work 19 sc, 1 inc, then 31 sc (52)
Round 29 :
Work 20 sc, 1 inc, then 31 sc (53)
Round 30 :
Work 21 sc, 1 inc, then 31 sc (54)
Round 31 :
Repeat (1 dec, 7 sc) 6 times (48)
Round 32 :
Work 3 sc, repeat (1 dec, 6 sc) 5 times, then 1 dec and 3 sc (42)
Round 33 :
Repeat (1 dec, 5 sc) 6 times (36)
Round 34 :
Work 2 sc, repeat (1 dec, 4 sc) 5 times, then 1 dec and 2 sc (30)
Round 35 :
Repeat (1 dec, 3 sc) 6 times (24)
Round 36 :
Repeat (1 dec, 2 sc) 6 times (18)
Round 37 :
Repeat (1 dec, 1 sc) 6 times (12)
Round 38 :
Work 6 dec or sew the remaining gap closed. Fasten off.
— 4. Tail - Large Piece :
Info :
Make 1 using blue or grey plush yarn.
Round 1 :
ch 2, work 6 sc into the second chain from hook (6)
Round 2 :
Work 1 inc in every stitch around (12)
Round 3 :
Work 1 sc in each stitch around (12)
Round 4 :
Work 1 dec, then 10 sc (11)
Round 5 :
Work 1 dec, then 9 sc (10)
Round 6 :
Work 1 dec, then 8 sc (9)
Round 7 :
Work 1 dec, then 7 sc (8)
Round 8 :
Work 1 dec, then 6 sc (7)
Round 9 :
Work 1 dec, then 5 sc (6)
Round 10 :
Work 1 dec, then 4 sc (5)
Round 11 :
Work 1 dec, then 3 sc. Fasten off leaving a tail (4)
— 5. Tail - Small Piece :
Info :
Make 2 using blue or grey plush yarn.
Round 1 :
ch 2, work 6 sc into the second chain from hook (6)
Round 2 :
Repeat (1 sc, 1 inc) 3 times (9)
Round 3 :
Work 1 sc in each stitch around (9)
Round 4 :
Work 1 dec, then 7 sc (8)
Round 5 :
Work 1 dec, then 6 sc (7)
Round 6 :
Work 1 dec, then 5 sc (6)
Round 7 :
Work 1 dec, then 4 sc (5)
Round 8 :
Work 1 dec, then 3 sc. Fasten off leaving a tail (4)
— 6. Wings :
Info :
Make 2 using blue or grey plush yarn.
Round 1 :
ch 2, work 6 sc into the second chain from hook (6)
Round 2 :
Work 1 inc in every stitch around (12)
Round 3 :
Repeat (3 sc, 3 inc) twice (18)
Round 4 :
Work 3 sc, then repeat (1 sc, 1 inc) 3 times, work 3 sc, then repeat (1 sc, 1 inc) 3 times (24)
Joining :
Fold the wing in half. Work 12 sl st through both layers using pink or yellow yarn to close the edge.
— 7. Legs - Big Toe :
Row 1 :
ch 10, start in the second ch from hook and work 9 sc. ch 1 and turn (9)
Row 2 :
Work 1 sc in each of the 9 stitches (9)
Row 3 :
Fold the piece lengthwise and work 9 sl st across to join. Leave a tail for sewing.
— 8. Legs - Little Toes :
Row 1 :
ch 8, start in the second ch from hook and work 7 sc. ch 1 and turn (7)
Row 2 :
Work 1 sc in each of the 7 stitches (7)
Row 3 :
Fold the piece and work 7 sl st across to join. Leave a tail. Make 2 of these for each leg.
— 9. Tuft Feather :
Round 1 :
ch 8, starting in the second ch from hook: 1 sl st, 1 sc, 3 sc, 1 sc, 1 sl st. Fasten off leaving a tail (7)
— 10. Beak :
Round 1 :
Using orange or beige yarn, ch 2 and work 6 sc into the second chain (6)
Round 2 :
Repeat (1 sc, 1 inc) 3 times (9)
Round 3 :
Repeat (2 sc, 1 inc) 3 times (12)
Round 4 :
Repeat (3 sc, 1 inc) 3 times (15)
Round 5-7 :
Work 1 sc in each stitch around (15)
Round 8 :
Add a small amount of stuffing, then work 8 sc through both edges to close. Leave a tail.
— 11. Eye Whites :
Round 1 :
ch 6, starting in the second ch from hook: work 3 sc into the first st, 3 sc along the chain, then repeat on the other side (12)
Round 2 :
Work 3 inc, then 3 sc, then repeat (18)
Round 3 :
Repeat (1 inc, 1 sc) 3 times, then 3 sc, then 2 sl st. Fasten off leaving a long tail.
I hope you have as much fun making these little feathered friends as I did! There’s something so rewarding about seeing those big eyes finally come together on that squishy plush body. Whether you’re making a pair of lovebirds for a wedding gift or a bright parrot to cheer up your workspace, they are sure to bring a smile to everyone who sees them. Don't forget to play around with different shades of plush yarn to create your own unique species! Happy crocheting, and enjoy your new tropical companions! 🧶 ✨ 🦜