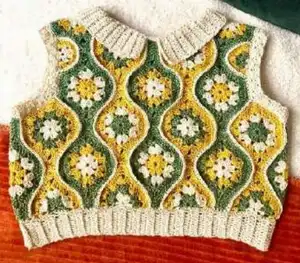
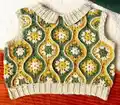
Create your own stunning Ada Top with this comprehensive crochet pattern! This beautiful granny square-inspired top features colorful lantern motifs joined together to form a stylish, comfortable garment. Available in sizes XS through 5X with three customizable length options, this versatile pattern lets you craft the perfect summer top. The design includes detailed ribbing at the waist and armholes, plus a charming collar with button closure. Perfect for showcasing your crochet skills while making a wearable piece you'll love to wear all season long.
Progress Tracker
0% Complete
— Normal Lanterns:
Row 0:
Start with 1st color, ch4, join with slst in 1st chain to make a loop
Row 1:
ch3, 2dc in the loop, *ch2, 3dc in the loop* repeat * 4 more times, ch2, join with slst to top ch of ch3, fasten off
Row 2:
Attach 2nd color in ch sp, ch3, 2dc in same ch sp, ch2, 3dc in same ch sp, *in next ch sp: 3dc, ch2, 3dc* repeat * 4 more times, join with slst to top ch of ch3, fasten off
Row 3:
Attach 3rd color in space between 2 ch sp, ch3, 2dc in same space. In next ch sp make peak: 3dc, ch6, dc in 4th ch from hook, dc in next 2ch, 3dc in same chain space. In next 5 spaces: 3dc, 6dc, 3dc, 6dc, 3dc. In next ch sp make other peak. In next 4 spaces: 3dc, 6dc, 3dc, 6dc. Join with slst in top ch of ch3, do NOT fasten off
Row 4:
ch1, sc in each st all around, also sc in stitches on right side of peaks (both loops), in top of peaks make 3sc in ch sp. At end skip last tiny st and join with slst in ch1
Size 1A*/1A/2A:
Fasten off
Size 1B/2B:
Add 1 extra row of sc, increasing at top of peaks (3sc in middle st of peaks), join with slst and fasten off
Size 1C:
Add 2 more rows of sc, increasing at top of peaks (3sc in middle st of peaks), join with slst and fasten off
— Long Lanterns:
Row 0-2:
Like normal lanterns
Row 3:
Finish row 3 like normal until you reach ch sp for 2nd peak. 3dc, ch9 (instead of ch6), dc in 4th ch from hook, dc in remaining 5ch, 3dc in same ch sp. Finish rest of row 3 like normal
Row 4-6:
Like normal (make same amount of rows as normal lanterns)
— Short Lanterns:
Row 0-2:
Like normal lanterns
Row 3:
Finish row 3 like normal until you reach space for 2nd peak. In that chain space work: 3dc, ch2, 3dc. Finish rest of row 3 like normal
Row 4:
Like normal, on short side make 2sc in ch sp
Row 5-6:
Like normal but don't increase on short side (make same amount of rows as normal lanterns)
— Horizontal Half Lanterns:
Row 0:
Start with 1st color, ch4, join with slst in 1st chain to make loop. In loop: ch3, dc, ch2, 3dc, ch2, 3dc, ch2, 2dc, fasten off
Row 2:
Attach 2nd color to top ch of ch3, ch4, *3dc in next ch sp, ch2, 3dc in same ch sp* repeat * 2 more times, ch1, dc in last st, fasten off
Row 3:
Attach 3rd color in first ch sp, ch3, dc in same ch sp, 6dc in next ch sp, 3dc in next space. In next ch sp make peak (normal length, ch6). 3dc in next space, 6dc in next ch sp, 2dc in last ch sp, fasten off
Row 4:
Attach 3rd color to 1st stitch, ch1, sc in each st across, fasten off
Size 1B/2B:
Add 1 more row of sc (increase in peak)
Size 1C:
Add 2 more rows of sc (increase in peak)
— Vertical Half Lanterns:
Row 0:
Starting with 1st color, ch5, join with slst in 1st ch to make loop
Row 1:
ch4, 2dc in loop, *ch2, 2dc in loop* repeat * 2 more times, ch1, dc in loop, fasten off
Row 2:
Attach 2nd color in first ch sp, ch3, 2dc in same ch sp. In next 4 spaces: 6dc, 3dc, 6dc, 3dc, fasten off
Row 3:
Attach 2nd color to first stitch, ch1, sc in each st across, fasten off
Size 1B/2B:
Add 1 more row of sc (no increase)
Size 1C:
Add 2 more rows of sc (no increase)
— Joining Lanterns:
Info:
Start on right side, insert hook in 1st st of half lantern and 1st st after top stitches of other lantern (4 loops on hook). Attach yarn, pull up loop and ch1
Joining Process:
sc in next st of both lanterns (both loops, 4 loops on hook) and continue. Make last sc in centre st + last st before top stitches. Make another sc in centre st + 1st st after top stitches of next lantern. Continue until end of row, fasten off. Push sc away from you with fingers for better appearance
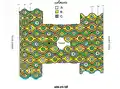
Side Seams:
Fold front panel over back panel (wrong sides together) and join blue lines with rows of sc. Repeat on other side
— Waist Ribbing:
Base Row:
Turn top so waistline faces up, attach yarn to middle st of lantern on right side, ch1. Make row of sc all around waistline, also sc in 1st st of each joining row. Join with slst to ch1, do NOT fasten off
Starting Rib:
Change to hook 0.5mm smaller, ch11 (for 5cm/2in rib; add 2ch for 1cm extra or skip 2ch for 1cm less). dc in 3rd ch from hook, dc in each remaining ch (total 10dc; first 2ch count as 1st dc)
Rib Rows:
*Skip 1 st, slst in next 3 stitches. dc in first dc from hook (both loops), dc in next 8 stitches (blo), dc in last st (both loops, make quite loose). ch2 (counts as 1st dc, make quite loose), dc in next st and each remaining st (blo except last: both loops)* repeat all around. Join with row of slst on inside (blo)
— Armhole Ribbing:
Size 2A/2B Corners:
Round corners by making: 2sc, 2hdc, 2dc, 1tc, 2dc, 2hdc, 2sc in colour C. Make tc in centre of corner. Do for all 4 corners
All Sizes:
Switch to bigger hook, attach yarn to st in middle of armpit, ch1. Make base row of sc all around, also in 1st stitches of joining rows. Join with slst to ch1, switch to smaller hook, ch5 (for 2cm/0.8in rib; add 2ch for 1cm extra)
Rib Process:
Make rib same way as waist (4dc per row instead of 10) all around. Join with row of slip stitches on inside (blo), fasten off. Repeat for other armhole
— Collar:
Base Row:
Switch to bigger hook, attach yarn to 1st st of joining row right from centre of neckline on back, ch1. sc in st joined by that 1st st of joining row. sc in each st across (don't forget to sc in 1st st of joining rows and 2 stitches joined by this st). Join with slst in ch1
Starting Collar:
Turn work so neckline faces you, slst to next corner of lantern on left, change to smaller hook, ch12 (for 5cm/2in collar). dc in 4th ch from hook, continue with rib as before BUT slst in next 2 st only (no skipping)
Front Opening:
Continue until you reach middle lantern on front. If you end at top of rib, slst down to base row. slst to other side of middle lantern. ch12, continue ribbing until you reach middle lantern on back. If you end at top of rib, slst down to base row
Button Loop:
ch6, slst in same st to make loop (or ch more if button is bigger). slst to starting place of collar, fasten off. Sew button on other side of collar
The Ada Top pattern brings together the beloved granny square technique with modern wearable fashion! This modular design lets you create a stunning, customizable garment that fits perfectly and showcases your color creativity. With detailed instructions for every step from individual lanterns to professional ribbed finishes, you'll craft a top that looks store-bought but feels wonderfully handmade. The size inclusivity and length options mean everyone can enjoy making and wearing this beautiful piece. 🧶 Happy crocheting! ✨👕