🧢 Beautiful ✨ Detailed πŸ’ Adorable

Mini Dragon Amigurumi Pattern

Mini Dragon Amigurumi Pattern
4.2β˜… Rating
6-8 Hours Time Needed
4.2K Made This
βœ‚οΈ

Intermediate Level

Ideal for those with basic knitting experience, featuring slightly more advanced stitches and techniques to expand your skills.

⏱️

Weekend Treat

Takes 5-7 hours, making it an enjoyable project to finish over a couple of days.

🐰

Whimsical Buddy

Playful characters full of personality, designed to spark imagination and become cherished playtime favorites.

About This Mini Dragon Amigurumi Pattern

This Mini Dragon pattern brings fantasy to life with its carefully designed features and charming details. The combination of cream belly and green body creates a classic dragon aesthetic, while pink spikes add a playful pop of color. Multiple components including wings, horns, ears, and a graduated tail come together to form a creature with incredible personality and presence.

Mini Dragon Amigurumi Pattern crochet pattern - detailed view of completed project

Working in continuous spirals with strategic color changes, you'll create a dragon that stands proudly on its own two feet. The pattern includes bobble stitch details for dimensional nostrils and textured toes, making this little companion truly special.

Why You'll Love This Mini Dragon Amigurumi Pattern

I absolutely love this pattern because it transforms simple yarn into a magical creature that feels alive with personality. The way the wings attach and the tail curves gives such dynamic movement to the finished piece. I'm particularly fond of how the layered ears and cream horns add depth and dimension, making each dragon unique depending on how you position them. The bobble stitch details on the face and feet are such clever touches that elevate this from a simple toy to a true handcrafted treasure. Every time I complete one, I'm amazed at how the assembly brings all the pieces together into something that feels ready to take flight.

Mini Dragon Amigurumi Pattern step 1 - construction progress Mini Dragon Amigurumi Pattern step 2 - assembly progress Mini Dragon Amigurumi Pattern step 3 - details and accessories Mini Dragon Amigurumi Pattern step 4 - final assembly and finishing

Switch Things Up

I love experimenting with different color combinations for this Mini Dragon pattern! Instead of the classic green and cream, I've tried making a midnight blue dragon with silver accents and purple spikes for a mystical night dragon effect. You could also go bold with a fiery red body, orange belly, and yellow spikes to create a fierce fire-breathing dragon.

For a softer look, I've used pastel pink with lavender and mint green accents, which creates an absolutely adorable baby dragon perfect for nursery decor. Another fun variation I enjoy is using variegated yarn for the body, which gives a magical, scale-like color-changing effect without any extra work.

I also like to play with the positioning during assembly. Angling the wings differently can make your dragon look like it's about to take flight or resting peacefully. The tail can be curved more dramatically or positioned straight for different personalities. You can even add small embroidered details like eyebrows or little scales using embroidery floss.

Some makers have told me they've added wire to the tail and wings to make them posable, which is a fantastic modification if you want your dragon to be more dynamic. Just remember to use child-safe materials if making this for little ones!

Common Mistakes & How to Fix Them

βœ— Forgetting to place stitch markers at the beginning of rounds can lead to uneven shaping and losing your place in the pattern βœ— Stuffing the head too firmly before closing can make it difficult to sew shut and create an overly hard texture βœ— Not leaving long enough tails for sewing pieces together results in running out of yarn mid-assembly and visible knots βœ— Skipping the pinning step before sewing limbs and features can result in crooked or unbalanced positioning that's hard to fix

Mini Dragon Amigurumi Pattern

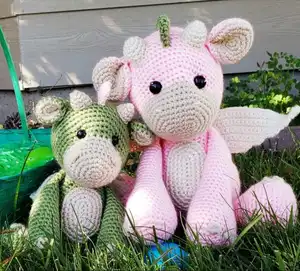
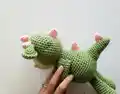
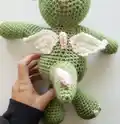
Create your own adorable Mini Dragon with this charming amigurumi pattern! Standing 11 inches tall, this sweet creature features delicate wings, colorful spikes, and a long curving tail that brings personality to life. Perfect for dragon lovers and fantasy enthusiasts, this pattern combines cream and green yarn with pink accents to create a whimsical companion. The detailed instructions guide you through crafting each element, from the bobble-stitched nostrils to the layered ears, resulting in a cuddly friend that's sure to be treasured for years to come.

Intermediate 6-8 Hours

Materials Needed for Mini Dragon Amigurumi Pattern

β€” Main Fabric

  • 01
    Worsted weight #4 yarn in Green (Color A)
  • 02
    Worsted weight #4 yarn in Cream (Color B)
  • 03
    Worsted weight #4 yarn in Pink (Color C)

β€” Tools Required

  • 01
    D Hook or 3.25 mm crochet hook
  • 02
    12 mm safety eyes
  • 03
    Scissors
  • 04
    Sewing needle
  • 05
    Stitch markers
  • 06
    Fiberfill stuffing

Progress Tracker

0% Complete

β€” Head :

Info :

Crocheted from front of nose to back of head. Starting with Color B

Round 1 :

Make 6 sc into a magic ring (6)

Round 2 :

Increase in each st around (12)

Round 3 :

(sc, inc) x 6 (18)

Round 4 :

(2 sc, inc) x 6 (24)

Round 5 :

(3 sc, inc) x 6 (30)

Round 6 :

FLO 4 sc, bob st, 8 sc, bob st, 16 sc (30)

Round 7-9 :

sc in each st around (30)

Info :

Change to Color A

Round 10 :

sc in each st around (30)

Round 11 :

(4 sc, inc) x 6 (36)

Round 12 :

(5 sc, inc) x 6 (42)

Round 13 :

(6 sc, inc) x 6 (48)

Info :

Place eyes between rows 12 and 13, leaving 10 holes between them

Round 14-19 :

sc in each st around (48)

Round 20 :

(7 sc, dec) x 6 (42)

Round 21 :

sc in each st around (42)

Round 22 :

(5 sc, dec) x 6 (36)

Info :

Start stuffing the head

Round 23 :

(4 sc, dec) x 6 (30)

Round 24 :

(3 sc, dec) x 6 (24)

Round 25 :

(2 sc, dec) x 6 (18)

Round 26 :

(sc, dec) x 6 (12)

Round 27 :

dec x 6 (6)

Info :

F/O and sew the hole closed

β€” Body :

Info :

With Color A

Round 1 :

Make 6 sc into a magic ring (6)

Round 2 :

Increase in each st around (12)

Round 3 :

(sc, inc) x 6 (18)

Round 4 :

(2 sc, inc) x 6 (24)

Round 5 :

(3 sc, inc) x 6 (30)

Round 6 :

(4 sc, inc) x 6 (36)

Round 7 :

(5 sc, inc) x 6 (42)

Round 8 :

(6 sc, inc) x 6 (48)

Round 9-12 :

sc in each st around (48)

Round 13 :

(6 sc, dec) x 6 (42)

Round 14-15 :

sc in each st around (42)

Round 16 :

(5 sc, dec) x 6 (36)

Round 17-18 :

sc in each st around (36)

Info :

Start stuffing the body

Round 19 :

(4 sc, dec) x 6 (30)

Round 20-22 :

sc in each st around (30)

Round 23 :

(3 sc, dec) x 6 (24)

Round 24-25 :

sc in each st around (24)

Round 26 :

(2 sc, dec) x 6 (18)

Info :

F/O and leave a long tail for sewing

β€” Arms (Make 2) :

Info :

With Color A

Round 1 :

Make 6 sc into a magic ring (6)

Round 2 :

Increase in each st around (12)

Round 3 :

(sc, inc) x 6 (18)

Round 4 :

2 sc, change to Color B: bob st, change to color A: 2 sc, change to color B: bob st, change to color A: 2 sc, change to color B: bob st, change to color A: 9 sc (18)

Round 5-6 :

sc in each st around (18)

Round 7 :

dec, 16 sc (17)

Round 8-9 :

sc in each st around (17)

Round 10 :

dec, 15 sc (16)

Info :

Start stuffing the arms

Round 11 :

dec, 14 sc (15)

Round 12-13 :

sc in each st around (15)

Round 14 :

dec, 13 sc (14)

Round 15-16 :

sc in each st around (14)

Info :

Stop stuffing the arms

Round 17 :

dec, 12 sc (13)

Round 18-19 :

sc in each st around (13)

Round 20 :

dec, 11 sc (12)

Round 21 :

sc in each st around (12)

Info :

F/O and leave a long tail for sewing

β€” Legs (Make 2) :

Info :

With Color A

Round 1 :

Make 6 sc into a magic ring (6)

Round 2 :

Increase in each st around (12)

Round 3 :

(sc, inc) x 6 (18)

Round 4 :

(2 sc, inc) x 6 (24)

Round 5 :

2 sc, change to Color B: bob st, change to color A: 2 sc, change to color B: bob st, change to Color A: 2 sc, change to Color B: bob st, change to Color A: 15 sc (24)

Round 6 :

sc in each st around (24)

Round 7 :

(6 sc, dec) x 3 (21)

Round 8 :

sc in each st around (21)

Round 9 :

(5 sc, dec) x 3 (18)

Round 10-11 :

sc in each st around (18)

Info :

Start stuffing the legs

Round 12 :

dec, 16 sc (17)

Round 13-14 :

sc in each st around (17)

Round 15 :

dec, 15 sc (16)

Round 16-17 :

sc in each st around (16)

Info :

Stop stuffing the legs

Round 18 :

(2 sc, dec) x 4 (12)

Round 19 :

sc in each st around (12)

Info :

F/O and leave a long tail for sewing

β€” Ears (Make 2 of each color) :

Info :

Starting with Color B

Round 1 :

Make 6 sc into a magic ring (6)

Round 2 :

Increase in each st around (12)

Round 3 :

(sc, inc) x 6 (18)

Info :

Do not fasten off green ears. Place the back sides of each ear together and single crochet around the edges with green yarn

β€” Tail :

Info :

With Color A

Round 1 :

Make 6 sc into a magic ring (6)

Round 2 :

(inc, 2 sc) x 2 (8)

Round 3 :

sc in each st around (8)

Round 4 :

(inc, 3 sc) x 2 (10)

Round 5 :

sc in each st around (10)

Round 6 :

(inc, 4 sc) x 2 (12)

Round 7 :

sc in each st around (12)

Round 8 :

(inc, 5 sc) x 2 (14)

Round 9 :

sc in each st around (14)

Round 10 :

(inc, 6 sc) x 2 (16)

Round 11 :

sc in each st around (16)

Info :

Stuff the tail as you work

Round 12 :

(inc, 7 sc) x 2 (18)

Round 13 :

sc in each st around (18)

Round 14 :

(inc, 8 sc) x 2 (20)

Round 15 :

sc in each st around (20)

Info :

F/O and leave a long tail for sewing

β€” Spikes (Make 5) :

Info :

With color C

Round 1 :

Make 4 sc into a magic ring (4)

Round 2 :

(inc, sc) x 2 (6)

Round 3 :

(inc, 2 sc) x 2 (9)

Round 4-5 :

sc in each st around (9)

Info :

Do not stuff the spikes. Sew the spike closed, F/O and leave a long tail for sewing

β€” Horns (Make 2) :

Info :

With Color B

Round 1 :

Make 4 sc into a magic ring (4)

Round 2 :

(inc, sc) x 2 (6)

Round 3 :

(inc, 2 sc) x 2 (9)

Round 4 :

sc in each st around (9)

Info :

F/O and leave a long tail for sewing

β€” Belly :

Info :

With Color B, ch 6

Round 1 :

sc in 2nd chain from hook, 3 sc, inc3 in last chain, working on the opposite side of the chain, 3 sc, inc (12)

Round 2 :

inc, 3 sc, inc x 3, 3 sc, inc x 2 (18)

Round 3 :

sc, inc, 4 sc, inc, sc, inc, sc, inc, 4 sc, inc, sc, inc (24)

Round 4 :

2 sc, inc, 5 sc, inc, 2 sc, inc, 2 sc, inc, 5 sc, inc, 2 sc, inc (30)

Info :

F/O and leave a long tail for sewing

β€” Wings (Make 2) :

Info :

Ch 5

Row 1 :

sc in 2nd chain from hook, 2 sc, sl st, ch 1, turn (4)

Row 2 :

sc, inc, 2 sc, ch 2, turn

Row 3 :

sc in 2nd chain from hook, 3 sc, inc, sl st, ch 1, turn

Row 4 :

3 sc, inc, 4 sc, ch 3, turn

Row 5 :

sc in 2nd chain from hook, 5 sc, inc, 2 sc, sl st, ch 1, turn

Row 6 :

4 sc, inc, 7 sc, ch 3, turn

Row 7 :

sc in 2nd chain from hook, 8 sc, inc, 3 sc, sl st

Info :

F/O and leave a long tail for sewing

Assembly Instructions

  • Pin the head onto the body for extra support, adding more stuffing as needed, then sew the head onto the body securely
  • Pin the belly onto the front of the body and sew into place using the long tail
  • Pin the arms in a forward-facing angle on the body and sew them on securely
  • Turn the body upside down with the nose facing away, pin the legs onto the bottom of the body, then sew them into place
  • Pin the tail onto the back of the body at your desired position and sew it securely
  • Pinch the ears at the bottom and sew about 3 stitches together, then pin and sew them onto the head near the top
  • Pin the horns onto the top of the head right near the ears and sew them into place
  • Pin the spikes onto the back of the body going down toward the tail and sew them into place
  • Pin the wings onto the back of the body and sew them securely into place

Important Notes

  • πŸ’‘Use a stitch marker to mark the beginning of each round to avoid losing your place
  • πŸ’‘Work in continuous spiral unless the pattern states to join rounds
  • πŸ’‘All stitches are worked in both loops unless stated otherwise in the pattern
  • πŸ’‘Stop stuffing arms and legs where indicated to allow for better positioning and flexibility
  • πŸ’‘Pin all pieces before sewing to ensure proper placement and symmetry
  • πŸ’‘Leave long tails when fastening off pieces to make assembly easier and more secure

This enchanting Mini Dragon pattern was lovingly designed to bring a touch of fantasy and whimsy into your crochet collection! With its adorable proportions, colorful details, and personality-filled features, this little dragon is perfect as a gift or a special companion for yourself. The combination of textured bobble stitches, layered components, and careful assembly creates a truly magical finished piece that stands proudly at 11 inches tall. πŸ‰ Happy crocheting and may your dragon bring you joy! 🧢✨

You ask,

we answer.

FAQs

What size will my finished Mini Dragon be?

When made with worsted weight #4 yarn and a 3.25mm hook, your finished Mini Dragon will measure approximately 11 inches from the bottom of the foot to the top of the head.

Can I use different yarn weights for this pattern?

Yes, you can use different yarn weights, but this will change the final size of your dragon. If you use a lighter weight yarn with a smaller hook, your dragon will be smaller, and heavier yarn with a larger hook will make it bigger. Adjust your hook size accordingly.

Do I need to know how to do bobble stitches?

Yes, this pattern uses bobble stitches for the nostrils and toe details. If you're unfamiliar with bobble stitches, it's recommended to practice them before starting or look up a tutorial, as they add important dimensional details to the dragon.

How do I keep track of rounds when working in continuous spiral?

Use a stitch marker at the beginning of each round to mark your starting point. Move the marker up as you complete each round to avoid losing your place in the pattern.

Why do I stop stuffing the arms and legs partway through?

Stopping the stuffing allows the limbs to be more flexible and posable at the ends, making it easier to position them during assembly and giving the dragon a more natural appearance when sewn to the body.

Can I change the colors to make different dragon variations?

Absolutely! Feel free to customize your dragon with any color combination you like. You could make a blue and silver ice dragon, a red and orange fire dragon, or any creative combination that speaks to you.