🧢 Beautiful ✨ Detailed πŸ’ Adorable

Mini Pumpkin Man Amigurumi Pattern

Mini Pumpkin Man Amigurumi Pattern
4.8β˜… Rating
2-3 Hours Time Needed
3.8K Made This
βœ‚οΈ

Beginner Friendly Level

Perfect for those just starting their sewing journey, with clear instructions and simple techniques

⏱️

Bite-Sized Project

Complete in under 2 hoursβ€”quick, fun, and perfect for a little creative escape.

πŸŽƒ

Whimsical Buddy

Playful characters full of personality, designed to spark imagination and become cherished playtime favorites.

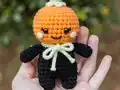
About This Mini Pumpkin Man Amigurumi Pattern

This Mini Pumpkin Man pattern brings together simple crochet techniques with creative assembly methods to create an adorable autumn companion. The design features a unique oval-shaped head that's transformed into a realistic pumpkin through special denting techniques using yarn threaded through the finished piece. What makes this pattern special is how basic single crochet rounds become something truly magical when you add those characteristic pumpkin ridges. The continuous round construction keeps the process flowing smoothly, while the combination of velvet yarn creates an irresistibly soft and cuddly texture that everyone will love.

Mini Pumpkin Man Amigurumi Pattern crochet pattern - detailed view of completed project

Working in continuous rounds means you'll develop a steady rhythm as you create each component. The pattern's clever construction method teaches you valuable shaping skills that you can apply to future amigurumi projects while keeping frustration at bay.

Why You'll Love This Mini Pumpkin Man Amigurumi Pattern

I absolutely love how this pattern transforms simple crochet rounds into something truly special through creative finishing techniques. What draws me to this design is the innovative denting method that turns a basic oval shape into an authentic-looking pumpkin with dimension and character. I appreciate that it's quick enough to complete in one cozy afternoon, yet impressive enough that everyone asks how you made it. The combination of velvet yarn creates such a wonderfully soft, huggable texture that makes you want to keep squeezing your finished pumpkin man. I also love the flexibility this pattern offers - you can customize the face, add accessories like a bow, or experiment with different color combinations while keeping the same adorable structure. It's the perfect introduction to character-building techniques without overwhelming beginners with complicated shaping.

Mini Pumpkin Man Amigurumi Pattern step 1 - construction progress Mini Pumpkin Man Amigurumi Pattern step 2 - assembly progress Mini Pumpkin Man Amigurumi Pattern step 3 - details and accessories Mini Pumpkin Man Amigurumi Pattern step 4 - final assembly and finishing

Switch Things Up

I love experimenting with this versatile pumpkin man pattern to create unique variations for different occasions and personal styles. One of my favorite modifications is changing the color scheme - try using white or cream yarn with a sparkly silver stem for an elegant ghost-pumpkin hybrid, or go bold with purple and green for a whimsical fantasy version.

You can easily adjust the facial expression to give your pumpkin different personalities. Instead of the sweet V-shaped smile, try creating a surprised O-shaped mouth, a wide grinning mouth with little teeth, or even a mischievous smirk. Add different eye styles by using button eyes instead of safety eyes, or embroider closed happy eyes for a sleeping pumpkin.

For seasonal versatility, I sometimes skip the pumpkin denting technique entirely to create a smooth round head, then add different decorative elements like embroidered flowers for spring, a tiny crochet hat for winter, or sunglasses for a summer vibe. The basic structure works beautifully as a base for any character you can imagine.

Consider adding accessories to personalize your pumpkin man further - a tiny crochet scarf, a miniature broom, a small witch hat, or even wings to create a pumpkin fairy. You could also make a whole pumpkin family by adjusting the number of rounds in the head to create different sizes, from tiny babies to large papa pumpkins.

The arms and legs can be modified too - make them longer for a gangly, whimsical look, or shorter for a rounder, chubbier appearance. You could even add little fingers by creating small chain stitches at the end of each arm before folding them closed.

Common Mistakes & How to Fix Them

βœ— Not creating tight enough tension when forming the pumpkin dents, resulting in shallow ridges that don't show clearly - pull firmly on the yarn while creating each dent to ensure deep, defined grooves that give your pumpkin authentic dimension. βœ— Placing the safety eyes too close together or on the wrong side of the oval head, making the face look cramped or misaligned - always check that eyes are positioned on the long side of the R1 oval with proper spacing for a balanced, appealing expression. βœ— Stuffing the head too firmly before creating the dents, which makes it impossible to thread yarn through and form proper pumpkin ridges - stuff lightly during construction and add more filling after denting is complete for best results. βœ— Forgetting to align the legs properly with the facial features when attaching the head to body, causing your pumpkin man to appear twisted or off-balance - always position the piece so eyes face forward before sewing components together securely.

Mini Pumpkin Man Amigurumi Pattern

Create an adorable miniature pumpkin character that captures the spirit of autumn with this charming amigurumi pattern. This delightful design features a lovable pumpkin-headed figure with distinctive ribbed texture created through special assembly techniques, complete with tiny black legs and arms, and a sweet little stem on top. Perfect for Halloween decorations, fall displays, or as a thoughtful handmade gift for someone special. The pattern uses soft velvet yarn in warm orange tones combined with classic black accents, resulting in a cuddly companion that's both seasonal and timeless. With its simple V-shaped smile and adorable blushed cheeks, this mini pumpkin man will bring joy and warmth to any space throughout the cozy autumn months.

Beginner Friendly 2-3 Hours

Materials Needed for Mini Pumpkin Man Amigurumi Pattern

β€” Main Fabric

  • 01
    Velvet yarn in orange (for head and creating dents)
  • 02
    Velvet yarn in black (for legs, arms, and body)
  • 03
    Velvet yarn in light green (for stem)
  • 04
    Velvet yarn in light pink (for cheeks)
  • 05
    Sport weight yarn in black (for mouth details)
  • 06
    Sport weight yarn in light brown (for decorative lines on pumpkin)

β€” Tools Required

  • 01
    4.5mm crochet hook (or hook matching your yarn weight)
  • 02
    8mm safety eyes
  • 03
    Fiber filling
  • 04
    Yarn needle
  • 05
    Scissors
  • 06
    Pins (for positioning before sewing)

Progress Tracker

0% Complete

β€” Head (in orange) :

R1 :

6ch, begin in 2nd chain from hook 4sc, inc in last chain, 4sc on the other side of the chain, inc (12)

R2 :

(sc, inc) x6 (18)

R3 :

(sc, inc, sc) x6 (24)

R4 :

sc around (24)

R5 :

(2sc, inc, sc) x6 (30)

R6 :

(2sc, inc, 2sc) x6 (36)

R7 :

sc around (36)

R8 :

(2sc, dec, 2sc) x6 (30)

R9 :

(2sc, dec, sc) x6 (24)

Infos :

Insert eyes between R7-R8, 5 stitches apart, while looking from the top, place them on the long side of the R1 oval. Begin stuffing

R10 :

(sc, dec, sc) x6 (18)

R11 :

(sc, dec) x6 (12)

Info :

Finish stuffing the head, sl st and fasten off, leave a long tail for sewing

β€” Legs - make 2 (in black) + Body :

R1 :

6sc in MR (6)

R2 :

sc around (6)

R3 :

(sc, inc) x3 (9)

Info :

After finishing the first leg, cut off the yarn. When making the second leg, do not fasten off and attach it to the first leg by doing 1 sc on any of the stitches of leg 1

R4 :

counting the previous sc, sc around both legs (18)

R5 :

(sc, inc, sc) x6 (24)

R6-R7 :

sc around (24 x2)

R8 :

(4sc, dec) x4 (20)

R9 :

(8sc, dec) x2 (18)

Info :

Stuff the legs and body

R10-R11 :

sc around (18 x2)

R12 :

(sc, dec) x6 (12)

Info :

Finish stuffing, sl st and fasten off

β€” Arms - make 2 (in black) :

R1 :

6sc in MR (6)

R2-R4 :

sc around (6 x3)

Info :

Do not stuff the arms

R5 :

fold the arms in half and 3sc through both sides of the stitches (3)

Info :

Sl st and fasten off. Leave a long tail for sewing

β€” Little stem (in light green) :

R1 :

6sc in MR (6)

R2-R3 :

sc around (6x2)

Info :

Sl st and fasten off. Leave a long tail for sewing

Assembly Instructions

  • Before sewing the head to the body, create the pumpkin dents by threading a long piece of orange velvet yarn through the head from top to bottom, alternating between sewing under and above the rows to form 5 distinct ridges.
  • Start creating the dents from the colored reference points, ensuring the front section (where the face is) is wider than the other sections - approximately 2 stitches from each eye to the sides.
  • After completing the pumpkin dents, thread brown sport weight yarn over each dent to create decorative lines that enhance the pumpkin texture and definition.
  • Position the completed head onto the body, making sure to align the eyes properly with the legs so your pumpkin man faces forward, then sew them together securely using the yarn tail from the head.
  • Attach the arms to both sides of the body right under the head, sewing them to the last row of the body section for proper positioning and stability.
  • Sew the little green stem directly on top of the head at R1, centering it for a balanced appearance.
  • Using black sport weight yarn, embroider a small V-shaped mouth on the face, and add two tiny lines for blush one row under and one stitch to the side of each eye. Optionally, add a decorative bow.

Important Notes

  • πŸ’‘The pattern is worked in continuous rounds, so use a stitch marker to keep track of the beginning of each round for accuracy.
  • πŸ’‘When creating the pumpkin dents, pull firmly on the yarn to form deep grooves, but be careful not to pull so hard that you distort the overall head shape.
  • πŸ’‘Stuff the head lightly before creating dents, then add more filling after the denting process is complete for the best pumpkin shape and definition.
  • πŸ’‘The oval created in R1 is crucial for proper head shaping - make sure your increases are placed correctly to create the elongated base shape.
  • πŸ’‘Velvet yarn can be more difficult to see individual stitches, so work in good lighting and take your time counting stitches in each round.
  • πŸ’‘Leave long tails when fastening off each piece as they will be used for sewing components together during assembly.
  • πŸ’‘Position all pieces with pins before final sewing to ensure proper alignment and balance of your finished pumpkin man.

This charming Mini Pumpkin Man pattern combines basic crochet skills with creative finishing techniques to create an irresistibly cute autumn companion. The innovative denting method transforms simple rounds into an authentic-looking pumpkin with personality and dimension. Perfect for beginners who want to learn character-building techniques while creating something truly special for fall decorating or gift-giving. The quick construction time means you can make an entire pumpkin patch in a weekend! πŸŽƒ Happy crocheting! 🧢✨

You ask,

we answer.

FAQs

What type of yarn works best for this pumpkin man pattern?

Velvet yarn (chenille) is recommended for the softest, most cuddly texture, but you can also use any medium weight yarn. The 4.5mm hook size should be adjusted if you use a different yarn weight to maintain proper tension and sizing.

How do I create the pumpkin dents without distorting the head shape?

The key is to stuff the head lightly before creating dents, then pull firmly but not excessively on the yarn as you thread it from top to bottom. Work slowly and check your progress - you can always pull tighter, but it's hard to loosen once complete. Add more stuffing after denting is finished.

Can I make this pumpkin man larger or smaller?

Yes! To make it larger, use a thicker yarn with a larger hook (like 5.5mm or 6mm). For a smaller version, use thinner yarn with a 3.5mm or 4mm hook. Just remember that changing yarn weight will also require different sized safety eyes to maintain proper proportions.

Where exactly should I place the safety eyes on the oval-shaped head?

Looking at the head from the top, you'll see the oval from R1. Place the eyes between R7-R8 on one of the long sides of that oval, with 5 stitches of space between them. This positioning ensures the face is centered on the widest part of the pumpkin for the best appearance.

Do I need to stuff the arms and legs of the pumpkin man?

No, the arms should not be stuffed - they're folded flat and sewn closed in R5. However, you should stuff the legs and body sections as indicated in the pattern before decreasing and finishing those components for proper shaping and structure.