About This Siamese Style Cat Amigurumi Pattern

This little companion makes a heartwarming gift for any cat enthusiast. It looks wonderful perched on a bookshelf or as a cozy desk buddy to keep you company while you work.
Ideal for those with basic crocheting experience, featuring slightly more advanced stitches and techniques to expand your skills.
Takes 5-7 hours, making it an enjoyable project to finish over a couple of days.
Delightful animal designs with sweet details that capture the essence of your favorite woodland and farmyard friends.
This little companion makes a heartwarming gift for any cat enthusiast. It looks wonderful perched on a bookshelf or as a cozy desk buddy to keep you company while you work.
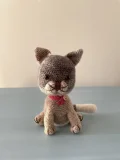
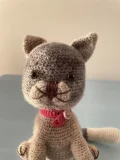
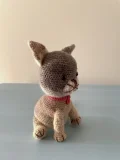
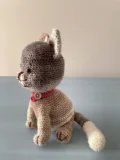
I honestly adore the way the head and body come together in this design. Using a variegated yarn for the main body means you don't have to worry about complex color changes to get that beautiful 'cat' look, and the tiny red collar is just the cutest finishing touch that brings the whole thing together.
I’ve always felt that cats have a way of choosing us, and this crochet project felt exactly the same way when I first picked up my hook. There’s a certain magic in using variegated or mixed-color yarns for amigurumi; it gives the fur a natural, mottled look that you just can't get with solid shades. As I worked on the head, I found myself getting excited to see how the 'markings' would turn out!
One thing I really want to mention is the leg join. It can feel a bit fiddly at first, especially when you’re trying to keep the alignment straight, but don't let that discourage you. I spent a good twenty minutes just pinning mine in place before I even touched my needle! It’s those little moments of patience that turn a good project into a great one. I decided to go with a bright red for the collar because every kitty needs a little pop of color, right? I hope you enjoy making this little soul as much as I did. It’s the perfect companion for a quiet afternoon of stitching and a hot cup of tea.
There is something truly special about a handmade feline friend, and this seated cat is one of my favorite designs to share. You will love how the mixed-color yarn gives the coat a realistic, mottled texture that makes every single kitty unique. It is a wonderful project for when you want to settle into your favorite chair and watch a character come to life stitch by stitch. Whether you are making this for yourself or as a thoughtful gift for a cat lover, the finished piece has a charming, soulful expression that is hard to resist.
Start with a mr and work 6 sc into it. (6)
Work 2 sc into every st around. (12)
Repeat [1 sc, 1 inc] 6 times. (18)
Repeat [2 sc, 1 inc] 6 times. (24)
Repeat [3 sc, 1 inc] 6 times. (30)
Repeat [4 sc, 1 inc] 6 times. (36)
Repeat [5 sc, 1 inc] 6 times. (42)
Repeat [6 sc, 1 inc] 6 times. (48)
Repeat [7 sc, 1 inc] 6 times. (54)
Work 1 sc into each st around for these 9 rounds. (54)
Work 19 sc, then repeat [6 sc, 1 inc] 4 times, followed by 19 sc. (66)
Work 1 sc into each st around for these 6 rounds. (66)
Repeat [9 sc, 1 dec] 6 times. (60)
Insert safety eyes between Rounds 17 and 18, leaving a space of 8 sc between them.
Repeat [8 sc, 1 dec] 6 times. (54)
Repeat [7 sc, 1 dec] 6 times. (48)
Repeat [6 sc, 1 dec] 6 times. (42)
Begin stuffing the head firmly and continue filling as you go.
Repeat [5 sc, 1 dec] 6 times. (36)
Repeat [4 sc, 1 dec] 6 times. (30)
Repeat [3 sc, 1 dec] 6 times. (24)
Work 1 sc into each st around for these 4 rounds. (24)
Work 2 sc into every st around. (48)
Repeat [6 sc, 1 inc] 6 times. (54)
Work 1 sc into each st around for these 2 rounds. (54)
Repeat [7 sc, 1 inc] 6 times. (60)
Repeat [8 sc, 1 inc] 6 times. (66)
Work 1 sc into each st around for these 4 rounds. (66)
Work 30 sc, then turn. Skip 12 st and join into the 43rd sc to create the neck opening.
Work 14 sc in each round. (14)
Work 20 sc in each round. (20)
Work 4 sc, then repeat [6 sc, 1 dec] 2 times. (14)
Work 2 sc, then repeat [6 sc, 1 dec] 1 time, followed by 2 sc. (8)
Work 8 dec and fasten off. Leave a gap for the body join as indicated in the assembly.
Start with 12 sc. (12)
Work 2 sc inc around. (14)
Work 1 sc in each st around for these 11 rounds. (14)
Work 4 sc, then repeat [6 sc, 1 inc] to increase. (20)
Work 1 sc in each st around for 3 rounds. (20)
Work 4 sc, then repeat [6 sc, 1 dec] around. (14)
Work 2 sc, then repeat [6 sc, 1 dec] around, ending with 2 sc. (8)
Work 8 dec and fasten off. Stuff the legs firmly.
Joining to body: Work 40 sc across the body section. (40)
Repeat [6 sc, 1 inc] 8 times. (48)
Repeat [7 sc, 1 inc] 6 times. (54)
Work 1 sc in each st around for 12 rounds. (54)
Repeat [6 sc, 1 dec] 6 times. (48)
Repeat [5 sc, 1 dec] 6 times. (42)
Repeat [4 sc, 1 dec] 6 times. (36)
Repeat [3 sc, 1 dec] 6 times. (30)
Repeat [2 sc, 1 dec] 6 times. (24)
Stuff the body section very tightly.
Repeat [2 sc, 1 dec] 6 times. (18)
Repeat [1 sc, 1 dec] 6 times. (12)
Work 6 dec and fasten off. (6)
Start with a mr and work 6 sc. (6)
Work 2 sc into every st around. (12)
Repeat [1 sc, 1 inc] 6 times. (18)
Work 1 sc in each st around for 6 rounds. (18)
Repeat [8 sc, 1 dec] 2 times. (16)
Work 1 sc in each st around for 2 rounds. (16)
Repeat [7 sc, 1 dec] 2 times. (14)
Stuff the tail as you continue working.
Work 1 sc in each st around for 20 rounds. (14)
Flatten the end and work 7 sc through both layers to close. Fasten off.
Start with a mr and work 6 sc. (6)
Work 6 increases around. (12)
Repeat [3 sc, 1 inc] 2 times. (8) Note: Follow PDF count despite math inconsistency.
Repeat [4 sc, 1 inc] 2 times. (10)
Repeat [5 sc, 1 inc] 2 times. (12)
Repeat [6 sc, 1 inc] 2 times. (14)
Repeat [7 sc, 1 inc] 2 times. (16)
Repeat [8 sc, 1 inc] 2 times. (18)
Repeat [9 sc, 1 inc] 2 times. (20)
Repeat [10 sc, 1 inc] 2 times. (22)
Repeat [11 sc, 1 inc] 2 times. (24)
Flatten and work 12 sc through both layers to close. Fasten off.
Start with a mr and work 6 sc. (6)
Work 6 increases around. (12)
Repeat [1 sc, 1 inc] 6 times. (18)
Work 1 sc in each st around for 3 rounds. (18)
Work 6 sc, then 4 sc dec, followed by 6 sc. (14)
Work 1 sc in each st around for 9 rounds. (14)
Flatten and work 7 sc through both layers to close. Fasten off.
Using red yarn, ch 40.
Work 40 sc along the chain. Fasten off.
Using dark brown, start with a mr and work 6 sc. (6)
Work 6 increases. (12)
Repeat [1 sc, 1 inc] 6 times. (18)
Work 1 sc in each st around for 3 rounds. Fasten off.
I hope you have a wonderful time bringing this little kitty to life! There is something so rewarding about seeing those tiny paws and ears finally come together. Once you are finished, your new feline friend will be ready to brighten up any corner of your home. Don't forget to give them a name—I think they look like a 'Misty' or a 'Jasper'! If you enjoyed this project, I would love to see your finished cat. Happy crocheting, and may your hook always move smoothly! 🧶 🐈 ✨
You certainly can, but it will change the size of your finished cat. If you use a thicker worsted weight yarn, your cat will be significantly larger and you will need to increase your hook size to around 3.5mm or 4mm.
The pattern is designed for 10mm safety eyes. If you use smaller eyes, the face might lose some of its 'kawaii' character, while much larger eyes might look a bit overwhelmed by the head size.
The key is the stuffing and the leg placement. Stuff the base of the body very firmly so it creates a flat bottom, and ensure the hind legs are sewn low enough to provide a tripod-like support.
Joining the legs (Round 48) is the trickiest part. Make sure you are counting the stitches across the 'bridge' between the legs correctly. If you are off by one or two, you can usually add an extra increase or decrease in the next round to fix it.
