🧢 Beautiful ✨ Detailed πŸ’ Adorable

Winnie the Pooh Phone Pouch Amigurumi Pattern

Winnie the Pooh Phone Pouch Amigurumi Pattern
4.6β˜… Rating
6-8 Hours Time Needed
2.8K Made This
βœ‚οΈ

Intermediate Level

Ideal for those with basic knitting experience, featuring slightly more advanced stitches and techniques to expand your skills.

⏱️

Weekend Treat

Takes 5-7 hours, making it an enjoyable project to finish over a couple of days.

🧸

Cute Companion

An adorable friend to cherish, handcrafted with love to bring comfort and joy for years to come.

About This Winnie the Pooh Phone Pouch Amigurumi Pattern

This delightful Winnie the Pooh phone pouch pattern combines functionality with whimsical charm. The design features a textured mesh-style bag worked in spirals, creating a flexible yet sturdy pouch for your phone. Pooh's cheerful face adorns the front, complete with his signature honey pot, making this both a practical accessory and a sweet tribute to everyone's favorite bear.

Winnie the Pooh Phone Pouch Amigurumi Pattern crochet pattern - detailed view of completed project

The pattern includes detailed instructions for creating the mesh-textured bag body, Pooh's dimensional head with safety eyes, and his beloved honey pot. A comfortable shoulder strap ensures easy carrying throughout your day.

Why You'll Love This Winnie the Pooh Phone Pouch Amigurumi Pattern

I absolutely love this pattern because it brings together childhood nostalgia and everyday practicality in the most charming way. The mesh stitch technique creates a beautiful texture that's both sturdy and flexible, perfect for protecting your phone while adding personality to your daily carry. Working on Pooh's sweet expression and his little honey pot brings such joy to the crafting process. The combination of yellow and red yarn captures Pooh's classic look perfectly, and seeing it all come together is incredibly satisfying. Plus, it makes an amazing handmade gift that friends and family will treasure and actually use every single day.

Winnie the Pooh Phone Pouch Amigurumi Pattern step 1 - construction progress Winnie the Pooh Phone Pouch Amigurumi Pattern step 2 - assembly progress Winnie the Pooh Phone Pouch Amigurumi Pattern step 3 - details and accessories Winnie the Pooh Phone Pouch Amigurumi Pattern step 4 - final assembly and finishing

Switch Things Up

I love customizing this Winnie the Pooh phone pouch to make each one unique and special! One of my favorite variations is adding embroidered details like small bees buzzing around Pooh or tiny flowers on the pouch body using surface crochet or embroidery stitches. You could also experiment with different color combinations - imagine a pastel version in soft pink and cream for a more whimsical look, or go bold with brighter shades.

Another fun modification is adjusting the strap length or even creating a wrist strap instead of a shoulder strap for a different carrying style. I've tried adding a small inner pocket by crocheting a smaller flat piece and sewing it inside the pouch for cards or earbuds. You could also make the honey pot removable by adding a small snap or button attachment, which adds an interactive element.

For those who want extra decoration, consider adding Pooh's name embroidered on the back of the pouch or creating tiny crocheted friends like Piglet or Eeyore to attach as charms. The mesh pattern also looks beautiful when worked in variegated or ombre yarn, creating a subtle color shift throughout the bag. Don't be afraid to make this pattern your own - that's what makes handmade items so special!

Common Mistakes & How to Fix Them

βœ— Miscounting stitches in the mesh pattern rounds - use stitch markers at the beginning of each round to track your progress accurately βœ— Making the shoulder strap too loose or uneven - maintain consistent tension throughout all rows and measure periodically to ensure evenness βœ— Overstuffing Pooh's head causing distortion - stuff firmly but gently, checking the shape regularly to maintain the rounded appearance βœ— Placing facial features incorrectly - pin all pieces in place before sewing and step back to check proportions from a distance βœ— Forgetting to alternate mesh pattern rounds correctly - mark odd and even rounds clearly in your pattern to avoid confusion

Winnie the Pooh Phone Pouch Amigurumi Pattern

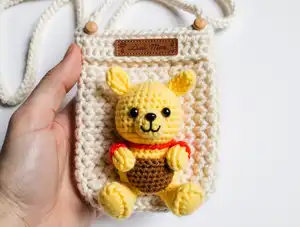
Create your own adorable Winnie the Pooh phone pouch with this charming crochet pattern! This functional and cute accessory combines practicality with nostalgia, featuring Pooh's sweet face, honey pot, and adjustable shoulder strap. Perfect for keeping your phone safe while showcasing your love for the Hundred Acre Wood's most beloved bear. The pouch measures 17cm in length and 10cm in width, making it ideal for most smartphones.

Intermediate 6-8 Hours

Materials Needed for Winnie the Pooh Phone Pouch Amigurumi Pattern

β€” Main Fabric

  • 01
    Sport weight yarn in yellow (for Pooh's body and head)
  • 02
    Sport weight yarn in red (for Pooh's shirt)
  • 03
    Sport weight yarn in brown (for honey jar)
  • 04
    YarnArt Jeans sport yarn recommended

β€” Tools Required

  • 01
    Crochet hook size 2.3mm
  • 02
    Two 6mm safety eyes
  • 03
    Two 15mm buttons
  • 04
    Polyester fiberfill
  • 05
    Stitch markers
  • 06
    Yarn needle for sewing
  • 07
    Scissors
  • 08
    Fabric glue

Progress Tracker

0% Complete

β€” BAG :

Info :

Work in spirals using x-stitch (yarn under single crochet). Make 24 ch, start in the second ch from hook

Rnd 1 :

22 sc, 3 sc in the last stitch, continue on the other side of the foundation chain, 21 sc, inc (48)

Rnd 2 :

inc, 21 sc, 3 inc, 21 sc, 2 inc (54)

Rnd 3 :

inc, 24 sc, 3 inc, 24 sc, 2 inc (60)

Rnd 4 :

60 sc (60)

Rnd 5 :

(1 ch, skip 1 stitch, 1 sc in the next stitch) x 30 (60)

Rnd 6 :

(1 sc in the space of 1 ch, 1 sc in the next stitch) x 30 (60)

Info :

Odd rounds (7, 9, 11, 13, 15…) will be made same as round 5, even rounds (8, 10, 12, 14, 16…) will be made same as round 6. Stop after finishing the 48th round

β€” Lid of Pouch :

Info :

Identify the 14 stitches in the middle of the 46th round

Rnd 1 :

14 sc, turn

Rnd 2-13 :

14 sc. Cut and weave the yarn. Sew the button into the lid of pouch

β€” Shoulder Strap :

Info :

Make 3 ch, start in the second ch from hook

Rnd 1 :

2 sc, turn

Rnd 2 :

2 sc, turn

Info :

Crochet repeat 2 sc until the shoulder-strap is about 113 cm. Fasten off and weave the yarn. Sew the shoulder-strap and button into the pouch

β€” POOH HEAD :

Info :

Start in yellow

Rnd 1 :

6 sc in the magic ring (6)

Rnd 2 :

6 inc (12)

Rnd 3 :

(1 sc, inc) x 6 (18)

Rnd 4 :

(inc, 2 sc) x 6 (24)

Rnd 5 :

(3 sc, inc) x 6 (30)

Rnd 6 :

1 sc, inc, (4 sc, inc) x 5, 3 sc (36)

Rnd 7-10 :

36 sc (36)

Rnd 11 :

7 sc, 7 inc, 7 sc, 7 inc, 8 sc (50)

Rnd 12-15 :

50 sc (50)

Rnd 16 :

7 sc, dec, 10 sc, dec, 7 sc, dec, 10 sc, dec, 8 sc (46)

Rnd 17 :

7 sc, dec, 8 sc, dec, 7 sc, (dec, 8 sc) x 2 (42)

Rnd 18 :

7 sc, (dec, 2 sc) x 2, dec, 7 sc, (dec, 2 sc) x 2, dec, 8 sc (36)

Rnd 19 :

(dec, 4 sc) x 6 (30)

Rnd 20 :

(3 sc, dec) x 6 (24)

Info :

Stuff the head

Rnd 21 :

12 dec (12)

Rnd 22 :

6 dec, slst (6)

Info :

Stuff the head. Fasten off and weave the yarn. Put in the eyes between rows 11-12, leaving 6 stitches space between them. Use fabric glue to pin the head into the pouch

β€” EAR (make 2) :

Info :

Start in yellow

Rnd 1 :

6 sc in the magic ring (6)

Rnd 2 :

6 inc (12)

Rnd 3-4 :

12 sc (12)

Rnd 5 :

(1 sc, dec) x 4, slst (8)

Info :

Fasten the yarn, leaving a long tail for sewing. Don't stuff the ear, flatten and fold the top of the ear. Put in the ears between rows 3-7

β€” MUZZLE :

Info :

Start in yellow

Rnd 1 :

6 sc in the magic ring (6)

Rnd 2 :

6 inc (12)

Rnd 3 :

12 sc, slst (12)

Info :

Fasten off and leaving a long tail for sewing. Sew the nose between rows 1-3 and sew the mouth between rows 2-3 of the muzzle with black. Put in the muzzle between rows 11-16. Sew the eyebrow between rows 5-7 with black

β€” LEG (make 2) :

Info :

Start in yellow

Rnd 1 :

6 sc in the magic ring (6)

Rnd 2 :

6 inc (12)

Rnd 3 :

(2 sc, inc) x 4 (16)

Rnd 4-5 :

16 sc (16)

Rnd 6 :

(2 sc, dec) x 4 (12)

Rnd 7 :

(2 sc, dec) x 3 (9)

Rnd 8-9 :

9 sc (9)

Info :

Slst and fasten the yarn, leaving a long tail for sewing. Stuff up to the 5th row of the leg. Sew the legs at row 4

β€” ARM (make 2) :

Info :

Start in yellow

Rnd 1 :

7 sc in the magic ring (7)

Rnd 2-4 :

7 sc (7)

Info :

Change to red

Rnd 5-7 :

7 sc (7)

Info :

Slst and fasten off the yarn, leaving a long tail for sewing. Don't stuff the arm

β€” HONEY POT :

Honey (Yellow) :

Rnd 1: 7 sc in the magic ring (7)

Honey (Yellow) :

Rnd 2: 7 inc (14). Slst, fasten off and weave the yarn

Jar (Brown) :

Rnd 1: 8 sc in the magic ring (8)

Jar (Brown) :

Rnd 2: 8 inc (16)

Jar (Brown) :

Rnd 3: (3 sc, inc) x 4 (20)

Jar (Brown) :

Rnd 4-6: 20 sc (20)

Jar (Brown) :

Rnd 5: (3 sc, dec) x 4 (16)

Jar (Brown) :

Rnd 6: (dec, 6 sc) x 2 (14). Stuff the jars

Jar (Brown) :

Rnd 7: working through both the front loop of the honey and the back loop of the jars: 14 inc (28). Slst, fasten off and weave the yarn

Assembly Instructions

  • Sew the legs to the front of the pouch at row 4 of the bag body
  • Use fabric glue to attach the honey pot to the desired position on the pouch
  • Sew the arms to the pouch, positioning them so they appear to be holding the honey pot
  • Use fabric glue to attach Pooh's completed head to the upper portion of the pouch
  • Attach the shoulder strap to both sides of the pouch, ensuring it's secure and even
  • Sew the button for the lid closure to the body of the pouch, aligning with the lid flap

Important Notes

  • πŸ’‘Use stitch markers to track your rounds, especially during the mesh pattern alternation between rounds 5 and 6
  • πŸ’‘The x-stitch technique (yarn under single crochet) creates a different texture than regular single crochet - watch tutorials if unfamiliar
  • πŸ’‘Don't overstuff Pooh's head - it should be firm but still have a soft, huggable appearance
  • πŸ’‘Pin all facial features and body parts in place before permanently attaching to ensure proper placement
  • πŸ’‘Fabric glue works best for attaching the head and honey pot, but you can also sew them if preferred
  • πŸ’‘The shoulder strap should be approximately 113cm long, but adjust based on your personal preference
  • πŸ’‘Make sure the button and lid flap align properly for easy opening and closing of the pouch

This adorable Winnie the Pooh phone pouch pattern brings the magic of the Hundred Acre Wood right into your everyday life! Combining practical phone protection with Pooh's timeless charm, this pattern features unique mesh stitching and dimensional details that make your creation truly special. The sweet honey pot detail and Pooh's cheerful expression will brighten your day every time you reach for your phone. It's a wonderful gift for Disney lovers and makes a delightful project for crafters looking to add personality to their accessories. 🧢🍯✨

You ask,

we answer.

FAQs

What size phone will fit in this pouch?

The pouch measures 17cm in length and 10cm in width, which fits most standard smartphones. The mesh pattern provides some stretch, so it can accommodate slightly larger devices as well.

What is x-stitch or yarn under single crochet?

X-stitch is a technique where you insert your hook under the yarn instead of through both loops of the stitch. This creates a different texture than traditional single crochet. Search for video tutorials on YouTube if you're unfamiliar with this technique.

Can I use a different yarn weight?

Yes, but your finished pouch size will differ. If you use heavier yarn, the pouch will be larger; lighter yarn will make it smaller. Adjust your hook size accordingly and measure as you go to ensure your phone will fit.

Do I have to use fabric glue, or can I sew everything?

You can sew all pieces if you prefer! Fabric glue is recommended for convenience and a cleaner finish, but sewing works just as well and may be more secure for pieces that will experience movement.

How do I keep track of the alternating mesh pattern rounds?

Use different colored stitch markers for odd and even rounds, or keep a written tally as you work. The pattern alternates between round 5 style (chain and skip) and round 6 style (sc in chain space) for rounds 7-48.