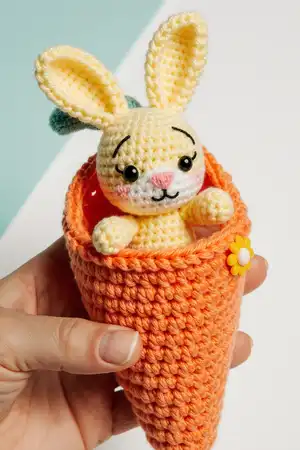
Create the most adorable bunny tucked inside a cozy carrot with this charming amigurumi pattern. This delightful project features a sweet yellow bunny with floppy ears and an orange plush carrot pouch complete with green leafy tops and a functional button closure. Perfect for Easter gifts, springtime decor, or as a cuddly companion for children, this pattern combines cotton yarn for the bunny with soft plush yarn for the carrot. The finished toy stands approximately 6 inches tall with ears and is wonderfully huggable, making it an irresistible handmade treasure that will bring smiles to faces of all ages.
Progress Tracker
0% Complete
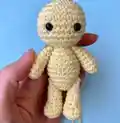
— Head :
Info :
With yellow yarn and hook B/2 (2.5 mm) make a magic ring
Round 1 :
6 sc in magic ring = 6 sts
Round 2 (INC) :
(2 sc in next st)*6 times = 12 sts
Round 3 (INC) :
(sc in next 1 st, 2 sc in next st)*6 times = 18 sts
Round 4 (INC) :
(sc in next 2 sts, 2 sc in next st)*6 times = 24 sts
Round 5 (INC) :
(sc in next 3 sts, 2 sc in next st)*6 times = 30 sts
Rounds 6-10 :
sc in each st around = 30 sts
Round 11 (DEC) :
(sc in next 3 sts, sc dec)*6 times = 24 sts
Info :
If you use safety eyes insert them between rounds 8 and 9 with 5 sts in between. Also stuff the head before making dec.
Round 12 (DEC) :
(sc in next 2 sts, sc dec)*6 times = 18 sts
Round 13 (DEC) :
(sc in next st, sc dec)*6 times = 12 sts
Info :
Fasten off. Leave the long tail for sewing (about 15cm). Stuff the head.
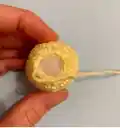
— Muzzle :
Info :
With white yarn and hook B/2 (2.5 mm) make a magic ring
Round 1 :
6 sc in magic ring = 6 sts
Round 2 (INC) :
sc 2 in each st around = 12 sts
Round 3 (INC) :
(sc in next st, 2 sc in next st)*6 times = 18 sts
Round 4 :
sc in each st around = 18 sts
Info :
Join with sl st and fasten off. Leave the long tail of the yarn for sewing.
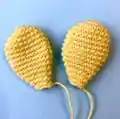
— Ear (Make 2) :
Info :
With yellow yarn and hook B/2 (2.5 mm) make a magic ring
Round 1 :
6 sc in magic ring = 6 sts
Round 2 (INC) :
2 sc in each st around = 12 sts
Round 3 (INC) :
(2 sc in next 2 sts, sc in next 4 sts)*2 times = 16 sts
Round 4 (INC) :
sc in next st, 2 sc in next 2 sts, sc in next 6 sts, 2 sc in next 2sts, sc in next 5 sts = 20 sts
Rounds 5-9 :
sc in each sts around = 20 sts
Round 10 (DEC) :
(sc dec, sc in next 8 sts)*2 times = 18 sts
Round 11 (DEC) :
(sc dec, sc in next 7 sts)*2 times = 16 sts
Round 12 (DEC) :
(sc dec, sc in next 6 sts)*2 times = 14 sts
Round 13 (DEC) :
(sc dec, sc in next 5 sts)*2 times = 12 sts
Round 14 (DEC) :
(sc dec, sc in next 4 sts)*2 times = 10 sts
Round 15 (DEC) :
(sc dec, sc in next 3 sts)*2 times = 8 sts
Info :
Join with sl st and fasten off. Leave the long tail of the yarn for sewing. Rep rnds 1-15 for the second ear.
— Body :
Info :
With yellow yarn and hook B/2 (2.5 mm) make a magic ring
Round 1 :
6 sc in magic ring = 6 sts
Round 2 (INC) :
2 sc in each st around = 12 sts
Round 3 (INC) :
(sc in next st, 2 sc in next st)*6 times = 18 sts
Round 4 :
sc in each st around = 18 sts
Round 5 (INC) :
(sc in next 2 sts, 2 sc in next st)*6 times = 24 sts
Rounds 6-8 :
sc in each st around = 24 sts
Round 9 (DEC) :
(sc in next 2 sts, sc dec)*6 times = 18 sts
Info :
Stuff the body firmly.
Round 10 :
sc in each st around = 18 sts
Round 11 (DEC) :
(sc in next st, sc dec)*6 times = 12 sts
Info :
Join with sl st and fasten off.
— Arm (Make 2) :
Info :
With yellow yarn and hook B/2 (2.5 mm) make a magic ring
Round 1 :
6 sc in magic ring = 6 sts
Round 2 (INC) :
(2 sc in next st, sc in next 2 st)*2 times = 8 sts
Round 3 :
sc in each st around = 8 sts
Round 4 (DEC) :
(sc dec in next st, sc in next 2 st)*2 times = 6 sts
Rounds 5-8 :
sc in each st around = 6 sts
Info :
Stuff the arm, do not stuff it too tight. Fold arm in half and sc two sides together with sc 3. Fasten off, cut yarn and weave in ends. One arm is done. Complete these steps with the second arm. Leave long tail of the yarn for sewing.
— Leg (Make 2) :
Info :
With yellow yarn and hook B/2 (2.5 mm) make a magic ring
Round 1 :
6 sc in magic ring = 6 sts
Round 2 (INC) :
2 sc in each st around = 12 sts
Round 3 (INC) :
(2 sc in next st, sc in next 3 st)*3 times = 15 sts
Round 4 (DEC) :
sc in next 2 st, (sc dec)*4 times, sc in next 5 st = 11 sts
Round 5 (DEC) :
sc in next 2 st, (sc dec)*2 times, sc in next 5 sts = 9 sts
Rounds 6-8 :
sc in each st around = 9 sts
Info :
Stuff the leg. Do not stuff it very firmly.
Round 9 (DEC) :
(sc in next st, sc dec)*3 times = 6 sts
Info :
Fold the leg in half and sc two sides together with sc 3. Fasten off, cut yarn and weave in ends. One leg is done. Complete these steps with the second leg. Leave long tail of the yarn for sewing.
— Belly :
Info :
With white yarn and hook B/2 (2.5 mm) make a ch6
Row 1 :
sc in the second st from the hook, sc in the next 3 stitches, 3sc in the last stitch. Working on other side of your chain: sc in the next 3 stitches, 2sc in the last st = 12 sts
Row 2 :
2sc in the first stitch, sc in the next 3 stitches, 2 sc in the next 3 stitches, sc in the next 3 stitches, 2sc in the next 2 stitches = 18 sts
Info :
Join with sl st, leave the long tail of the yarn for sewing.
— Tail :
Info :
With white yarn and hook B/2 (2.5 mm) make a magic ring
Round 1 :
6 sc in magic ring = 6 sts
Round 2 (INC) :
(sc in next st, 2 sc in next st)*3 times = 9 sts
Info :
Join with sl st and fasten off. Leave the long tail of the yarn for sewing.
— Carrot :
Info :
With orange plush yarn and hook G/6 (4 mm) make a magic ring
Round 1 :
6 sc in magic ring = 6 sts
Round 2 :
sc in each st around = 6 sts
Round 3 (INC) :
2 sc in each st around = 12 sts
Round 4 :
sc in each st around = 12 sts
Round 5 (INC) :
(sc in next st, 2 sc in next st)*6 times = 18 sts
Round 6 :
sc in each st around = 18 sts
Round 7 (INC) :
(sc in next 2 sts, 2 sc in next st)*6 times = 24 sts
Rounds 8-15 :
sc in each st around = 24 sts
Info :
Check that the width and height of the carrot are enough to fit the bunny!!!
Round 16 :
sc in next 6 sts, Ch 24 = 30 sts
Round 17 :
sc in next 6 sts, sc in next ch 9, skip ch 6 (buttonhole), sc in next ch 9 = 24 sts
Info :
VIDEO for ROUNDS 16-17 on https://www.youtube.com/watch?v=wiTx8-QGNjI
Rounds 18-21 :
sc in each st around = 24 sts
Round 22 (DEC) :
(sc in next 2 sts, sc dec)*6 times = 18 sts
Round 23 (DEC) :
(sc in next st, sc dec)*6 times = 12 sts
Round 24 (DEC) :
sc dec*6 times = 6 sts
Info :
Fasten off, cut yarn and weave in ends.
— Carrot Leaves :
Instructions :
With green plush yarn and hook G/6 (4 mm) make the leaves. Make sl st in the round 24 of the carrot, (ch 10, sl st in the same st)*repeat 3 times. Fasten off, cut yarn and weave in ends.
Info :
Sew the button in the middle between rounds 13 and 14.
This enchanting bunny in carrot amigurumi pattern was designed to capture the magic of springtime and create an interactive toy that children will treasure for years. The clever design allows the bunny to snuggle inside its cozy carrot home, secured with a sweet button closure that makes it perfect for imaginative play. Combining soft cotton for the bunny with plush yarn for the carrot creates wonderful textural interest and huggable appeal. Whether you're making it for Easter, as a baby gift, or just because someone special deserves an extra dose of cuteness, this pattern will bring joy to both the maker and the recipient. 🐰🥕 Happy crocheting! 🧶✨