🧢 Beautiful ✨ Detailed πŸ’ Adorable

Toadstool Keychain Amigurumi Pattern

Toadstool Keychain Amigurumi Pattern
4.8β˜… Rating
1.5-2 Hours Time Needed
3.6K Made This
βœ‚οΈ

Beginner Friendly Level

Perfect for those just starting their sewing journey, with clear instructions and simple techniques

⏱️

Bite-Sized Project

Complete in under 2 hoursβ€”quick, fun, and perfect for a little creative escape.

🎁

Tiny Treasure

Small, sweet, and gift-worthy creations that fit perfectly in the palm of your hand with detailed charm.

About This Toadstool Keychain Amigurumi Pattern

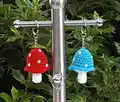
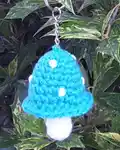
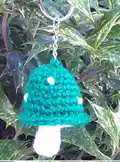
This Toadstool Keychain pattern is a quick and delightful project that brings a touch of woodland magic to your everyday accessories. The design features a classic red mushroom cap adorned with cute white spots, paired with a creamy white stalk that creates that iconic toadstool look we all love. Working in continuous rounds with simple increases and decreases, you'll shape both the base and cap separately before joining them together for a seamless finish. The pattern includes helpful notes about stuffing techniques to ensure your toadstool maintains its perfect shape without the filling showing through the stitches.

Toadstool Keychain Amigurumi Pattern crochet pattern - detailed view of completed project

Perfect for using up yarn scraps, this mini project requires just small amounts of white and your chosen main color yarn. The finished keychain makes a wonderful handmade gift, party favor, or personal accessory that adds a playful touch wherever you attach it.

Why You'll Love This Toadstool Keychain Amigurumi Pattern

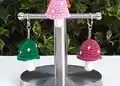
I absolutely love this toadstool keychain pattern because it's one of those satisfying quick makes that you can finish in one sitting while still creating something truly special. The way the cap and stalk come together feels almost magical, and there's something so rewarding about seeing that classic mushroom shape emerge from your hook. I appreciate how forgiving this pattern is for beginners while still producing a polished result that looks professionally made. The spots add just the right amount of whimsy, and customizing the cap color lets you create everything from traditional red toadstools to fantasy-inspired variations in purple, blue, or any shade you love. Plus, every time I see one dangling from my keys, it brings an instant smile to my face and reminds me of fairytale forests and childhood storybooks.

Toadstool Keychain Amigurumi Pattern step 1 - construction progress Toadstool Keychain Amigurumi Pattern step 2 - assembly progress Toadstool Keychain Amigurumi Pattern step 3 - details and accessories Toadstool Keychain Amigurumi Pattern step 4 - final assembly and finishing

Switch Things Up

I love experimenting with this toadstool pattern because it's so versatile and open to creative interpretation! One of my favorite variations is making a whole family of toadstools in graduated sizes by simply adjusting the hook size - use a 2.5mm hook for tiny charms, or go up to 4mm for a chunkier keychain that really makes a statement.

Color-wise, the possibilities are absolutely endless and that's what makes this pattern so exciting to revisit. I've made deep purple caps with silver metallic spots for a mystical fairy vibe, soft pastel pink with white dots for a kawaii aesthetic, and even tried variegated yarn for the cap which created the most beautiful ombre mushroom effect. For a more natural look, I sometimes use browns and tans with cream spots to mimic real forest mushrooms.

Another fun twist I enjoy is changing up the spot pattern entirely - instead of random placement, try arranging them in a circle around the cap, making them in different sizes, or even using French knots instead of backstitches for a more dimensional texture. You could also embroider tiny details like a little door or window on the stalk to transform it into a fairy house mushroom!

I've even experimented with adding small crocheted leaves around the base of the stalk using green yarn, or attaching a tiny crocheted worm or ladybug to the cap for extra woodland charm. These little additions take just minutes but really personalize each piece and make them feel extra special as gifts.

Common Mistakes & How to Fix Them

βœ— Overstuffing the toadstool causing the filling to show through the stitches and distorting the mushroom shape completely βœ— Forgetting to work in continuous rounds and accidentally working in joined rounds which creates visible seam lines βœ— Not using stitch markers to track rounds resulting in uneven shaping and miscounted stitches throughout the project βœ— Pulling the finishing thread too tight when weaving through the cap which warps the toadstool shape permanently βœ— Attaching the keychain insecurely with loose stitches causing it to fall off with regular use and handling βœ— Making spots too large or placing them unevenly which throws off the balanced appearance of the mushroom cap

Toadstool Keychain Amigurumi Pattern

Create your own adorable miniature toadstool keychain with this delightful crochet pattern! This charming mushroom design features a classic white-spotted red cap sitting atop a sweet white stalk, making it the perfect accessory for your keys, bags, or backpack. The pattern uses simple stitches and techniques to create a whimsical woodland-inspired piece that's both functional and decorative. With clear step-by-step instructions and minimal materials needed, you'll have your very own handmade toadstool companion ready to brighten up your everyday carry items in just a couple of hours.

Beginner Friendly 1.5-2 Hours

Materials Needed for Toadstool Keychain Amigurumi Pattern

β€” Main Fabric

  • 01
    Hayfield Bonus White yarn - 2g
  • 02
    Hayfield Bonus Main color yarn (red or color of choice) - 3g

β€” Tools Required

  • 01
    3mm crochet hook
  • 02
    Wool needle for sewing
  • 03
    Hi-Loft Quality Toy Stuffing
  • 04
    Keychain attachment
  • 05
    Stitch markers

Progress Tracker

0% Complete

β€” Base (White) :

Row 1 :

ch2, hdc 8sts into 2nd st from hook (alternatively hdc 8sts into magic ring) (8) sl st to join

Row 2 :

BLO Row: sc to end (8)

Row 3 :

sc (8)

Row 4 :

(sc into next 2sts, dec) x2 (6)

Row 5 :

sc (6)

Row 6 :

FLO Row: inc x6 (12)

Row 7 :

inc x12 (24)

Info :

F/O leaving a short end. Stuff the stalk section and put to one side.

β€” Cap (Main Color) :

Row 1 :

ch 2, sc 6sts into 2nd st from hook (alternatively sc 6sts into magic ring) (6)

Row 2 :

inc x6 (12)

Row 3 :

(sc into next 3sts, inc) x3 (15)

Row 4 :

sc (15)

Row 5 :

(sc into next 4sts, inc) x3 (18)

Row 6 :

sc (18)

Row 7 :

(sc into next 5sts, inc) x3 (21)

Row 8 :

(sc into next 6sts, inc) x3 (24)

Row 9 :

pick up base and place behind the cap wrong sides together, sl st to join, ch1, working through both layers hdc the 2 pieces together until 5sts remain, stuff the cap just enough to hold it's shape, hdc to end (24) sl st to join

Info :

F/O leaving a 20cm end

Assembly Instructions

  • Weave the finishing end through the colored section of the cap, bringing it out in the starting circle at the top center.
  • Secure the end with a couple of small stitches, being very careful not to pull too tight and distort the toadstool shape.
  • Using small backstitch technique, attach the keychain securely to the top of the mushroom cap where the finishing thread emerges.
  • With white yarn and groups of 3 small backstitches worked 1 row deep, sew random spots onto the toadstool cap for decoration.
  • Weave all remaining yarn ends through the inside of the cap and trim them flush with the surface for a clean finish.

Important Notes

  • πŸ’‘Work in continuous rounds unless stated otherwise, using a stitch marker to track the last stitch of each round
  • πŸ’‘Do not overstuff the parts - they should be filled just enough to hold shape and be easily squeezed when pinched firmly
  • πŸ’‘The stuffing should never show through your stitches, so add filling gradually and test as you go
  • πŸ’‘Keep your tension consistent throughout to ensure the toadstool has a smooth, even appearance without gaps
  • πŸ’‘When joining the cap to the base in Row 9, work slowly to ensure you're catching both layers evenly
  • πŸ’‘Use contrasting color stitch markers to help distinguish between rounds when working with solid colored yarn

This charming Toadstool Keychain pattern is designed to bring a touch of whimsical woodland magic into your everyday life! With its classic red cap dotted with white spots and sweet white stalk, this miniature mushroom is perfect for beginners looking for a quick and satisfying project. The pattern uses simple techniques and minimal materials, making it ideal for testing out new yarns or using up those precious scraps from your stash. Whether you're making one for yourself or creating handmade gifts for friends, this little toadstool is sure to spread joy wherever it goes. πŸ„ Happy crocheting! 🧢✨

You ask,

we answer.

FAQs

Can I use different yarn weights for this pattern?

Yes, you can use different yarn weights, but remember to adjust your hook size accordingly. Lighter weight yarns will create a smaller keychain, while bulkier yarns will make a larger version. Just make sure your hook and yarn pairing creates a tight enough fabric that stuffing won't show through.

How do I prevent my spots from looking lumpy or uneven?

The key is to use small, consistent backstitches in groups of three, worked only one row deep into the cap surface. Don't pull too tight, and try to space them evenly across the cap before you start sewing. Planning the placement with pins first can really help achieve a balanced look.

What if I don't have a keychain attachment?

You can easily turn this into a regular amigurumi decoration or ornament by skipping the keychain attachment. Alternatively, you could attach a ribbon loop, a bag clip, or even a safety pin to the back depending on how you want to use your finished toadstool.

Can I make the toadstool in colors other than red and white?

Absolutely! This pattern works beautifully in any color combination you love. Try purple and white for a fantasy look, brown and cream for a more natural mushroom, or even rainbow colors for a magical fairy garden aesthetic. The pattern structure remains the same regardless of your color choices.

How do I keep track of rounds without visible joins?

Use a stitch marker or a small piece of contrasting yarn to mark the last stitch of each round. Move the marker up as you complete each round. This helps you keep track of your progress and ensures your stitch counts remain accurate throughout the pattern.