🧢 Beautiful ✨ Detailed πŸ’ Adorable

Turtle Bowl Amigurumi Pattern

Turtle Bowl Amigurumi Pattern
4.7β˜… Rating
6-8 Hours Time Needed
3.5K Made This
βœ‚οΈ

Intermediate Level

Ideal for those with basic knitting experience, featuring slightly more advanced stitches and techniques to expand your skills.

⏱️

Weekend Treat

Takes 5-7 hours, making it an enjoyable project to finish over a couple of days.

🏑

Cozy Accent

A warm touch for your space that transforms ordinary corners into inviting nooks filled with handmade charm.

About This Turtle Bowl Amigurumi Pattern

Turtle Bowl Amigurumi Pattern crochet pattern - detailed view of completed project

Standing approximately 16 cm tall, this turtle bowl works up relatively quickly using 5-ply milk cotton yarn and continuous round construction. The pattern guides you through creating the sturdy bowl base first, then adding all the delightful turtle details that make this project truly special.

Why You'll Love This Turtle Bowl Amigurumi Pattern

I absolutely love how this pattern transforms a practical storage bowl into an enchanting decorative piece that brings smiles to everyone who sees it. The dual-layer construction technique creates a surprisingly sturdy bowl that's perfect for so many uses around your home, and I find the process of joining those two layers together incredibly satisfying. What really captured my heart is how the tiny accessoriesβ€”that sweet little hat and adorable bowβ€”give this turtle so much personality and charm. I also appreciate that this project teaches you valuable techniques like working in front loops only and joining layers, skills that you'll use in countless future crochet projects.

Turtle Bowl Amigurumi Pattern step 1 - construction progress Turtle Bowl Amigurumi Pattern step 2 - assembly progress Turtle Bowl Amigurumi Pattern step 3 - details and accessories Turtle Bowl Amigurumi Pattern step 4 - final assembly and finishing

Switch Things Up

I love experimenting with color combinations on this turtle bowl pattern! Instead of navy and light blue, try creating a sea turtle version using gorgeous teal and turquoise shades, or go for a warm earthy look with brown and tan tones. You could even make a rainbow turtle by using different colors for each leg.

For a completely different vibe, consider swapping the hat and bow for other accessories - maybe a tiny flower crown for spring, a miniature scarf for winter, or even small sunglasses for a fun beachy feel. I've also tried adding embroidered details like spots or patterns on the shell bowl to give each turtle unique personality.

If you want to adjust the size, simply use a thicker yarn with a larger hook for a bigger storage bowl, or go smaller with fingering weight yarn for a tiny trinket dish. I find that changing the bowl depth is easy too - just add or subtract rounds in the body section to customize it perfectly for your needs.

Common Mistakes & How to Fix Them

βœ— Not turning the inner layer inside out before attaching the outer layer, which results in visible wrong-side stitches showing through the finished bowl βœ— Overstuffing the bowl body makes it lose its functional shape and prevents it from sitting flat or holding items properly βœ— Forgetting to attach safety eyes before completing the head decreases, making installation nearly impossible without damaging your work βœ— Miscounting stitches between the safety eyes results in an unbalanced face that looks uneven or cross-eyed on the finished turtle

Turtle Bowl Amigurumi Pattern

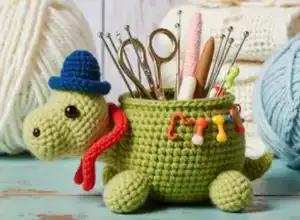
Create an adorable turtle bowl that's both charming and functional with this delightful crochet pattern. Perfect as a decorative storage piece or plant pot cover, this sweet turtle design features a spacious inner bowl structure and cute details like a tiny hat and bow. You'll craft this project using simple stitches worked in continuous rounds, building both an inner and outer layer for the sturdy bowl base, then adding an endearing turtle head and four little legs to bring your creation to life.

Intermediate 6-8 Hours

Materials Needed for Turtle Bowl Amigurumi Pattern

β€” Main Fabric

  • 01
    5-ply milk cotton yarn in navy blue (1 skein, 50g)
  • 02
    5-ply milk cotton yarn in light blue (1 skein, 50g)
  • 03
    Small amounts of dark brown yarn for hat
  • 04
    Small amounts of pink yarn for bow

β€” Tools Required

  • 01
    3mm crochet hook
  • 02
    10mm safety eyes
  • 03
    Tapestry needle for sewing
  • 04
    Polyester fiberfill stuffing
  • 05
    Stitch marker
  • 06
    Scissors
  • 07
    Black embroidery thread

Progress Tracker

0% Complete

β€” Body (Inner Layer) :

Round 1 :

Use navy blue, ch 2, starting from the second chain from hook, 6 sc (6)

Round 2 :

inc, rep 6x (12)

Round 3 :

sc, inc, rep 6x (18)

Round 4 :

sc, inc, [2 sc, inc = rep 5x], sc (24)

Round 5 :

3 sc, inc, rep 6x (30)

Round 6 :

2 sc, inc, [4 sc, inc = rep 5x], 2 sc (36)

Round 7 :

FLO, 5 sc, inc, rep 6x (42)

Round 8-16 :

sc around

Round 17 :

3 sc, inc, [6 sc, inc = rep 5x], 3 sc (48)

Round 18-19 :

sc around

Round 20 :

7 sc, inc, rep 6x (54)

Round 21-22 :

sc around

Info :

F/O. Turn the inner layer inside out

β€” Body (Outer Layer) :

Info :

Use the same color yarn. Start from the loop of R6

Round 1 :

3 sc, inc, rep 9x (45)

Round 2 :

2 sc, inc, rep 15x (60)

Round 3-4 :

sc around

Round 5 :

9 sc, inc, rep 6x (66)

Round 6-11 :

sc around

Round 12 :

9 sc, dec, rep 6x (60)

Round 13-14 :

sc around

Round 15 :

8 sc, dec, rep 6x (54)

Round 16-18 :

sc around

Info :

Stuff, but don't too much

Round 19 :

Join both layers by crocheting them together, sl st around. F/O

β€” Head :

Round 1 :

Use light blue, ch 2, starting from the second chain from hook, 6 sc (6)

Round 2 :

inc, rep 6x (12)

Round 3 :

sc, inc, rep 6x (18)

Round 4 :

sc, inc, [2 sc, inc = rep 5x], sc (24)

Round 5 :

3 sc, inc, rep 6x (30)

Round 6 :

sc around

Round 7 :

2 sc, inc, [4 sc, inc = rep 5x], 2 sc (36)

Round 8 :

5 sc, inc, rep 6x (42)

Round 9 :

19 sc, (inc=4x), 19 sc (46)

Round 10 :

22 sc, (inc=2x), 22 sc (48)

Round 11 :

sc around

Round 12 :

22 sc, (dec=2x), 22 sc (46)

Round 13 :

19 sc, (dec=4x), 19 sc (42)

Info :

Attach safety eyes between R9-10, and give 12 stitches (count from R10) between them

Round 14 :

5 sc, dec, rep 6x (36)

Round 15 :

2 sc, dec, [4 sc, dec = rep 5x], 2 sc (30)

Round 16 :

3 sc, dec, rep 6x (24)

Round 17 :

sc around

Info :

Stuff

Round 18 :

2 sc, dec, rep 6x (18)

Round 19-22 :

sc around

Round 23 :

4 sc, dec, rep 3x (15)

Round 24 :

sc around

Round 25 :

3 sc, dec, rep 3x (12)

Round 26 :

sc around

Info :

Stuff

Round 27 :

Flatten the round; crochet both sides together by using sl st to close the hole, 4 sl st. F/O leaving a long tail for sewing

β€” Legs (Make 4) :

Round 1 :

Use light blue, ch 2, starting from the second chain from hook, 6 sc (6)

Round 2 :

inc, rep 6x (12)

Round 3 :

sc, inc, rep 6x (18)

Round 4 :

sc around

Round 5 :

4 sc, dec, rep 3x (15)

Round 6 :

sc around

Round 7 :

3 sc, dec, rep 3x (12)

Info :

Stuff. F/O leaving a long tail for sewing

β€” Accessories - Hat :

Round 1 :

Use dark brown, ch 2, starting from the second chain from hook, 5 sc (5)

Round 2 :

inc, rep 5x (10)

Round 3 :

sc, inc, rep 5x (15)

Round 4 :

BLO, sc around

Round 5-6 :

sc around

Round 7 :

15 fpsc (15)

Round 8 :

2 sc, inc, rep 5x (20)

Round 9 :

3 sc, inc, rep 5x (25)

Info :

Stuff and F/O

β€” Accessories - Bow :

Row 1 :

Use pink, ch 11, starting from the second chain from hook, sc in each sts (10), ch 1, turn

Row 2 :

dec, 6 sc, dec (8), ch 1, turn

Row 3 :

dec, 4 sc, dec (6), ch 1, turn

Row 4 :

dec, 2 sc, dec (4), ch 1, turn

Row 5 :

dec, dec (2), ch 1, turn

Row 6 :

sc in each st (2), ch 1, turn

Row 7 :

inc, inc (4), ch 1, turn

Row 8 :

inc, 2 sc, inc (6), ch 1, turn

Row 9 :

inc, 4 sc, inc (8), ch 1, turn

Row 10 :

inc, 6 sc, inc (10)

Info :

F/O. Wrap the yarn around the center of the piece

Assembly Instructions

  • Sew the head securely to the top center of the bowl body, positioning it so the turtle's face looks outward
  • Attach the four legs evenly spaced around the bottom edge of the bowl, ensuring they're positioned to support the bowl structure
  • Place the hat on top of the turtle's head and sew it in place, centering it between the safety eyes
  • Position the bow on the front of the neck area where the head meets the body and sew securely
  • Embroider the mouth using black embroidery thread between the eyes, creating a sweet smile expression

Important Notes

  • πŸ’‘Remember to turn the inner layer inside out before joining it to the outer layer for a clean finish
  • πŸ’‘Use a stitch marker consistently to track the beginning of each round, especially during the bowl construction
  • πŸ’‘Don't overstuff the bowl body - it should maintain its shape while remaining functional as a container
  • πŸ’‘Position safety eyes carefully before closing the head, ensuring they're symmetrically placed between rounds 9-10
  • πŸ’‘Leave long tails when finishing each piece to make assembly easier and more secure
  • πŸ’‘The bowl can be used as both a decorative item and a functional plant pot cover

This charming Turtle Bowl pattern brings together functionality and cuteness in one delightful project! The innovative double-layer bowl construction creates a sturdy base that's perfect for storage, while the adorable turtle details with his tiny hat and sweet bow add personality that'll make you smile every time you see him. Whether you use it to organize small items, hold plants, or simply display as home decor, this versatile creation showcases your crochet skills beautifully. 🐒 Happy crocheting! 🧢✨

You ask,

we answer.

FAQs

Can I use different yarn weights for this pattern?

While the pattern calls for 5-ply milk cotton, you can substitute with other yarn weights - just adjust your hook size accordingly. Using thicker yarn will create a larger bowl, while thinner yarn makes a smaller version. Keep in mind that changing yarn weight will affect the final measurements.

How do I join the two layers of the bowl together?

After completing both the inner and outer layers, make sure to turn the inner layer inside out first. Then align both layers and use slip stitches to crochet through both layers simultaneously in Round 19, joining them together securely.

What can I use this turtle bowl for?

This versatile bowl works wonderfully for many purposes! Use it to store small items like keys, jewelry, or office supplies. It also makes an adorable plant pot cover for small succulents or houseplants, or simply display it as charming home decor.

Do I need to stuff the entire bowl?

No, only stuff the bowl body lightly - not too much - to maintain its shape while keeping it functional. The head and legs should be stuffed more firmly. Overstuffing the bowl will make it lose its container shape and prevent it from holding items properly.

Can I make the accessories optional?

Absolutely! While the hat and bow add extra charm and personality to your turtle, they're completely optional. You can skip them for a simpler look, or get creative and design your own accessories to personalize your turtle bowl.