About This The Cannady Cardigan Knitting Pattern

This gorgeous cardigan makes the ultimate cozy gift for a loved one, or a luxurious treat for yourself to wear all season long.
Ideal for those with basic crocheting experience, featuring slightly more advanced stitches and techniques to expand your skills.
Takes 5-7 hours, making it an enjoyable project to finish over a couple of days.
Perfect for cozy, stylish layering through changing seasons with versatile, mix-and-match potential.
This gorgeous cardigan makes the ultimate cozy gift for a loved one, or a luxurious treat for yourself to wear all season long.
I absolutely adore how fast this cardigan works up on large needles! There is nothing more satisfying than seeing a stylish, wearable garment come together in just a weekend, and the slipped-stitch edges look so beautifully professional.

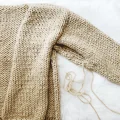
There is something incredibly magical about working with super bulky yarn and massive needles. Every single stitch feels like instant progress, and watching this gorgeous, squishy fabric grow in your lap is the ultimate cozy experience. When I first designed this cardigan, I wanted to create the ultimate 'throw-on-and-go' piece—something that feels like a giant, soft hug but still looks effortlessly stylish when you run out the door.
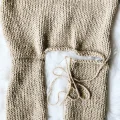
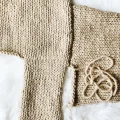
To make it truly your own, don't be afraid to play with colors! A soft, oatmeal cream gives it that classic, minimalist aesthetic, but a bold mustard or a deep forest green would make it a stunning statement piece. If you want to customize the fit, you can easily add a few rows to the body before starting the neckline shaping if you prefer a longer, duster-style look. Just remember to keep track of your row counts so both front panels match perfectly. Take your time with the mattress stitch seaming—it’s the secret to getting those professional, clean lines!
Wrap yourself in the ultimate handmade hug with this delightfully chunky cardigan! Crafted with ultra-cozy, super bulky yarn, this design is all about modern simplicity and maximum comfort. You will love watching the plush stockinette stitches fly off your needles, creating a gorgeous, drape-heavy silhouette that looks effortlessly chic. It is the perfect lazy-Sunday project that you can wear out to brunch the very next day.
Cast on 46 stitches.
Work in rib stitch by alternating k1 and p1 across the entire row.
Starting with a k row, work back and forth in stockinette stitch (k on right side rows, p on wrong side rows).
k17, cast off 12 stitches for the neck opening, then k to the end of the row.
p17, then turn your work, leaving the remaining stitches on the needle to be worked later.
Cast off all 17 active stitches.
Rejoin your yarn to the other side of the neck opening and p17 across.
Cast off the remaining 17 stitches.
Cast on 56 stitches.
Work in rib stitch by alternating k1 and p1 across the entire row.
Starting with a k row, work back and forth in stockinette stitch (k on right side rows, p on wrong side rows).
k22, cast off 12 stitches for the neck opening, then k to the end of the row.
p22, then turn your work, leaving the remaining stitches on the needle to be worked later.
Cast off all 22 active stitches.
Rejoin your yarn to the other side of the neck opening and p22 across.
Cast off the remaining 22 stitches.
Cast on 24 stitches.
Work in rib stitch by alternating k1 and p1 across the entire row.
sl1, then k to the end of the row.
p across the entire row.
Repeat the pattern established in Row 7 and Row 8.
sl1, k1, k2tog, then k to the end of the row (23).
p across the entire row (23).
sl1, then k to the end of the row (23).
p across the entire row (23).
sl1, k1, k2tog, then k to the end of the row (22).
p across the entire row (22).
sl1, then k to the end of the row (22).
p across the entire row (22).
sl1, k1, k2tog, then k to the end of the row (21).
p across the entire row (21).
sl1, then k to the end of the row (21).
p across the entire row (21).
sl1, k1, k2tog, then k to the end of the row (20).
p across the entire row (20).
sl1, then k to the end of the row (20).
p across the entire row (20).
sl1, k1, k2tog, then k to the end of the row (19).
p across the entire row (19).
sl1, then k to the end of the row (19).
p across the entire row (19).
sl1, k1, k2tog, then k to the end of the row (18).
p across the entire row (18).
sl1, then k to the end of the row (18).
p across the entire row (18).
sl1, k1, k2tog, then k to the end of the row (17).
p across the entire row (17).
sl1, then k to the end of the row (17).
p across the entire row (17).
Cast off all 17 stitches.
Cast on 28 stitches.
Work in rib stitch by alternating k1 and p1 across the entire row.
sl1, then k to the end of the row.
p across the entire row.
Repeat the pattern established in Row 7 and Row 8.
sl1, k1, k2tog, then k to the end of the row (27).
p across the entire row (27).
sl1, then k to the end of the row (27).
p across the entire row (27).
sl1, k1, k2tog, then k to the end of the row (26).
p across the entire row (26).
sl1, then k to the end of the row (26).
p across the entire row (26).
sl1, k1, k2tog, then k to the end of the row (25).
p across the entire row (25).
sl1, then k to the end of the row (25).
p across the entire row (25).
sl1, k1, k2tog, then k to the end of the row (24).
p across the entire row (24).
sl1, then k to the end of the row (24).
p across the entire row (24).
sl1, k1, k2tog, then k to the end of the row (23).
p across the entire row (23).
sl1, then k to the end of the row (23).
p across the entire row (23).
sl1, k1, k2tog, then k to the end of the row (22).
p across the entire row (22).
sl1, then k to the end of the row (22).
p across the entire row (22).
sl1, then k to the end of the row (22).
p across the entire row (22).
sl1, then k to the end of the row (22).
p across the entire row (22).
Cast off all 22 stitches.
Cast on 24 stitches.
Work in rib stitch by alternating k1 and p1 across the entire row.
k across the entire row.
sl1, then p to the end of the row.
Repeat the pattern established in Row 7 and Row 8.
k20, k2tog, k2 (23).
sl1, then p to the end of the row (23).
k across the entire row (23).
sl1, then p to the end of the row (23).
k19, k2tog, k2 (22).
sl1, then p to the end of the row (22).
k across the entire row (22).
sl1, then p to the end of the row (22).
k18, k2tog, k2 (21).
sl1, then p to the end of the row (21).
k across the entire row (21).
sl1, then p to the end of the row (21).
k17, k2tog, k2 (20).
sl1, then p to the end of the row (20).
k across the entire row (20).
sl1, then p to the end of the row (20).
k16, k2tog, k2 (19).
sl1, then p to the end of the row (19).
k across the entire row (19).
sl1, then p to the end of the row (19).
k15, k2tog, k2 (18).
sl1, then p to the end of the row (18).
k across the entire row (18).
sl1, then p to the end of the row (18).
k14, k2tog, k2 (17).
sl1, then p to the end of the row (17).
k across the entire row (17).
sl1, then p to the end of the row (17).
Cast off all 17 stitches.
Cast on 28 stitches.
Work in rib stitch by alternating k1 and p1 across the entire row.
k across the entire row.
sl1, then p to the end of the row.
Repeat the pattern established in Row 7 and Row 8.
k24, k2tog, k2 (27).
sl1, then p to the end of the row (27).
k across the entire row (27).
sl1, then p to the end of the row (27).
k23, k2tog, k2 (26).
sl1, then p to the end of the row (26).
k across the entire row (26).
sl1, then p to the end of the row (26).
k22, k2tog, k2 (25).
sl1, then p to the end of the row (25).
k across the entire row (25).
sl1, then p to the end of the row (25).
k21, k2tog, k2 (24).
sl1, then p to the end of the row (24).
k across the entire row (24).
sl1, then p to the end of the row (24).
k20, k2tog, k2 (23).
sl1, then p to the end of the row (23).
k across the entire row (23).
sl1, then p to the end of the row (23).
k19, k2tog, k2 (22).
sl1, then p to the end of the row (22).
k across the entire row (22).
sl1, then p to the end of the row (22).
k22 across the entire row (22).
sl1, then p to the end of the row (22).
k across the entire row (22).
sl1, then p to the end of the row (22).
Cast off all 22 stitches.
Follow these instructions twice to make two identical sleeves.
Cast on 34 stitches.
Starting with a k row, work in stockinette stitch (k on right side rows, p on wrong side rows).
k2tog, k30, k2tog (32).
Starting with a p row, work in stockinette stitch.
k2tog, k28, k2tog (30).
Starting with a p row, work in stockinette stitch.
k2tog, k26, k2tog (28).
Starting with a p row, work in stockinette stitch.
Repeat the sequence [k2tog, k1] 8 times, then work [k2tog, k2tog] to finish the row (18).
Work in rib stitch by alternating k1 and p1 across each row.
Cast off all 18 stitches.
I hope you absolutely love making and wearing your Cannady Cardigan! There is nothing quite like wrapping yourself up in a giant, hand-knit hug that you created with your own two hands. Don't forget to take plenty of cozy photos of your finished masterpiece and share them with the maker community. Happy knitting, and may your days be warm and filled with cozy stitches! 🧶✨
This cardigan relies on the dramatic chunkiness of weight 6 super bulky yarn. If you substitute a lighter weight yarn, your cardigan will turn out much smaller and won't have that signature oversized silhouette.
The mattress stitch is definitely the way to go! It creates an invisible, strong seam that handles the weight of the super bulky yarn beautifully without adding unnecessary bulk.
Because of the drop-shoulder design, the wider body of the L/XL size naturally drops lower down the arm, requiring a slightly shorter sleeve length to achieve the perfect fit!
Yes, definitely! Slipping that first stitch creates a lovely, neat chain edge along the open front of your cardigan, making it look clean and polished without needing an extra ribbed border.
