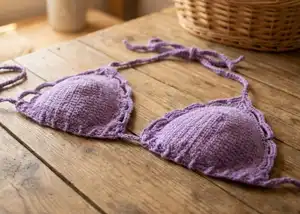
Create your own stunning handmade swimwear with this beautiful Oceana Bikini Top pattern! This design puts a modern twist on the classic string bikini, featuring adjustable cups for the perfect fit and gorgeous scalloped edging created with shell stitches. Available in three cup sizes (Small, Medium, and Large) with customizable back ties, this versatile pattern allows you to craft a beach-ready piece that's uniquely yours. The combination of functional design and decorative details makes this bikini top perfect for poolside relaxation or seaside adventures.
Progress Tracker
0% Complete
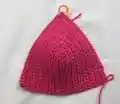
— Main Cup Section (Small Cup) :
Row 1 :
ch14, sc in 2nd ch from hook, sc along 11sts, In last st [2sc,ch1,2sc], Sc along 12 sts (12sc, 2sc, ch1, 2sc, 12sc)
Row 2 :
ch1, turn, sc along to 1st st of the [2sc,ch1,2sc] group of prev row, skp sc before ch1 sp, [2sc,ch1,2sc] in ch1 sp, Skp next sc, Sc along (13sc, 2sc, ch1, 2sc,13sc)
Row 3-14 :
Rep row 2 (25sc, 2sc, ch1, 2sc, 25sc)
Info :
Fasten off after row 13 and reattach yarn and knitting-in elastic for row 14 if you are using it for the edging (OPTIONAL)
— Main Cup Section (Medium Cup) :
Row 1 :
ch 15, hdc in 2nd ch from hook, hdc along 12 sts, In last st [2hdc,ch1,2hdc], hdc along 13sts (13sts,2hdc,ch1,2hdc,13sts)
Row 2 :
ch1,turn, hdc to 1st hdc of the [2hdc,ch1,2hdc] group, skp hdc before ch1 sp, [2hdc,ch1,2hdc] in ch sp, skp next hdc st, hdc along (14hdc,2hdc,ch2,2hdc,14hdc)
Row 3-12 :
Rep row 2 (24hdc, 2hdc, ch1, 2hdc, 24hdc)
Info :
Fasten off after row 11 and reattach yarn and knitting-in elastic for row 12 if you are using it for the edging (OPTIONAL)
— Main Cup Section (Large Cup) :
Row 1 :
ch16, hdc in 2nd ch from hook, hdc along 13sts, In last st [2hdc,ch1,2hdc], hdc along 14sts (14hdc, 2hdc, ch2, 2hdc,14hdc)
Row 2 :
ch1,turn, hdc to 1st hdc of the [2hdc,ch1,2hdc] group, skp hdc before ch1 sp, [2hdc,ch1,2hdc] in ch sp, skp next hdc st, hdc along (15hdc,2hdc,ch1,2hdc,15hdc)
Row 3-15 :
Rep row 2 (28hdc, 2hdc, ch1, 2hdc, 28hdc)
Info :
Fasten off after row 14 and reattach yarn and knitting-in elastic for row 15 if you are using it for the edging (OPTIONAL)
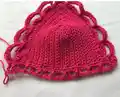
— Edging Section (Small and Medium Cup) :
Row 1 :
ch1, turn, sc in 1st st, *skp 2 sts, 5 tr in next st (shell st), skp 2 sts, sc in next st* *-* rep 3 times, skp 2 sts (skp 1 st for medium), 5 tr in ch 1 sp of prev row, skp 2 sts (skp 1 st for medium), *sc in next st, skp 2 sts, 5tr in next st (shell), skp 2 sts * *-* rep 3 times, sc in last st (9 shells,10 sc) (45tr, 10 sc)
Row 2 :
ch1,turn, hdc in 1st st, *ch7, skp 5 sts, hdc in sc between shells* *-*rep 3 times, ch5, skp 2 sts, hdc in top of shell, ch5, skp 2 sts, *hdc in sc between shells, ch7, skp 5sts* *-*rep 3 times, hdc last st (66chs, 11hdc)
Row 3 :
ch1, turn, sc in 1st st, *9sc in ch 7 sp, sc in hdc between chs* *-* rep 3 times, 5 sc in ch 5 sp, sc in hdc at top of shell (47 sc), ch 90+1 (This is the neck strap ch more or less to get desired length), sc in 2nd ch from hook, sc along chs (90scs), sl st into sc at base of ch, 5sc in ch 5 sp, *sc in hdc between chs, 9sc in ch 7 sp* *-* rep 3 times, sc in last st (46 sc, 1 sl st) (93 sc, 1 sl st and 90 sc for strap)
Info :
Fasten off and weave in ends
— Base of Cup (Small and Medium) :
Info :
Attach yarn in the 3rd sc of the last row
Row 1 :
sc along base (including 3 sts either side from last row of the cup), spread sts evenly (37sc)(40sc for medium)
Row 2 :
ch 3, turn (counts as a st), *FPtr around next st after ch, ch 1, skp 1 st, BPtr around next st, ch1, skp 1* *-*rep 8 times. For small cup FPtr in last st. For Medium cup FPtr, ch1, skp 1, BPtr in last st (10 FPtr, 9 BPtr for small) (10 FPtr, 10 BPtr for medium)
Info :
Fasten off weave in ends
— Edging Section (Large Cup) :
Row 1 :
ch1,turn, sc in next 4 sts, *skp 2 sts, 5 tr in next st, skp 2 sts, sc in next st* *-* rep 3 times, skp 2 sts, 5tr in the ch 1 sp of prev row, skp 2 sts, *sc in next st, skp 2 sts, 5tr in next st, skp 2 sts* *-* rep 3 times, sc in last 4 sts (9 shells, 16 sc) (45tr, 16 sc)
Row 2 :
ch1,turn, sc in first 3 sts, hdc in 4th st (the last sc before shell st), *ch7, skp 5 sts, hdc in sc between shells* *-*rep 3 times, ch5, skp 2 sts, hdc in top of shell, ch5, skp 2 sts, *hdc in sc between shells, ch7, skp 5sts* *-*rep 3 times, hdc in the next st, sc in last 3 sts (66chs, 11hdc, 6 sc)
Row 3 :
ch1, turn, sc in next 4 sts, *9sc in ch 7 sp, sc in hdc between chs* *-* rep 3 times, 5 sc in ch 5 sp, sc in hdc at top of shell (50 sc), ch 90+1 (This is the neck strap ch more or less to get desired length), sc along chs (90scs), sl st into sc at base of ch, 5sc in ch 5 sp, *sc in hdc between chs, 9sc in ch 7 sp* *-* rep 3 times, sc in last 4 sts (49 sc, 1 sl st) (99 sc, 1 sl st and 90 sc for strap)
Info :
Fasten off and weave in ends
— Base of Cup (Large) :
Info :
Attach yarn in the 6th sc of the last row
Row 1 :
sc along base (including 6 sts either side from last row of the cup), spread sts evenly (43 sc)
Row 2 :
ch 3, turn (doesn't count as a st), *FPtr around next st after ch, ch 1, skp 1 st, BPtr around next st, ch1, skp 1* *-*rep 9 times, FPtr in last st (11 FPtr, 10 BPtr)
Info :
Fasten off weave in ends
— Back Tie :
Instructions :
Make a chain to your desired length of a back tie (for reference for a 32" back chain 250). Then simply sc along ch, fasten off and weave in ends. You can also use an old bikini back tie for this if you wish.
Info :
When finished simply weave the back tie through the FPtr and BPtr at the base of cup
This gorgeous Oceana Bikini Top pattern brings together functionality and beauty in a customizable swimwear design that you'll love creating and wearing! With three size options, adjustable features, and elegant scalloped edging, this pattern gives you the power to craft swimwear that fits your body perfectly. The combination of classic string bikini styling with decorative shell stitches creates a piece that's both timeless and eye-catching. Whether you're new to garment crochet or an experienced maker, this pattern offers clear instructions and helpful adaptation tips to ensure your success. 🌊 Happy crocheting! 🧶✨