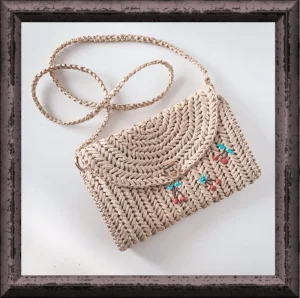
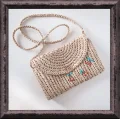
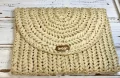
Get ready to create your new favorite summer accessory with this beautifully textured clutch! Crocheted with natural raffia, this project brings a touch of beachy elegance directly to your wardrobe. You will absolutely love watching the gorgeous herringbone texture take shape as you work, creating a sturdy and stylish fabric that feels incredibly high-end. It is the perfect blend of rustic charm and chic design.
Progress Tracker
0% Complete
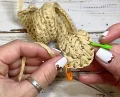
— 1. Main Body Canvas :
Info :
Leave a yarn tail of approximately 1.5 meters (59 inches) before starting. We will work with two strands of yarn held together.
Row 1 :
Work 51 CH. Insert hook into second CH from hook, pull up loop, insert into next CH, pull up loop, and pull through all three loops. Continue working herringbone SC across next 48 CH. Work 4 SC in last CH. Turn and work 49 SC along opposite side of chain, working 2 SC in last loop. CH 1. (Place markers in first and fourth SC of the 4 SC group).
Row 2 :
Turn with wrong side facing. Bring yarn to front. Work 48 SC (first SC over two loops), followed by 4 Inc. Move markers to first and last loops of the Inc. Work 49 SC (2 SC in last loop). CH 1.
Row 3 :
Work 48 SC (first SC over two loops), then work (Inc, 1 SC) 4 times. Move markers to first and last loops of this section. Work 49 SC (2 SC in last loop). CH 1.
Row 4 :
Work 48 SC (first SC over two loops), then work (Inc, 2 SC) 4 times. Move markers to first and last loops of this section. Work 49 SC (2 SC in last loop). CH 1.
Row 5 :
Work 48 SC (first SC over two loops), then work (Inc, 3 SC) 4 times. Move markers to first and last loops of this section. Work 49 SC (2 SC in last loop). CH 1.
Row 6 :
Work 48 SC (first SC over two loops), then work (Inc, 4 SC) 4 times. Move markers to first and last loops of this section. Work 49 SC (2 SC in last loop). CH 1.
Row 7 :
Work 48 SC (first SC over two loops), then work (Inc, 5 SC) 4 times. Move markers to first and last loops of this section. Work 49 SC (2 SC in last loop). CH 1.
Row 8 :
Work 48 SC (first SC over two loops), then work (Inc, 6 SC) 4 times. Move markers to first and last loops of this section. Work 49 SC (2 SC in last loop). CH 1.
Row 9 :
Work 48 SC (first SC over two loops), then work (Inc, 7 SC) 4 times. Move markers to first and last loops of this section. Work 49 SC (2 SC in last loop). CH 1.
Row 10 :
Work 48 SC (first SC over two loops), 1 Inc, move marker to first loop of this Inc, 8 SC, 1 Inc, 5 SC, CH 2, skip 2 loops, SC over 2 loops, SC in second loop, 8 SC, 1 Inc, 8 SC, move marker to eighth SC, 49 SC (2 SC in last loop). CH 1.
Row 11 :
Work 48 SC (first SC over two loops), 1 Inc, remove marker, 9 SC, 1 Inc, 9 SC, work 2 SC over CH space, 1 Inc, 9 SC, 1 Inc, 6 SC, remove second marker, 49 SC (2 SC in last loop).
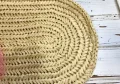
Base Trim :
Work 3 SC in last loop of row, work 19 SC along side edge (one SC in each row), work 3 SC in corner. Cut yarn, pull tail through, and hide end on wrong side.
— 2. Side Panels (Make Two) :
Info :
Leave a yarn tail of approximately 30 cm (12 inches) before starting. Work with two strands of yarn held together.
Row 1 :
Work 20 CH. Starting in second CH from hook: 17 SC, 4 SC in 1, 18 SC. CH 1. Place markers in first and fourth SC of the 4 SC group.
Row 2 :
Work 17 SC, 4 Inc, 18 SC (2 SC in last loop). Cut yarn, pull tail through last loop, tie ends on wrong side, and hide tails.
— 3. Strap (I-Cord) :
Row 1 :
Insert hook through eyelet of first snap hook ring, pull up loop, twist clockwise, CH 1. Work 2 SC through eyelet, CH 1, turn.
Row 2 :
Work 2 SC, turn. Insert hook under left leg of SC from previous row, pull up loop, SC, turn.
Row 3 :
Insert hook under two loops of SC from previous row, pull up loop, SC, turn.
Row 4 :
Repeat previous row to desired length (about 110 cm / 43 inches).
Row 5 :
Work 2 SC through eyelet of second snap hook ring. Cut yarn, pull tail through, and hide end on wrong side.
— 4. Cherry Embroidery :
Info :
To embroider the stems, twist a small piece of brown raffia yarn and fold it in half. Thread the ends through to the wrong side of the front flap. Pull one end back to the front, intercept the middle of the stem to form an inverted V shape, and secure it tightly on the back.
Info :
To embroider the leaves, use green raffia yarn to make a few small satin stitches at the top join of the brown stems.
Info :
To make the cherries, twist a small piece of red raffia yarn into a tight ball. Wrap a flat strand of red raffia around the ball, pull both ends through to the wrong side of the flap at the bottom of a stem, and tie them securely in a knot. Repeat to create the desired number of cherries.
I am so incredibly proud of you for wrapping up this gorgeous project! There is nothing quite like the feeling of stepping out with a stunning accessory that you made with your own two hands. I hope every single compliment you get on this clutch brings a massive smile to your face and inspires your next design. Keep shining, keep sharing your beautiful work with the world, and happy crafting! 🧶✨