🧶 Beautiful ✨ Detailed 💝 Adorable

Gingham Blanket Crochet Pattern

Gingham Blanket Crochet Pattern
4.0★ Rating
15-20 Hours Time Needed
3.6K Made This
✂️

Intermediate Level

Ideal for those with basic knitting experience, featuring slightly more advanced stitches and techniques to expand your skills.

⏱️

Slow & Steady

A 10-12 hour project—great for savoring the process over several sessions.

🏡

Cozy Accent

A warm touch for your space that transforms ordinary corners into inviting nooks filled with handmade charm.

About This Gingham Blanket Crochet Pattern

This Gingham Blanket pattern is an absolute showstopper that will have everyone asking how you made it! The clever combination of front post and back post double crochet stitches creates vertical columns, while surface slip stitches worked afterward form the horizontal lines that complete the classic gingham look. What makes this pattern special is that it's worked in one continuous piece with very few ends to weave in, making finishing a breeze.

Gingham Blanket Crochet Pattern crochet pattern - detailed view of completed project

The pattern includes comprehensive photo instructions for every special technique, so even if you're new to post stitches, you'll master them quickly. After just a few rows, the rhythm becomes natural and meditative.

Why You'll Love This Gingham Blanket Crochet Pattern

I absolutely love this pattern because it never fails to amaze people! Every time I make one, fellow crafters stop to examine it, trying to figure out the technique. The fact that it looks complex but is actually quite straightforward makes it incredibly satisfying to create. I also appreciate how customizable it is—you can adjust the size to anything from a baby blanket to a full throw, and play with different color combinations to match any decor. The texture is wonderfully cozy, and watching the gingham pattern emerge as you add the surface crochet is pure magic.

Gingham Blanket Crochet Pattern step 1 - construction progress Gingham Blanket Crochet Pattern step 2 - assembly progress Gingham Blanket Crochet Pattern step 3 - details and accessories Gingham Blanket Crochet Pattern step 4 - final assembly and finishing

Switch Things Up

I love experimenting with this gingham pattern because it's so versatile! One of my favorite variations is creating a rainbow gingham by using five different bright colors arranged in a repeating sequence. The effect is absolutely stunning and perfect for a child's room.

For a more sophisticated look, I've made this in monochromatic shades—try three different tones of grey or blue for an elegant, modern aesthetic. You could also go bold with contrasting colors like navy and coral, or keep it classic with red and white for a picnic-inspired throw.

If you want to make a smaller project to test the pattern or create a matching set, try making coordinating cushion covers using the same technique but with fewer starting chains. I've also made baby blankets in soft pastels that make perfect shower gifts.

Another fun twist is to vary the width of your color panels—instead of 10 rows per color, try 15 rows for wider stripes or 5 rows for a tighter checkerboard effect. You could even create an asymmetrical design by varying panel widths throughout the blanket.

Common Mistakes & How to Fix Them

✗ Forgetting to maintain consistent tension throughout the project can result in uneven squares and a wavy finished blanket ✗ Not counting stitches after Row 2 leads to incorrect panel widths and a blanket that doesn't align properly with the pattern ✗ Changing colors on the wrong side of the work creates visible color joins that disrupt the clean gingham appearance ✗ Working surface slip stitches too tightly causes the blanket to pucker and lose its flat, smooth texture ✗ Skipping the blocking process after completion prevents the blanket from lying flat and showing the gingham pattern clearly ✗ Not leaving long enough yarn tails when starting surface crochet makes it difficult to secure and incorporate into tassels later

Gingham Blanket Crochet Pattern

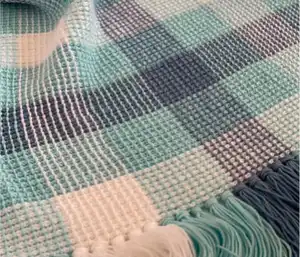
Create a stunning gingham-style blanket that will leave everyone guessing how it's made! This unique crochet pattern combines front post and back post stitches with surface crochet to achieve an eye-catching checkered design. Perfect as a baby blanket, housewarming gift, or cozy throw for any room, this project works up in one piece with minimal finishing. The pattern features detailed photo instructions and is fully customizable in size and color combinations.

Intermediate 15-20 Hours

Materials Needed for Gingham Blanket Crochet Pattern

— Main Fabric

  • 01
    3 x 100g Ouma Ralie Feels Like Cashmere DK in Frosty White (Color A)
  • 02
    4 x 100g Ouma Ralie Feels Like Cashmere DK in Bubblegum Blue (Color B - light blue)
  • 03
    4 x 100g Ouma Ralie Feels Like Cashmere DK in Beach House Blue (Color C - dark blue)
  • 04
    Alternative: Any DK weight (Light 3) yarn with approximately 273 yards/250 meters per 100g
  • 05
    Suggested substitutes: Rico Essentials Acrylic, King Cole Cherished Baby DK, Stylecraft Bambino DK, Lion Brand Jeans, Scheepjes Softfun

— Tools Required

  • 01
    5mm crochet hook (for main blanket)
  • 02
    7mm crochet hook (for surface crochet)
  • 03
    Yarn needle for weaving in ends
  • 04
    Scissors
  • 05
    Measuring tape
  • 06
    Stitch markers (optional but helpful)

Progress Tracker

0% Complete

— Foundation Chain :

Setup :

Ch 182 with colour A and 5mm hook

— Main Blanket Rows :

Row 1 :

hdc in fourth ch from hook, ch 1, skip 1 st, *hdc in next st, ch 1, skip 1 st, rep from * to end of row, end with a hdc in last ch, turn

Row 2 (WS) :

ch 3, skip first st, *FPdc around next st, ch 1, rep from * to end of row, hdc around ch3-tc, turn (you should now have 89 FPdc and one hdc at the end of your row)

Row 3 (RS) :

ch 3, skip first st, *BPdc around next st, ch 1, rep from * to end of row, hdc around ch3-tc, turn

Row 4 (WS) :

ch 3, skip first st, *FPdc around next st, ch 1, rep from * to end of row, hdc around ch3-tc, turn

Rows 5-10 :

rep rows 3-4 another 3 times

Rows 11-20 :

Change to colour B, rep rows 3-4 five times

Rows 21-30 :

Change to colour C, rep rows 3-4 five times

Rows 31-40 :

Change to colour B, rep rows 3-4 five times

Rows 41-50 :

Change to colour A, rep rows 3-4 five times

Rows 51-60 :

Change to colour B, rep rows 3-4 five times

Rows 61-70 :

Change to colour C, rep rows 3-4 five times

Rows 71-80 :

Change to colour B, rep rows 3-4 five times

Rows 81-90 :

Change to colour A, rep rows 3-4 five times

Rows 91-100 :

Change to colour B, rep rows 3-4 five times

Rows 101-110 :

Change to colour C, rep rows 3-4 five times

Rows 111-120 :

Change to colour B, rep rows 3-4 five times

Rows 121-130 :

Change to colour A, rep rows 3-4 five times. Fasten Off.
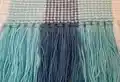
— Surface Crochet :

Info :

Turn the blanket so that the WS is facing you. The BPdc and FPdc form vertical rows, while the RS has horizontal rows. When the WS is facing you, these horizontal rows almost look like the rungs of a ladder behind the BPdc and FPdc vertical rows. The surface slip stitches are worked around these rungs of the ladder, with the WS facing you.

First Vertical Column :

Make a slipknot with colour C and place it around the 7mm crochet hook (leave a long yarn tail). Join colour C with a slip stitch on the right side of the first vertical row formed by the BPdc and FPdc, around the first bottom horizontal row. Make sure your working yarn is BEHIND the blanket.

Continue Column :

Make a slip stitch around the next horizontal row right above the bottom row. Keep making slip stitches around the horizontal rows until you reach the top and fasten off (remember to leave a long yarn tail)

Subsequent Columns :

Begin the second vertical row by making slip stitches between the next two rows of BPdc and FPdc (remember to keep your working yarn BEHIND the blanket). Fasten off. Make 10 such slip stitch-rows in colour C.

Color Sequence :

Continue making 10 slip stitch rows in each colour, following the same colour sequence: First with C, then B, A, B, C, B, A, B, C

Assembly Instructions

  • After completing all surface crochet slip stitch columns, turn your blanket to examine the right side and ensure all columns are evenly spaced
  • Use your crochet hook to pull the yarn tail of every second row into the adjacent space where you will add tassels
  • Create 20 tassels in each of the three colors (60 tassels total) by wrapping yarn around your hand or a cardboard piece
  • Attach five tassels at the bottom and five at the top of each vertical slip stitch column, matching the tassel color to the column color
  • To attach each tassel, pull the mid-section through the space using your hook, open it slightly, and pull the tail end through the loop
  • Once all tassels are attached, trim them to an even length for a polished finished look
  • Weave in any remaining yarn ends that weren't incorporated into the tassels using your yarn needle

Important Notes

  • 💡The blanket will naturally curl during the crocheting process—this is completely normal and will flatten out once you add the surface crochet
  • 💡Always change colors in the last stitch of the previous row for clean color transitions
  • 💡Keep your tension consistent throughout the project to maintain even squares in the gingham pattern
  • 💡When working surface slip stitches, ensure your working yarn stays behind the blanket for proper texture
  • 💡Leave long yarn tails when starting and ending surface crochet columns as these will be incorporated into your tassels
  • 💡Count your stitches after Row 2 to ensure you have exactly 89 FPdc before proceeding with the rest of the blanket
  • 💡The pattern is fully customizable—refer to Tables 1 and 2 in the original pattern to adjust size by changing starting chains or row repeats

This stunning Gingham Blanket pattern creates a mesmerizing checkered design that looks like it could be woven, knitted, or crocheted—keeping everyone guessing! The clever combination of post stitches and surface crochet makes this a truly unique project that works up surprisingly quickly once you get into the rhythm. Whether you're making it for a nursery, as a thoughtful gift, or to add cozy charm to your own home, this blanket is guaranteed to be a conversation starter. The best part? It's worked in one continuous piece with customizable sizing options, so you can make it exactly the way you envision it. Happy crocheting! 🧶✨

You ask,

we answer.

FAQs

Can I use different yarn weights for this pattern?

Yes, you can substitute with any DK weight (Light 3) yarn, but be sure to make a gauge swatch first. If you use a different weight, the finished dimensions will change, but you can still follow the pattern structure using the multiples of 20 plus 2 for chains and multiples of 10 for rows.

How do I keep track of which row I'm on with all the color changes?

Use a row counter or keep a notepad nearby to mark off rows as you complete them. The color changes happen every 10 rows, so you can also use this as a checkpoint. Each color section consists of 5 repetitions of rows 3-4.

Why is my blanket curling while I crochet?

This is completely normal! The nature of post stitches creates tension that causes curling during the crocheting process. Don't worry—the surface slip stitches added at the end will flatten it out and give it structure. Resist the urge to change your tension to prevent curling.

Can I make this blanket with only two colors instead of three?

Absolutely! The pattern works beautifully with 2-5 colors. Just adjust your color sequence accordingly. With two colors, you might alternate them throughout, or use one color for most panels and the second as an accent.

What's the difference between Front Post and Back Post double crochet?

Both stitches are worked around the post of the stitch from the previous row rather than into the top loops. Front Post stitches are worked from the front of your work, creating raised texture, while Back Post stitches are worked from the back, creating recessed texture. The pattern includes detailed photo instructions for both.

Do I need to add the tassels, or can I finish the blanket without them?

The tassels are optional! They add a decorative bohemian touch and help use up the yarn tails from surface crochet, but the blanket looks beautiful without them too. You could also add a different edging like single crochet border if preferred.