About This Sunset Ombre Market Bag Pattern
Style it for the beach or your local farmer's market—this sturdy, colorful tote is the perfect blend of fashion and function for any outing and makes a thoughtful, long-lasting gift.
Ideal for those with basic crocheting experience, featuring slightly more advanced stitches and techniques to expand your skills.
Takes 5-7 hours, making it an enjoyable project to finish over a couple of days.
An elegant detail to elevate any look, combining traditional techniques with contemporary design sensibilities.
Style it for the beach or your local farmer's market—this sturdy, colorful tote is the perfect blend of fashion and function for any outing and makes a thoughtful, long-lasting gift.
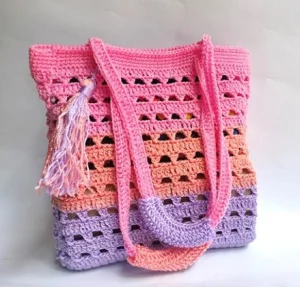
I honestly adore how the crossed double crochets add just the right amount of 'wow' factor without being overly complicated. There is something so satisfying about watching the colors shift as you move through the mesh sections, and the added shoulder pads make it actually comfortable to carry even when it is loaded down with heavy produce.


I’ve always felt that market bags are the unsung heroes of the crochet world. They’re practical, they’re eco-friendly, and they let us show off our skills in the wild! When I first sat down with this pattern, I was struck by how much the texture of the crossed double crochet adds to the overall look. It gives the bag this beautiful, architectural mesh that’s way more interesting than a standard net.
Working with nylon yarn was a bit of a learning curve for me—it’s definitely slipperier than cotton!—but the durability is unmatched. I highly recommend keeping a lighter or matches nearby to seal those ends; it makes a world of difference in keeping your hard work from unraveling.
I decided to go with a sunset palette for my version, but I can totally see this looking chic in a single neutral tone or even a scrappy multi-color version to use up your stash. The shoulder pads are a total game-changer, too. No more straps digging in when you’ve found the perfect heavy watermelon! I hope you enjoy every stitch of this one as much as I did.
Get ready to turn heads at the farmers' market with a bag that is as sturdy as it is stylish. You will love how the rhythmic cross-stitches create a beautiful mesh texture that expands to fit all your fresh finds. This project is perfect for using those vibrant nylon yarns that hold their shape through years of grocery trips and beach days. It is time to swap those plastic bags for something handmade, heart-felt, and totally unique to your style.
Start by making 12 ch. Work 1 tch, then crochet 12 sc across the row. (12)
Work 1 tch and crochet 12 sc across each row. (12)
Work sc evenly all the way around the entire rectangular piece, ending with a sl st in the first stitch. (120)
ch 3, then work 119 dc around the base. Join with a sl st to the 3rd ch. (120)
Repeat the following 30 times: 1 c-dc, ch 2, and sk 2 sts. Join with a sl st to the 3rd ch. (120)
ch 3, then work 119 dc around. Join with a sl st to the 3rd ch. (120)
Repeat the following 30 times: 1 c-dc, ch 2, and sk 2 sts. Join with a sl st to the 3rd ch. (120)
ch 3, then work 119 dc around. Join with a sl st to the 3rd ch. (120)
Repeat the following 30 times: 1 c-dc, ch 2, and sk 2 sts. Join with a sl st to the 3rd ch. (120)
Switch to your next yarn color. ch 3, then work 119 dc around. Join with a sl st to the 3rd ch. (120)
Repeat the following 30 times: 1 c-dc, ch 2, and sk 2 sts. Join with a sl st to the 3rd ch. (120)
ch 3, then work 119 dc around. Join with a sl st to the 3rd ch. (120)
Repeat the following 30 times: 1 c-dc, ch 2, and sk 2 sts. Join with a sl st to the 3rd ch. (120)
ch 3, then work 119 dc around. Join with a sl st to the 3rd ch. (120)
Repeat the following 30 times: 1 c-dc, ch 2, and sk 2 sts. Join with a sl st to the 3rd ch. (120)
Change yarn color again. ch 3, then work 119 dc around. Join with a sl st to the 3rd ch. (120)
Repeat the following 30 times: 1 c-dc, ch 2, and sk 2 sts. Join with a sl st to the 3rd ch. (120)
ch 3, then work 119 dc around. Join with a sl st to the 3rd ch. (120)
Repeat the following 30 times: 1 c-dc, ch 2, and sk 2 sts. Join with a sl st to the 3rd ch. (120)
ch 3, then work 119 dc around. Join with a sl st to the 3rd ch. (120)
Repeat the following 30 times: 1 c-dc, ch 2, and sk 2 sts. Join with a sl st to the 3rd ch. (120)
ch 3, then work 119 dc around. (120)
Work 120 sc around in a continuous spiral. Place a marker in the first stitch of every round to keep track. (120)
Using markers, measure 7cm from each side. sc around, but at each marker, work (3 ch + sk 3 sts) to create the four handle holes. (120)
Work 120 sc around in a spiral. Finish with a sl st in the final stitch, then cut yarn and weave in ends. (120)
Create a chain that measures 120cm in length.
Work 1 dc into every stitch across. Join with a sl st to finish. Cut the yarn, leaving a long tail for sewing.
Thread the handle through the four holes created in the body of the bag and sew the ends together securely with a tapestry needle.
Work 21 ch. (21)
Work 3 tch, then crochet 20 dc across the row. (21)
Work 3 tch and crochet 20 dc across each row. (21)
Make a second pad following the same steps. Wrap each pad around the handle where it sits on your shoulder and sew the edges together.
I really hope you enjoy bringing this market bag to life! There is nothing quite like the feeling of finishing a project that you know will get used almost every single day. Whether you are filling it with fresh sourdough, a bouquet of eucalyptus, or just your beach essentials, this bag is built to last and designed to turn heads. Don't forget to take a moment to admire that beautiful texture you've created with those cross stitches. I can't wait to see the color combinations you choose for yours! Happy making, and enjoy your next trip to the market with your brand new handmade tote. 🧶✨
Yes, you can! Cotton is a great alternative, but keep in mind it will stretch more when heavy items are inside. Nylon is chosen for this pattern specifically because it holds its shape very well under weight.
The length is determined by the initial chain of the handle. Simply measure the chain against your body before moving on to the double crochet row to ensure it hangs exactly where you want it.
For the cleanest look, pull through the new color on the final slip stitch of the previous row. This ensures your first stitch of the new color is crisp and perfectly placed.
Nylon yarn is made of synthetic fibers that tend to unravel quickly when cut. Melting the ends slightly fuses the fibers together, creating a permanent seal that won't come undone during use.
