🧢 Beautiful ✨ Detailed πŸ’ Adorable

Mushroom Pendant with Gnome Amigurumi Pattern

Mushroom Pendant with Gnome Amigurumi Pattern
3.9β˜… Rating
2-3 Hours Time Needed
3.8K Made This
βœ‚οΈ

Intermediate Level

Ideal for those with basic knitting experience, featuring slightly more advanced stitches and techniques to expand your skills.

⏱️

Bite-Sized Project

Complete in under 2 hoursβ€”quick, fun, and perfect for a little creative escape.

🎁

Tiny Treasure

Small, sweet, and gift-worthy creations that fit perfectly in the palm of your hand with detailed charm.

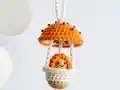
About This Mushroom Pendant with Gnome Amigurumi Pattern

This enchanting mushroom pendant pattern combines delicate cotton crochet work with adorable woodland charm. The design features a realistic mushroom with a carefully constructed two-part cap that creates beautiful dimension and structure. The accompanying gnome adds personality and whimsy, making this pendant a conversation starter wherever you go. With customizable decoration options including painted dots, embroidered details, or sewn beads, each pendant becomes a unique miniature work of art.

Mushroom Pendant with Gnome Amigurumi Pattern crochet pattern - detailed view of completed project

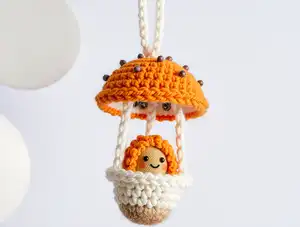
Perfect for fairy tale enthusiasts and nature lovers alike, this pendant pattern teaches valuable techniques like working in spiral rounds, creating structured forms without excessive stuffing, and attaching decorative elements. The included chain strap makes it ready to wear immediately upon completion.

Why You'll Love This Mushroom Pendant with Gnome Amigurumi Pattern

I absolutely adore this pattern because it combines functionality with pure whimsical charm in such a tiny package. There's something magical about creating wearable art that tells a story, and this mushroom-and-gnome duo does exactly that. I love how the pattern teaches you to create dimension and structure through clever construction techniques rather than relying solely on stuffing. The customization possibilities are endless, from choosing your favorite mushroom colors to deciding whether your gnome has a painted face or embroidered features. It's quick enough to make several in an afternoon yet detailed enough to feel truly special and handcrafted.

Mushroom Pendant with Gnome Amigurumi Pattern step 1 - construction progress Mushroom Pendant with Gnome Amigurumi Pattern step 2 - assembly progress Mushroom Pendant with Gnome Amigurumi Pattern step 3 - details and accessories Mushroom Pendant with Gnome Amigurumi Pattern step 4 - final assembly and finishing

Switch Things Up

I love experimenting with different color combinations for this mushroom pendant to create entirely different moods and styles. Instead of the traditional red-capped mushroom, I've made dusty pink caps with cream stems for a soft cottagecore aesthetic, or bold purple and teal combinations for a fantasy-inspired look. You could even create seasonal versions - autumn mushrooms in orange and brown, or winter wonderland mushrooms in icy blues and whites.

Another fun variation I enjoy is changing up the gnome's personality through facial expressions and positioning. Sometimes I give my gnome a surprised expression with wide eyes, other times a content sleepy face. You can also adjust where the gnome sits - perched on top of the cap, peeking out from behind the stem, or sitting at the base.

For decoration, I've moved beyond simple dots and experimented with embroidered swirls, tiny French knots in contrasting colors, or even sequins for a sparkly fairy garden effect. Adding a tiny felt leaf or flower next to the gnome creates a complete woodland scene. Some of my favorites include giving the mushroom a weathered look by dry-brushing with slightly darker paint around the edges, making it appear aged and mysterious.

Common Mistakes & How to Fix Them

βœ— Not keeping crochet tight enough which causes the mushroom to lose its solid shape and structure, resulting in a floppy pendant that won't stand properly βœ— Forgetting to hide yarn tails inside while crocheting the magic ring, leaving visible loose ends that detract from the finished professional appearance βœ— Pulling the chain too tightly through the mushroom cap center which can distort the cap shape and create unwanted puckering in the finished piece βœ— Overstuffing the gnome body which makes it difficult to properly fold the borders and creates a lumpy appearance instead of smooth curves

Mushroom Pendant with Gnome Amigurumi Pattern

Create a charming miniature mushroom pendant complete with an adorable gnome companion that's perfect for wearing or gifting. This delightful pattern features intricate techniques including working in spiral rounds, creating a two-part mushroom cap with inner and outer sections, and crafting a sweet little gnome figure with personality. The finished pendant measures approximately two inches in height, making it a perfectly portable piece of wearable art that showcases your crochet skills while adding whimsy to any outfit.

Intermediate 2-3 Hours

Materials Needed for Mushroom Pendant with Gnome Amigurumi Pattern

β€” Main Fabric

  • 01
    100% cotton yarn 100g/200m (3.5 oz/218 yds – yarn weight β„–2 – fine/DK yarn) in various colors for mushroom cap, stem, and gnome

β€” Tools Required

  • 01
    1.75 mm crochet hook (US steel/thread hook 4 or UK steel/thread hook 2)
  • 02
    Scissors
  • 03
    Wooden bead for gnome's head (10-14 mm diameter)
  • 04
    Tapestry needle with wide enough eye for yarn
  • 05
    Small amount of toy filler/stuffing
  • 06
    Textile markers or acrylic paints with brush for decoration
  • 07
    Pastels for tinting stem (optional)
  • 08
    Beads for decoration (optional)
  • 09
    Sewing thread in matching colors with suitable needle
  • 10
    Piece of thread in contrast color as a stitch marker

Progress Tracker

0% Complete

β€” Mushroom Stem :

Info :

Work in spiral rows (rounds). Use marker after finishing each row to see the beginning of next row if needed. Make a magic loop (adjustable ring) or ch 2, insert hook into 1st ch.

Row 1 :

sc 6 (6) - try to hide the tail of yarn inside while crocheting

Row 2 :

inc 6 (12)

Row 3 :

[inc, sc 2] x 4 (16)

Rows 4-8 :

sc in each stitch (16), ch 250 (this would be approx. 65 cm strand to hang on neck as a necklace; you may ch as many as you wish), sl st into sc 7 of last row (into the middle of last row), fasten off, weave in the tail

β€” Mushroom Cap - Top Part :

Info :

Make a magic loop (adjustable ring) or ch 2, insert hook into 1st ch.

Row 1 :

sc 6 (6) - try to hide the tail of yarn inside while crocheting

Row 2 :

inc 6 (12)

Row 3 :

[inc, sc 2] x 4 (16)

Row 4 :

into front loop only [inc, sc 3] x 4 (20)

Row 5 :

[inc, sc 4] x 4 (24)

Rows 6-7 :

sc in each stitch (24), fasten off, weave in the tail

Info :

If you wish to sew the beads to the cap top, it would be more comfortable to make it before next step

β€” Mushroom Cap - Inner Part :

Info :

Turn the top part of cap inner side out

Row 1 :

sc into each back loop of top part row 3 (16)

Row 2 :

sc in each stitch (16)

Row 3 :

[dc inc, dc 3] x 4 (20), fasten off, weave in the tail

Info :

Pull the stem chain through the center of cap (use thick hook for this purpose)

β€” Gnome :

Info :

Make a magic loop (adjustable ring) or ch 2, insert hook into 1st ch

Row 1 :

sc 6 (6)

Row 2 :

[inc, sc] x 3 (9)

Rows 3-5 :

sc into each stitch (9)

Rows 6-8 :

ch 1, turn, sc 6 (6) - stuff it, then fold the borders

Row 9 :

sl st 3 through both borders. Fasten off, leaving long tail to sew the bead

Info :

Pull the tail with a needle through the bead as showed and fix it. To make a quiff let small tail of yarn remain on the outside. Make face features with textile marker or acrylic paint

β€” Alternative Crochet Ball for Gnome (Optional) :

Info :

Wooden bead may be replaced with crochet ball in suitable color of same yarn and hook. Crochet inner side out.

Row 1 :

sc 6 in a magic ring (6)

Row 2 :

sc into each stitch (6)

Row 3 :

dec 3 (3). Fasten off, hide the tail inside

Info :

You may embroider face with sewing thread (easier to make a face after joining with body)

Assembly Instructions

  • Pull the long chain strap through the center of the mushroom cap using a thick crochet hook to create the necklace
  • Attach the gnome body to the wooden bead by pulling the long tail through the bead with a tapestry needle and securing it firmly
  • Position the gnome near or on the mushroom pendant as desired, leaving a small yarn tail on top of the bead to create a quiff hairstyle
  • Sew or glue the gnome to the mushroom stem or cap area if you want it permanently attached to the pendant

Important Notes

  • πŸ’‘Keep your crochet tension tight throughout the project to ensure the mushroom maintains its solid structure and doesn't become floppy
  • πŸ’‘The pendant size is approximately 2 inches (4.5 x 4 cm) with suggested materials, but you can adjust size by using thicker or thinner yarn
  • πŸ’‘Remember to hide yarn tails inside your work as you crochet the magic ring for a cleaner professional finish
  • πŸ’‘Decorate the mushroom before or after assembly depending on your chosen method - beads are easier to sew before attaching the cap
  • πŸ’‘The chain length can be customized to your preference - the pattern suggests 250 chains for approximately 65 cm necklace length
  • πŸ’‘Paint or draw the gnome's face before attaching to avoid accidentally marking the surrounding yarn with paint or markers

This adorable mushroom pendant pattern brings woodland magic to life in wearable form, combining delicate crochet techniques with charming character design. The two-part cap construction creates beautiful dimension while the tiny gnome companion adds personality and storytelling to your handmade jewelry. Whether you're creating a gift for a fairy tale enthusiast or adding whimsical touches to your own wardrobe, this quick project delivers maximum charm in minimal time. Customize with your favorite colors, decoration styles, and embellishments to make each pendant uniquely yours. Happy crocheting!

You ask,

we answer.

FAQs

Can I use acrylic yarn instead of cotton for this pendant?

While the pattern specifies cotton yarn, you can use acrylic if needed. However, cotton is recommended because it holds its shape better and creates a firmer structure for the pendant. If using acrylic, make sure to crochet even tighter than usual to maintain the mushroom's solid form.

What if I don't have a wooden bead for the gnome's head?

The pattern includes an alternative method for creating a crochet ball head instead of using a wooden bead. Simply follow the optional crochet ball instructions provided in the pattern to create a small crocheted sphere that works perfectly as the gnome's head.

How do I make the mushroom cap inner part?

After completing the cap top part, turn it inside out. Then work into the back loops of row 3 from the top part to create the inner section. This unique construction method creates beautiful dimension and allows the cap to maintain its mushroom shape without heavy stuffing.

Can I make this pendant larger or smaller?

Yes! You can easily adjust the size by using thicker or thinner yarn with an appropriate hook size. Just remember to maintain tight tension regardless of yarn weight so the mushroom keeps its structural integrity and doesn't become floppy.

What's the best way to decorate the mushroom cap?

The pattern offers several decoration options including textile markers for painted dots, acrylic paints with a brush, sewn beads, or embroidered details. You can also use pastels to tint the stem for added realism. Choose the method that best matches your skill level and desired aesthetic.