🧶 Beautiful ✨ Detailed 💝 Adorable

Succulent Potted Plant Car Hanging Pattern

Succulent Potted Plant Car Hanging Pattern
4.0★ Rating
2-3 Hours Time Needed
2.6K Made This
✂️

Beginner Friendly Level

Perfect for those just starting their sewing journey, with clear instructions and simple techniques

⏱️

Bite-Sized Project

Complete in under 2 hours—quick, fun, and perfect for a little creative escape.

🏡

Cozy Accent

A warm touch for your space that transforms ordinary corners into inviting nooks filled with handmade charm.

About This Succulent Potted Plant Car Hanging Pattern

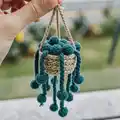
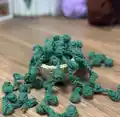
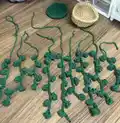
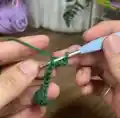
This delightful succulent car hanging pattern combines the beauty of nature with practical crochet skills. The design features a sturdy green pot base worked in half double crochet, creating a textured foundation that mimics real pottery. Seven to nine individual succulent strands are crafted using chain stitches and puff stitches, giving each piece a unique, organic appearance. The pattern uses simple increase techniques to shape the pot perfectly, while the hanging rope ensures easy display in your car or any space that needs a botanical touch.

Succulent Potted Plant Car Hanging Pattern crochet pattern - detailed view of completed project

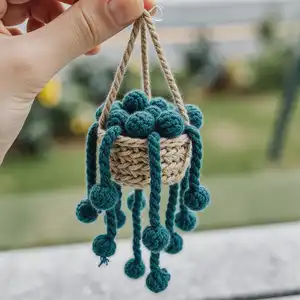
Working with superfine yarn in beige brown and pine green creates realistic color variations that bring your succulent to life. The magic ring foundation and straightforward stitch progression make this an achievable project for beginners while still producing impressive results.

Why You'll Love This Succulent Potted Plant Car Hanging Pattern

I absolutely love how this pattern transforms simple yarn into something that looks genuinely botanical and charming. The puff stitch succulents have such wonderful texture and dimension that they truly capture the essence of real plants. I appreciate how quick this project works up—you can make several in an afternoon for gifts or to decorate different spaces. The combination of the structured pot base and the flowing succulent ropes creates beautiful movement, and watching those little plant pieces come together is incredibly satisfying. This pattern has that perfect balance of being simple enough for confident beginners but interesting enough to keep you engaged throughout the entire process.

Succulent Potted Plant Car Hanging Pattern step 1 - construction progress Succulent Potted Plant Car Hanging Pattern step 2 - assembly progress Succulent Potted Plant Car Hanging Pattern step 3 - details and accessories Succulent Potted Plant Car Hanging Pattern step 4 - final assembly and finishing

Switch Things Up

I love experimenting with this pattern because it's so versatile and adaptable to different styles and preferences. One of my favorite modifications is using variegated yarn for the succulent ropes—it creates beautiful color transitions that look incredibly natural and organic, just like real succulents with their subtle hue variations.

I've also tried making larger versions by using worsted weight yarn with a bigger hook, which creates statement pieces perfect for hanging in doorways or windows rather than just cars. The bigger scale really shows off the puff stitch texture beautifully.

For a more whimsical look, I sometimes add tiny flowers between the succulent ropes using French knots or small chain loops in contrasting colors like pink or yellow. This gives the piece a blooming succulent appearance that's absolutely delightful.

Another fun variation I enjoy is creating different pot styles—instead of the solid green pot, I've worked in stripes or even tried tapestry crochet techniques to add geometric patterns that give each piece a unique pottery-inspired look.

I've also experimented with the hanging element by braiding three chains together instead of using a single chain, which creates a more substantial and decorative hanging rope. You could even add beads to the hanging rope for extra visual interest and a touch of bohemian charm that complements the natural plant theme perfectly.

Common Mistakes & How to Fix Them

✗ Not stuffing the pot firmly enough before sewing the circular base, which can cause the pot to collapse or lose its shape over time ✗ Making puff stitches too tight or too loose, resulting in succulents that don't have consistent texture or dimension throughout the piece ✗ Forgetting to slip stitch at the end of each row on the pot, which can cause the rounds to spiral incorrectly and distort the final shape ✗ Creating too few or too many succulent ropes, affecting the fullness and realistic appearance of the finished plant arrangement

Succulent Potted Plant Car Hanging Pattern

Create this adorable succulent potted plant car hanging decoration that brings a touch of nature to your vehicle or living space. This charming pattern features a textured pot in pine green with a circular base, topped with realistic-looking succulent ropes that cascade beautifully. Perfect for plant lovers and crochet enthusiasts alike, this project combines simple stitches with puff stitch techniques to create dimension and texture. The finished piece includes a hanging rope for easy display, making it an ideal gift or personal accessory that adds botanical charm wherever it goes.

Beginner Friendly 2-3 Hours

Materials Needed for Succulent Potted Plant Car Hanging Pattern

— Main Fabric

  • 01
    Superfine weight yarn in beige brown color - 1.8 oz (50g)
  • 02
    Superfine weight yarn in pine green color - 1.8 oz (50g)

— Tools Required

  • 01
    Crochet hook size 2.5-3.0 mm
  • 02
    Stitch markers
  • 03
    Sewing needle
  • 04
    Scissors
  • 05
    Cotton filling for stuffing

Progress Tracker

0% Complete

— POTS :

Row 1 :

Magic ring, chain 1, 10 Single Crochet

Row 2 :

chain 1, (1 Single Crochet, 1 increase) 5 times (15 stitches)

Row 3 :

chain 1 (2 Single Crochet, 1 increase) 5 times (20 stitches)

Row 4 :

chain 1 (3 Single Crochet, 1 increase) 5 times (25 stitches)

Row 5 :

chain 1 (4 Single Crochet, 1 increase) 5 times (30 stitches)

Row 6 :

chain 1 (5 Single Crochet, 1 increase) 5 times (35 stitches)

Row 7-10 :

chain 1, 35 Single Crochet (35 stitches)

Info :

chain-1 at beginning of row, slip stitch at the end of every row

— CIRCLE BASE (green) :

Row 1 :

Magic Ring, chain 1, 10 half double crochet (10 stitch)

Row 2 :

10 half double crochet increase (20 stitch)

Row 3 :

chain 1, (1 half double Crochet, 1 increase) 10 times (30 stitch)

Row 4 :

chain 1 (5 Single Crochet, 1 increase) 5 times (35 stitches)

— SUCCULENT :

First strand :

Chain 4, 1 Puff stitch in 3rd sts, 1 slip stitch in next sts

Continuing strands :

Chain 8, 1 Puff stitch in 3rd sts, 1 slip stitch in next sts (repeat 8ch, 1PS in 3rd, 1 SL ST until the length you want)

Info :

Make 7-9 succulent pieces total

— Hanging rope :

Rope :

Chain 60 in the sides of the pots

Assembly Instructions

  • Stuff the pot firmly with cotton filling before proceeding to the next step to ensure it holds its shape properly
  • Position the circular base at the bottom opening of the pot, ensuring edges align evenly all around
  • Sew the circle base securely inside the pot using a whipstitch or slip stitch, working all the way around the perimeter
  • Arrange the 7-9 succulent ropes on the middle top of the pot, spacing them evenly to create a full, natural appearance
  • Sew each succulent rope securely to the center of the pot, making sure they're firmly attached and won't pull loose
  • Attach the hanging rope (chain 60) to the sides of the pot by sewing it securely at two opposite points for balance
  • Test the hanging rope to ensure it's secure and the pot hangs level before displaying

Important Notes

  • 💡Use stitch markers to keep track of rounds, especially when working the pot increases to maintain proper shaping
  • 💡When making puff stitches for succulents, keep tension consistent throughout all pieces for uniform appearance
  • 💡Don't skip the slip stitch at the end of pot rows as noted in the pattern instructions
  • 💡Make sure to stuff the pot before sewing the base closed—it's difficult to add filling afterward
  • 💡Create at least 7 succulent ropes but feel free to add up to 9 for a fuller, more dramatic look
  • 💡Secure the hanging rope firmly on both sides to prevent the pot from tilting when displayed

This charming succulent car hanging pattern brings the beauty of plants into a portable, maintenance-free form! Perfect for adding a touch of greenery to your car, office cubicle, or any small space that needs botanical charm. The combination of textured puff stitches and simple construction techniques creates a realistic succulent arrangement that's sure to brighten anyone's day. Whether you're making it as a thoughtful gift for a plant-loving friend or creating a collection for yourself, this quick project delivers impressive results. 🌿 Happy crocheting and enjoy your handmade botanical beauty! 🧶✨

You ask,

we answer.

FAQs

Can I use different yarn weights for this pattern?

While the pattern calls for superfine yarn, you can use different weights—just adjust your hook size accordingly. Keep in mind that using heavier yarn will create a larger finished piece, and lighter yarn may result in a more delicate appearance.

How many succulent ropes should I make for the best look?

The pattern recommends 7-9 succulent ropes. Start with 7 and add more if you want a fuller appearance. The number can vary based on personal preference and how dense you want your succulent arrangement to look.

What's the best way to make consistent puff stitches?

For uniform puff stitches, wrap your yarn the same number of times (usually 3-4 loops) for each one and maintain consistent tension throughout. Practice a few on scrap yarn first to find your rhythm before starting the actual succulent pieces.

Can I skip the hanging rope and use this as a desk decoration instead?

Absolutely! Simply omit the chain 60 hanging rope and your succulent pot will sit perfectly on a flat surface. You can even add a slightly larger base if you want extra stability for desktop display.

How do I keep the pot from losing its shape over time?

The key is stuffing firmly before sewing the base closed. Use quality cotton filling and pack it well but not so tightly that it distorts the shape. The firm stuffing helps the pot maintain its structure even when hanging.