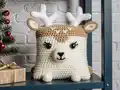
Create an adorable reindeer pillow that brings festive charm to any space! This delightful pattern combines soft velvet yarn with charming details like antlers, embroidered features, and cute little arms and legs. Perfect for decorating nurseries, bedrooms, living rooms, or even your car, this pillow makes a wonderful handmade gift that captures the magic of the holiday season. The finished pillow measures approximately 30x35 cm including antlers, creating a cozy companion that's both decorative and functional for cuddling.
Progress Tracker
0% Complete
— Pillow :
Info :
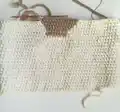
Crochet with beige yarn. Work in a spiral (except the indicated moments)
Rnd 2 :
connect in a circle with the first stitch: 1 sc (it is the first stitch of a new round) and crochet further 89 sc {90}
Rnd 3-19 (17 rounds) :
90 sc
Info :
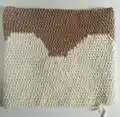
Next, alternate colors
Rnd 20 :
in beige: 18 sc, in brown: 8 sc, in beige: 64 sc {90}
Rnd 21 :
in beige: 18 sc, in brown: 8 sc, in beige: 64 sc {90}
Rnd 22 :
in beige: 17 sc, in brown: 10 sc, in beige: 63 sc {90}
Rnd 23 :
in beige: 16 sc, in brown: 12 sc, in beige: 60 sc, in brown: 1 sc, in beige: 1 sc {90}
Rnd 24 :
in beige: 15 sc, in brown: 14 sc, in beige: 16 sc, in brown: 1 sc, in beige: 42 sc, in brown: 2 sc {90}
Rnd 25 :
in beige: 14 sc, in brown: 16 sc, in beige: 14 sc, in brown: 2 sc, in beige: 42 sc, in brown: 2 sc {90}
Rnd 26 :
in brown: 1 sc, in beige: 12 sc, in brown: 19 sc, in beige: 11 sc, in brown: 3 sc, in beige: 42 sc, in brown: 2 sc {90}
Rnd 27 :
in brown: 2 sc, in beige: 10 sc, in brown: 21 sc, in beige: 9 sc, in brown: 4 sc, in beige: 42 sc, in brown: 2 sc {90}
Rnd 28-37 (10 Rounds) :
in brown: 46 sc, in beige: 42 sc, in brown: 2 sc {90}
Info :
Leave a long yarn tail for sewing and sew up the top of the pillow. Fasten off, hide the yarn end inside. (If you secure eyes before stuffing the pillow, then insert them between rounds 17 and 18, counting from the bottom with distance between the eyes of 12-13sc)
Info :
Stuff the pillow, especially the corners. Sew up the bottom of the pillow, fasten off, hide it inside
— Ears (make 2) :
Info :
Crochet with beige yarn
Row 2 :
from the second chain on the hook: 11 sc, 3 sc in the last chain, on the other side of the chain: 12 sc, ch1, turn
Row 3 :
from the second stitch on the hook: 13 sc, 3 sc in 1 stitch, 12 sc, ch1, turn
Row 4 :
from the second stitch on the hook: 14 sc, 3 sc in 1 stitch, 13 sc
Info :
Fasten off, cut the yarn
Info :
Crochet with brown yarn
Row 2 :
from the second stitch on the hook: 11 sc, 3 sc in the last chain, on the other side of the chain: 12 sc, ch1, turn
Row 3 :
from the second stitch on the hook: 13 sc, 3 sc in 1 stitch, 12 sc, ch1, turn
Row 4 :
from the second stitch on the hook: 14 sc, 3 sc in 1 stitch, 13 sc, ch1
Info :
Do not cut the yarn. Fold both pieces together and crochet through both pieces with brown yarn. Hide the ends inside
Row 4 :
15 sc, 3 sc in 1 stitch, 14 sc
Info :
Leave a long yarn end for sewing. Fold the bottom of the ear in half and sew up the edges. Sew the ears to the upper corners of the pillow. Fix the thread and hide inside
— Nose :
Info :
Crochet with brown and beige yarn, alternating colors
Rnd 1 :
in brown: 6 sc in an amigurumi ring {6}
Rnd 2 :
in beige: 3 inc, in brown: 3 inc {12}
Rnd 3 :
in beige: (1 sc, inc) – repeat 3 times, in brown: 6 sc {15}
Rnd 4 :
in beige: (2 sc, inc) – repeat 3 times, in brown: (1 sc, inc) – repeat 3 times {21}
Rnd 5 :
in beige: (3 sc, inc) – repeat 3 times, in brown: (2 sc, inc) – repeat 3 times {27}
Rnd 6 :
in beige: (4 sc, inc) – repeat 3 times, in brown: (3 sc, inc) – repeat 3 times {33}
Rnd 7 :
in beige: (5 sc, inc) – repeat 3 times, in brown: (4 sc, inc) – repeat 3 times {39}
Infos :
Stuff the nose, sew it between rounds 10 and 18, leave a small hole (it will be more convenient to start embroidering the nose through it and fix the thread there). Sew on the eyes between rounds 17 and 18 (distance between eyes 12-13 sc). Take black yarn, embroider a nose and eyelids (so that the eyelids do not slip, you can carefully glue them to the pillow with transparent glue). Fix the thread, hide it inside the nose. With beige yarn embroider checkmarks on the forehead, fix the thread. Sew up the hole and also hide the thread inside
— Legs (make 2) :
Info :
Crochet with brown yarn
Rnd 1 :
6 sc in an amigurumi ring {6}
Rnd 2 :
(inc) – repeat 6 times {12}
Rnd 3 :
(1 sc, inc) – repeat 6 times {18}
Info :
Leave a long yarn end for sewing
— Arms (make 2) :
Info :
Crochet with brown yarn
Rnd 1 :
6 sc in an amigurumi ring {6}
Rnd 2 :
(inc) – repeat 6 times {12}
Info :
Leave a long yarn end for sewing
— Antlers (make 2) :
Info :
Crochet with white yarn
Rnd 1 :
6 sc in an amigurumi ring {6}
Rnd 2 :
(inc) – repeat 6 times {12}
Rnd 3 :
(1 sc, inc) – repeat 6 times {18}
Rnd 4-7 (4 rounds) :
18 sc
Info :
Do not fasten off on the piece 1, leave the loop open and leave a long tail for sewing
Rnd 1 :
6 sc in an amigurumi ring {6}
Rnd 2 :
(inc) – repeat 6 times {12}
Rnd 3 :
(1 sc, inc) – repeat 6 times {18}
Rnd 4-5 (2 rounds) :
18 sc
Info :
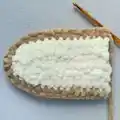
Do not cut the yarn, continue crocheting, connecting both pieces
Rnd 1 :
Along piece 1: 4 sc (crochet the first stitch with 2 loops of both pieces, as per photo below), dec, 2 sc, dec, 2 sc, dec, 2 sc, dec. Along piece 2: 4 sc, dec, 2 sc, dec, 3 sc, dec, 1 sc, dec {28}
Info :
Sew up the hole with 2 sc or with a needle and yarn end from piece 1
Rnd 2 :
(2 sc, dec) – repeat 7 times {21}
Rnd 3 :
11 sc, dec, 6 sc, dec {19}
Info :
Leave a long yarn end for sewing. Stuff the antlers and sew them to the top
— Assembly :
Final Steps :
Sew on the arms between rounds 7 and 10, stuff them tightly and sew on the legs. Fix the threads and hide them inside the pillow. Your Pillow is ready!
This charming Pillow Reindeer pattern brings festive magic to life with its adorable design and luxurious velvet yarn texture. Perfect for holiday decorating or as a year-round companion, this project combines straightforward techniques with delightful details like dimensional antlers and embroidered features. Whether you're crafting for your own home or creating heartfelt gifts, this reindeer pillow is sure to bring smiles and cozy comfort to everyone who encounters it. The pattern's clear instructions and spiral construction make it an enjoyable weekend project! 🦌✨🧶