🧢 Beautiful ✨ Detailed πŸ’ Adorable

Monster Frankenstein Amigurumi Pattern

Monster Frankenstein Amigurumi Pattern
4.0β˜… Rating
2.5-3.5 Hours Time Needed
2.7K Made This
βœ‚οΈ

Beginner Friendly Level

Perfect for those just starting their sewing journey, with clear instructions and simple techniques

⏱️

Bite-Sized Project

Complete in under 2 hoursβ€”quick, fun, and perfect for a little creative escape.

🧸

Whimsical Buddy

Playful characters full of personality, designed to spark imagination and become cherished playtime favorites.

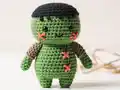
About This Monster Frankenstein Amigurumi Pattern

This adorable Monster Frankenstein amigurumi pattern creates a friendly green monster character that's perfect for Halloween or year-round display. The pattern begins with a beautifully shaped head featuring a color transition from skin tone to vibrant green, creating that classic Frankenstein look. The body is constructed with integrated legs that connect seamlessly, and the arms are intentionally left unstuffed for a floppy, playful appearance. The finishing touch is a handmade miniature sweater that adds charm and personality to your monster friend.

Monster Frankenstein Amigurumi Pattern crochet pattern - detailed view of completed project

Using Alize Cotton Gold yarn and a 2.00mm hook, this pattern works up quickly with straightforward construction techniques. The clear round-by-round instructions make it easy to track your progress, and the minimal color changes keep the project simple yet visually interesting.

Why You'll Love This Monster Frankenstein Amigurumi Pattern

I absolutely adore this Monster Frankenstein pattern because it transforms the classic scary monster into an utterly charming and huggable friend! The genius of starting with a flesh-toned base and transitioning to green creates that authentic Frankenstein aesthetic without being complicated. I love how the pattern includes a tiny crocheted sweater that gives the monster such personality and warmthβ€”it's those little details that make this project special. The fact that the arms are left unstuffed gives the monster an endearing, floppy quality that makes him even more lovable. What really wins me over is how beginner-friendly this pattern is while still producing a character with so much charm and character. It's quick enough to finish in one sitting but impressive enough that people will think you spent days on it. Whether you're making it for Halloween decor or as a year-round companion, this little Frankenstein friend is guaranteed to steal hearts instead of scaring them!

Monster Frankenstein Amigurumi Pattern step 1 - construction progress Monster Frankenstein Amigurumi Pattern step 2 - assembly progress Monster Frankenstein Amigurumi Pattern step 3 - details and accessories Monster Frankenstein Amigurumi Pattern step 4 - final assembly and finishing

Switch Things Up

I love experimenting with different color combinations for this Monster Frankenstein pattern! While the classic green works perfectly, you could create a purple monster, blue creature, or even a pink Frankenstein for a unique twist on the character. Try using variegated yarn for the body to create a more textured, patchwork appearance that plays on Frankenstein's stitched-together origins.

The sweater is where you can really let your creativity shine! I've made versions with striped sweaters using multiple colors, added tiny buttons using French knots, or embroidered patterns onto the sweater front. You could even crochet a tiny vest instead of a full sweater, or add a bow tie for a dapper monster gentleman.

Consider adding embroidered details like stitches across the forehead with black thread to enhance the Frankenstein theme, or create different facial expressions by positioning the safety eyes differently. Some makers add felt hair on top for a wild look, while others prefer the smooth, bald appearance. You could also scale up the pattern by using thicker yarn and a larger hook to create an oversized cuddle buddy, or make a whole monster family in different sizes and colors. The possibilities for personalizing this charming creature are truly endless!

Common Mistakes & How to Fix Them

βœ— Forgetting to change yarn color at Round 11 of the head can ruin the classic Frankenstein skin-to-green transition effect βœ— Not working the Round 12 Back Loop Only creates an incorrect texture and makes the color transition look messy instead of clean βœ— Overstuffing the arms makes them stiff when they should remain floppy and poseable for that classic monster character movement βœ— Failing to leave a long tail when fastening off the body makes sewing the head attachment extremely difficult and insecure

Monster Frankenstein Amigurumi Pattern

Bring the classic monster to life with this charming Monster Frankenstein amigurumi pattern! This delightful crochet project features a friendly green monster character complete with a cozy sweater and adorable personality. Perfect for beginners and intermediate crocheters, this pattern uses simple techniques like single crochet, increases, and decreases to create a lovable monster companion. The finished Frankenstein stands approximately 15-18 cm tall and makes a perfect handmade gift for monster lovers, Halloween decorations, or year-round cuddle buddy. With clear step-by-step instructions for the head, body, legs, arms, and sweater, you'll create an unforgettable character that's more cute than scary!

Beginner Friendly 2.5-3.5 Hours

Materials Needed for Monster Frankenstein Amigurumi Pattern

β€” Main Fabric

  • 01
    Alize Cotton Gold in three colors: 126 (flesh/beige), 493 (green), and 60 (color for sweater)
  • 02
    Any worsted weight cotton or cotton blend yarn can be substituted in similar colors

β€” Tools Required

  • 01
    2.00mm crochet hook (or size appropriate for your yarn)
  • 02
    Safety eyes 6mm
  • 03
    Polyester fiberfill stuffing
  • 04
    Tapestry needle for sewing
  • 05
    Scissors
  • 06
    Stitch markers (recommended)

Progress Tracker

0% Complete

β€” HEAD :

Round 1 :

6 sc in magic ring (6)

Round 2 :

(inc) x6 (12)

Round 3 :

(sc, inc) (18)

Round 4 :

(inc, 2 sc) x6 (24)

Round 5 :

(3 sc, inc) x6 (30)

Round 6 :

2 sc, inc, (4 sc, inc) x5, 2 sc (36)

Round 7 :

(5 sc, inc) (42)

Round 8 :

3 sc, inc, (6 sc, inc) x5, 3 sc (48)

Round 9 :

(7 sc, inc) x6 (54)

Round 10 :

4 sc, inc, (8 sc, inc) x5, 4 sc (60)

Round 11 :

sc around (60) *change to green yarn

Round 12 :

BLO Sc around (60)

Round 13-23 :

Sc around (60) (11 rnds)

Round 24 :

(3 sc, dec) x12 (48)

Round 25 :

(2 sc, dec) x12 (36)

Round 26 :

2 sc, dec, (4 sc, dec) x5, 2 sc (30)

Round 27 :

(3 sc, dec) x6 (24)

Round 28 :

sc around (24)

β€” LEG :

Round 1 :

7 sc in magic ring (7)

Round 2 :

(inc) x7 (14)

Round 3-5 :

sc around (14) *make 2 pieces

Info :

After making the first leg, cut the thread. When making the second leg, do not cut the thread and continue to the body

β€” BODY :

Round 6 :

ch4, join the first leg with the sc. Crochet on the first leg: 2 sc, (inc, 5 sc) x2, working on the chain: inc, 2 sc, inc, crochet on the second leg: (5 sc, inc) x2, 2 sc, working on the chain: 4 sc (42)

Round 7 :

(13 sc, inc) x3 (45)

Round 8-12 :

sc around (45) (5 rnds)

Round 13 :

(13 sc, dec) x3 (42)

Round 14-16 :

sc around (42) (3 rnds)

Round 17 :

(5 sc, dec) x6 (36)

Round 18-20 :

sc around (36) (3 rnds)

Round 21 :

(4 sc, dec) x6 (30)

Round 22-24 :

sc around (30)

Round 25 :

(3 sc, dec) x6, slst (24)

Info :

Fasten off and leaving a long tail for sewing. Stuff the body. Sew the Head with the Body

β€” ARM :

Round 1 :

6 sc in magic ring (6)

Round 2 :

(sc, inc) x3 (9)

Round 3-11 :

sc around (9) (9 rnds)

Info :

Do not fill arms. Make 2 pieces

β€” SWEATER :

Round 1 :

Ch 25, (sc, inc) x12 (36) ch1, turn

Round 2 :

(2 sc, inc) x12 (48) ch1, turn

Round 3 :

Sc around (48) ch1, turn

Round 4 :

7 sc, ch3, skip 10 sc, 14 sc, ch3, skip 10 sc, 7 sc, ch1, turn

Round 5-7 :

Sc around (34) (3 rnds) ch1, turn. Cut the yarn and hide

Assembly Instructions

  • Attach the 6mm safety eyes to the head between rounds 15-17, spacing them evenly for a friendly expression
  • Stuff the head firmly but not too tightly, shaping it as you go to create a nice rounded appearance
  • After completing the body with legs attached, stuff the body firmly while shaping the leg portions
  • Sew the head to the body using the long tail left from the body, ensuring it's centered and secure
  • Attach the arms to the sides of the body at approximately rounds 22-24, leaving them unstuffed for floppy movement
  • Dress your Monster Frankenstein in the completed sweater by carefully sliding it over the head and onto the body
  • Adjust the sweater positioning so the armholes align naturally with the attached arms for the best appearance

Important Notes

  • πŸ’‘Use stitch markers to track rounds, especially during the long head section with 11 continuous rounds
  • πŸ’‘The color change at Round 11 is crucial for the Frankenstein look, so plan your yarn positioning carefully
  • πŸ’‘Working Round 12 in back loops only creates the defined line between flesh tone and green sections
  • πŸ’‘Do not stuff the arms as specified in the pattern to maintain the character's floppy, playful appearance
  • πŸ’‘Leave a long tail when fastening off the body to make head attachment easier and more secure
  • πŸ’‘The sweater is worked flat in rows with chain-1 turns, different from the circular construction of the body

This delightful Monster Frankenstein amigurumi pattern brings the iconic character to life in the most adorable way possible! With a clever color transition from flesh tone to green and a handmade miniature sweater, this friendly monster is more huggable than scary. The straightforward construction makes it perfect for beginners, while the charming details create a character with real personality. Whether you're creating Halloween decorations or a year-round cuddle companion, this little Frankenstein is sure to become a beloved favorite. πŸ§ΆπŸ‘Ύ Happy crocheting! πŸ’šβœ¨

You ask,

we answer.

FAQs

What size will my finished Monster Frankenstein be?

Using Alize Cotton Gold yarn with a 2.00mm hook, your finished Monster Frankenstein will measure approximately 15-18 cm (6-7 inches) tall. The final size depends on your tension and how firmly you stuff the body.

Can I use different yarn weights for this pattern?

Yes, you can substitute different yarn weights, but you'll need to adjust your hook size accordingly. Using thicker yarn will create a larger monster, while thinner yarn will make a smaller one. Just ensure your stitches are tight enough that stuffing won't show through.

Why shouldn't I stuff the arms?

The pattern specifically instructs not to stuff the arms to give them a floppy, poseable quality that adds to the monster's character and charm. Stuffed arms would be stiff, while unstuffed arms create natural movement and personality.

When do I change from flesh color to green yarn?

You change to green yarn at Round 11 of the head. Complete Round 11 with the new green yarn, then work Round 12 in back loops only to create a clean, defined line between the two colors that mimics Frankenstein's classic appearance.

How do I attach the legs to create the body?

After making two separate legs, you'll chain 4 stitches and join them together in Round 6. The pattern provides detailed instructions for working around both legs and the connecting chains to create a seamless body construction.

Is the sweater difficult to make?

Not at all! The sweater is worked flat in simple rows with chain-1 turns. Round 4 creates armholes by skipping stitches and using chains, making it look complex but actually quite straightforward. It's a great introduction to making doll clothes.