๐Ÿงถ Beautiful โœจ Detailed ๐Ÿ’ Adorable

Mario and Luigi Plumbers Amigurumi Pattern

Mario and Luigi Plumbers Amigurumi Pattern
4.1โ˜… Rating
8-10 Hours Time Needed
3.0K Made This
โœ‚๏ธ

Intermediate Level

Ideal for those with basic knitting experience, featuring slightly more advanced stitches and techniques to expand your skills.

โฑ๏ธ

All-Day Adventure

Requires 8-10 hours, ideal for a full day of immersive knitting.

๐Ÿฐ

Whimsical Buddy

Playful characters full of personality, designed to spark imagination and become cherished playtime favorites.

About This Mario and Luigi Plumbers Amigurumi Pattern

Mario and Luigi Plumbers Amigurumi Pattern crochet pattern - detailed view of completed project

The bonus warp pipe patterns come in two sizes and feature realistic layered construction with terra cotta bases and green interiors. The mushroom patterns complete the Super Mario world with their spotted caps and cheerful expressions!

Why You'll Love This Mario and Luigi Plumbers Amigurumi Pattern

I'm absolutely obsessed with how this pattern captures every tiny detail that makes Mario and Luigi so instantly recognizable! The genius of the construction really shines through - those overalls with the actual straps that go over the shoulders and the tiny pockets that sit perfectly in the center are just adorable. I love how the pattern doesn't cut corners - you get real embroidered letters on the caps, dimensional mustaches that have personality, and even those characteristic sideburns! The way the shoes are constructed by flipping the piece inside out creates such a realistic rounded toe shape that I'm always impressed by. What really excites me is the attention to character differences - Luigi isn't just a recolored Mario; he has a taller head, different proportions, and even a differently shaped mustache that captures his unique personality. The back loop only and front loop only techniques throughout create incredible texture that makes the fabric look professionally structured. I appreciate the optional wire armature for the arms - it lets you pose them holding their caps or waving, which adds so much display potential! The bonus patterns are incredibly thoughtful - those warp pipes with the weighted bottom option are perfect for display, and the mushrooms are quick, satisfying makes that round out the whole Super Mario aesthetic!

Mario and Luigi Plumbers Amigurumi Pattern step 1 - construction progress Mario and Luigi Plumbers Amigurumi Pattern step 2 - assembly progress Mario and Luigi Plumbers Amigurumi Pattern step 3 - details and accessories Mario and Luigi Plumbers Amigurumi Pattern step 4 - final assembly and finishing

Switch Things Up

I love creating different versions of these iconic plumbers to build an entire Super Mario universe! Instead of the classic red and green, I've made alternate color schemes like Fire Mario in all white with red accents, or even Wario and Waluigi by using purple and yellow color combinations. The uniform pattern is perfect for experimentation - I've tried different colored overalls like making Mario in his classic brown overalls from the original game, or giving them modern color variations.

The cap embroidery offers wonderful customization opportunities - instead of just M and L, I've embroidered numbers for player one and player two, or even added tiny stars for a powered-up version. You could also make mini versions by using fingering weight yarn and a smaller hook, creating adorable keychain-sized plumbers perfect for backpack decorations or zipper pulls.

For the accessories, I've gone beyond the included patterns to create additional Super Mario elements - tiny golden coins using yellow yarn, question blocks using yellow and brown with embroidered question marks, power-up stars in yellow with embroidered faces, and even green shells. The warp pipe pattern is incredibly versatile - I've made them in different colors to represent different worlds from the games, like blue for water levels or grey for castle pipes.

The mushrooms can be modified too - instead of just the standard red Super Mushroom and green 1-Up, I've created purple poison mushrooms with black spots, or even made them larger as standalone decoration pieces by increasing the initial stitch counts. Adding tiny arms to the mushrooms following the plumber arm pattern creates those adorable enemies from the newer games!

Common Mistakes & How to Fix Them

โœ— Forgetting to flip pieces inside out when instructed for shoes and arms, resulting in texture appearing on wrong side of work โœ— Not using ballpoint pins during assembly, making it extremely difficult to position all the intricate uniform pieces correctly and symmetrically โœ— Missing the color change rounds in the body section, especially the beige belly area, which throws off the entire character proportions โœ— Sewing the hair base straight across instead of diagonally for Mario, completely changing his iconic hairstyle appearance and character recognition

Mario and Luigi Plumbers Amigurumi Pattern

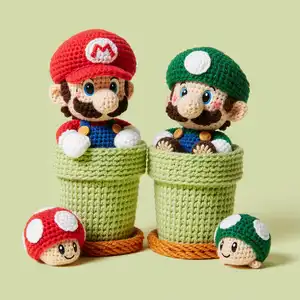
Create the iconic Super Mario Brothers duo with this comprehensive amigurumi pattern! This intermediate-level design brings both Mario and Luigi to life at approximately 4.7 inches tall, complete with their signature red and green outfits, adorable mustaches, and classic plumber overalls. The pattern includes detailed instructions for every element - from their expressive faces and caps with embroidered letters to their tiny shoes and white gloves. As a bonus, you'll also get patterns for decorative warp pipes in two different heights and cute Super Mario mushrooms in red and green! Perfect for gaming enthusiasts, Nintendo fans, or anyone who grew up loving these legendary video game characters.

Intermediate 8-10 Hours

Materials Needed for Mario and Luigi Plumbers Amigurumi Pattern

โ€” Main Fabric

  • 01
    Sport weight (#2) yarn in beige for skin
  • 02
    Sport weight (#2) yarn in dark brown for hair, mustache, eyebrows, and sideburns
  • 03
    Sport weight (#2) yarn in brown for Mario's shoes
  • 04
    Sport weight (#2) yarn in red for Mario's shirt, cap, and arms
  • 05
    Sport weight (#2) yarn in bronze for buttons
  • 06
    Sport weight (#2) yarn in blue for Mario's overalls, straps, and pocket
  • 07
    Sport weight (#2) yarn in tan/light brown for shoe soles
  • 08
    Sport weight (#2) yarn in white for gloves and cap details
  • 09
    Sport weight (#2) yarn in green for Luigi's shirt, cap, and arms
  • 10
    Sport weight (#2) yarn in light blue for embroidery
  • 11
    Sport weight (#2) yarn in navy blue for Luigi's overalls
  • 12
    Sport weight (#2) yarn in dark brown for Luigi's shoes
  • 13
    Sport weight (#2) yarn in terracotta, light green, and green for pipes
  • 14
    Sport weight (#2) yarn in red, green, and white for mushrooms
  • 15
    Sport weight (#2) yarn in yellow (optional for variations)

โ€” Tools Required

  • 01
    Crochet hook 2.50mm (matches sport weight yarn)
  • 02
    Safety eyes 10mm for plumbers (4 pairs total)
  • 03
    Safety eyes 5mm for mushrooms
  • 04
    Ballpoint pins for assembly
  • 05
    Tapestry/yarn needle
  • 06
    Stitch markers
  • 07
    Scissors
  • 08
    Fiberfill stuffing
  • 09
    Hot glue gun (optional for sealing tails and attaching small pieces)
  • 10
    Wire for poseable arms (optional, not for children)
  • 11
    Peach or pink blush/eyeshadow for cheeks (optional)
  • 12
    Popcorn kernels for pipe weight (optional)

Progress Tracker

0% Complete
Due to the extensive nature of this pattern with multiple characters and pieces, I'll provide the complete Mario pattern structure. Luigi follows Mario's pattern with color substitutions noted in the pattern.

โ€” MARIO HEAD :

Info :

Use beige yarn

R1 :

6sc in magic ring [6]

R2 :

inc x6 [12]

R3 :

(inc, sc) x6 [18]

R4 :

(inc, 2sc) x6 [24]

R5 :

(inc, 3sc) x6 [30]

R6 :

(inc, 4sc) x6 [36]

R7 :

(inc, 5sc) x6 [42]

R8 :

(inc, 6sc) x6 [48]

R9-R17 :

sc around (9 rounds) [48]

R18 :

(dec, 6sc) x6 [42]

R19 :

(dec, 5sc) x6 [36]

R20 :

(dec, 4sc) x6 [30]

Info :

Insert eyes between round 16-17, about 10 sts between. Snap washer and stuff firmly

R21 :

(dec, 3sc) x6 [24]

R22 :

(dec, 2sc) x6 [18]

Info :

Slst, fasten off, weave tail in, add more stuffing if needed

โ€” MARIO COLLAR :

Left Collar :

Red yarn: ch 4, (starting from 2nd ch from hook) 2sc, slst [3]

Right Collar :

Red yarn: ch 4, (starting from 2nd ch from hook) slst, 2sc [3]

Info :

Fasten off, leave tail for sewing or glue later

โ€” MARIO BODY :

Info :

Use red and beige yarn

R1 :

(in red) 6sc in magic ring [6]

R2 :

inc x6 [12]

R3 :

(inc, sc) x6 [18]

R4 :

(inc, 2sc) x6 [24]

R5-R9 :

sc around (5 rounds) [24]

R10 :

(dec, 2sc) x2, dec, sc, (change to beige) sc, (change to red) (dec, 2sc) x3 [18]

R11 :

8sc, (change to beige) 2sc, (change to red) 8sc [18]

Info :

Slst, fasten off, leave tail for sewing and stuff fully

โ€” MARIO LEGS (Make 2) :

Info :

Use tan, brown, and blue yarn

R1 :

(in tan) 6sc in magic ring [6]

R2 :

inc x6 [12]

R3 :

(change to brown) BLO, sc around [12]

R4 :

FLO, sc around [12]

Info :

Flip upper part inside out to make easier to work (back loops show up), flip back after finishing

R5 :

(crochet into back loops of R3) (change to blue) 5sc, sk 1 st, 5sc, sk 1 st [10]

R6-R7 :

sc around (2 rounds) [10]

R8 :

(dec, 3sc) x2 [8]

Info :

Slst, fasten off, leave tail for sewing and stuff firmly. Fasten off, weave in/seal tails

โ€” MARIO UNIFORM :

Info :

Use blue yarn

R1 :

6sc in magic ring [6]

R2 :

inc x6 [12]

R3 :

(inc, sc) x6 [18]

R4 :

(inc, 2sc) x6 [24]

R5 :

(inc, 11sc) x2 [26]

R6-R8 :

sc around (3 rounds) [26]

Info :

Making back flap. Continue in rows. Ch 1 to start

R9 :

8sc, ch 1 and turn [8]

R10 :

sc, sk 1 st, 4sc, sk 1 st, sc [6]

Info :

Cut yarn and fasten off. Making front flap: Skip 5 sts from left side of back flap. Repeat back flap pattern for front flap

โ€” POCKET :

Instructions :

Blue yarn: Ch 5, (starting from 2nd ch from hook) sc, 2dc, sc [4]. Fasten off, leave tail for sewing or glue later

โ€” SIDEBURNS (Make 2) :

Instructions :

Dark brown: Ch 7, (starting from 2nd ch from hook) slst, 3sc, 2hdc [6]. Fasten off, leave tail for sewing or glue later

โ€” STRAPS (Make 2) :

Instructions :

Blue: Ch 14, (starting from 2nd ch from hook) 13slst [13]. Fasten off, leave tail for sewing or glue later

โ€” BUTTONS (Make 2) :

Instructions :

Bronze: Ch 3, (starting from 3rd ch from hook) hdc [1]. Fasten off and seal tails

โ€” MARIO ARMS (Make 2) :

Info :

Use white and red yarn

R1 :

(in white) 4sc in magic ring [4]

R2 :

inc x4 [8]

R3 :

sc around [8]

R4 :

FLO, sc around [8]

Info :

Flip upper part inside out (back loops show), flip back after finishing

R5 :

(crochet into back loops of R3) (change to red) sc around [8]

R6-R9 :

sc around (4 rounds) [8]

Info :

Slst, fasten off, leave tail for sewing and stuff lightly

โ€” HAIR BASE :

Info :

Dark brown yarn

R1 :

6sc in magic ring [6]

R2 :

inc x6 [12]

R3 :

(inc, sc) x6 [18]

R4 :

(inc, 2sc) x6 [24]

R5 :

(inc, 3sc) x6 [30]

R6 :

(inc, 4sc) x6 [36]

R7 :

(inc, 5sc) x6 [42]

R8 :

(inc, 6sc) x6 [48]

R9-R17 :

sc around (9 rounds) [48]

Info :

Slst, fasten off and leave long tail for sewing

โ€” NOSE :

Info :

Beige yarn

R1 :

5sc in magic ring [5]

R2 :

inc x5 [10]

R3 :

sc around [10]

Info :

Slst, fasten off, leave long tail for sewing and stuff lightly

โ€” EYEBROWS (Make 2) :

Instructions :

Dark brown: Ch 5, (starting from 2nd ch from hook) slst, 2sc, slst [4]. Fasten off, leave tail for sewing or glue later

โ€” MARIO MOUSTACHE :

Instructions :

Dark brown: Ch 10, (starting from 2nd ch from hook) slst, hdc inc, slst, (dc inc, slst) x2, hdc inc, slst [13]. Fasten off, leave tail for sewing or glue later

โ€” MARIO CAP :

Info :

Red yarn

R1 :

6sc in magic ring [6]

R2 :

inc x6 [12]

R3 :

(inc, sc) x6 [18]

R4 :

(2sc, inc) x6 [24]

R5 :

(inc, 3sc) x6 [30]

R6 :

(4sc, inc) x6 [36]

R7 :

(inc, 5sc) x6 [42]

R8 :

(6sc, inc) x6 [48]

R9 :

(inc, 7sc) x6 [54]

R10 :

(8sc, inc) x6 [60]

R11 :

(inc, 9sc) x6 [66]

R12-R15 :

sc around (4 rounds) [66]

R16 :

(dec, 9sc) x6 [60]

R17 :

sc around [60]

R18 :

(8sc, dec) x6 [54]

Info :

Cut yarn and fasten off. Skip 18sts from stitch you fastened off. Work FRONT loops only. Start by chain 1

R19 :

FLO, slst, sc, hdc, dc, htc, tc inc, 6tc, tc inc, htc, dc, hdc, sc, slst [20]

Info :

Weave in/seal all tails

โ€” EARS (Make 2) :

Instructions :

Beige: Ch 5, (starting from 2nd ch from hook) slst, 2dc, slst [4]. Fasten off, leave tail for sewing

โ€” CAP DETAIL :

Step 1 :

White yarn: R1: 5sc in magic ring [5], R2: inc x5 [10], R3: (inc, sc) x5 [15]. Slst, fasten off, leave tail for sewing or glue later

Step 2 :

Using red yarn, embroider M letter on white circle

Step 3 :

Attach to centre of cap

Assembly Instructions

  • Sew body to head securely, ensuring proper alignment for neck stability.
  • Sew hair base to head diagonally as shown in pattern photos for Mario's iconic hairstyle.
  • Sew left and right collar pieces outlining the beige belly area on the body.
  • Attach uniform to body, making sure front and back flaps are centered properly.
  • Sew legs to lower part of body, approximately on R4-R7 of uniform, about 4sts between them.
  • Optional: Insert wire through upper body for poseable arms (not for children). Sew arms to sides of upper body.
  • Attach pocket to center of uniform, then attach straps from front flap over shoulders to back flap.

Important Notes

  • ๐Ÿ’กUse ballpoint pins during assembly to keep pieces in place - this pattern has many small detailed parts that need precise positioning
  • ๐Ÿ’กRemember to flip pieces inside out when instructed for shoes and gloves to achieve proper texture on right side
  • ๐Ÿ’กThe hot glue sealing method shown is optional and saves time, but ensure sealed areas won't be visible on finished piece
  • ๐Ÿ’กWhen changing colors, especially on the body's belly section, carry yarn carefully to avoid visible strands showing through stitches
  • ๐Ÿ’กStuff pieces firmly but not overly tight - overstuffing will distort the character proportions and make assembly difficult
  • ๐Ÿ’กFor Luigi, follow Mario's pattern exactly but make all specified color and proportional changes for his taller, slimmer build

This incredible Mario and Luigi plumbers pattern brings the world's most famous video game duo to life in adorable amigurumi form! With meticulous attention to detail from their embroidered cap letters to their distinctive mustaches and complete uniforms with functioning straps, these 4.7-inch characters are instantly recognizable. The pattern includes everything you need to create both brothers with their unique proportions and personalities, plus bonus warp pipes and mushrooms to complete your Super Mario world display. Whether you're a retro gaming enthusiast, Nintendo collector, or simply love these iconic characters, this pattern delivers professional results that will impress everyone who sees them. It's-a me, Mario! Let's-a go! ๐Ÿ„โœจ

You ask,

we answer.

FAQs

Do I have to make both Mario and Luigi, or can I make just one?

You can absolutely make just one! Luigi's pattern follows Mario's with specific modifications clearly noted. If you only want Mario, simply follow his pattern completely. The patterns are designed so each character stands independently.

What does it mean to flip the pieces inside out?

For the shoes and gloves, you'll work some rounds in FLO (front loop only) and BLO (back loop only). Flipping the piece inside out after FLO rounds makes it easier to see and work into the back loops from the previous round, creating the characteristic rounded shape. You flip it back to the right side when finished.

Are the warp pipes and mushrooms included in the pattern?

Yes! The pattern includes bonus patterns for two different sized warp pipes (one regular, one double height) and cute mushrooms in both red and green. These make perfect display companions for your Mario and Luigi figures.

Can I add wire to the arms for posing?

Yes, the pattern includes an optional step for inserting wire through the upper body to make the arms poseable. However, this is NOT recommended if you're making these for children, as wire can be a safety hazard. For display pieces only.

How do I make Luigi's head different from Mario's?

Luigi has a completely different head pattern provided in the Luigi section. His head is taller and slimmer (45 stitches vs Mario's 48, but worked over more rounds), which creates his characteristic longer face shape compared to Mario's rounder proportions.

What is the sealing method mentioned in the pattern?

The sealing method uses a hot glue gun to secure and seal off yarn tails instead of weaving them in. You hold the tail against your piece, apply a small amount of hot glue, press it with a flat metal object, then cut off the excess. Only use this on hidden areas. Traditional weaving is safer for children's toys.

Do I need all the colors listed to make one character?

No, each character uses a subset of colors. Mario needs: beige, dark brown, brown, red, bronze, blue, tan, white, and light blue. Luigi needs: beige, dark brown, dark brown (for shoes), green, bronze, navy blue, tan, white, and light blue. You only need the pipe and mushroom colors if making those bonus items.