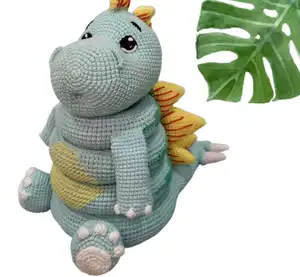
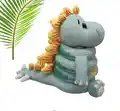
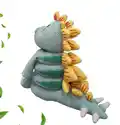
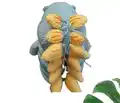
Create your own adorable prehistoric friend with this comprehensive Stegosaurus amigurumi pattern! This detailed design features the iconic plated back with four different sizes of plates, a charming face with embroidered details, and sturdy legs that allow your dino to stand proudly. Perfect for dinosaur enthusiasts of all ages, this pattern combines classic amigurumi techniques with unique construction methods including three graduated rings for the body and decorative spikes for the tail. The finished Stegosaurus showcases beautiful color work with green body tones accented by yellow and white details, creating a cuddly companion that's both impressive and huggable.
Progress Tracker
0% Complete
— BASE :
Info :
With light green yarn
Round 4 :
(1 sc; inc)*6 (18)
Round 7 :
(2 sc; inc)*6 (24)
Round 11 :
(3 sc; inc)*6 (30)
Round 16 :
(4 sc; inc)*6 (36)
Round 22 :
(5 sc; inc)*6 (42)
Round 29 :
(6 sc; inc)*6 (48)
Round 37 :
(7 sc; inc)*6 (54)
Round 46 :
(8 sc; inc)*6 (60)
Round 47 :
FLO (9 sc; inc)*6 (66)
Round 48 :
5 sc; inc; (10 sc; inc)*5; 5 sc (72)
Round 49 :
(11 sc; inc)*6 (78)
Round 50 :
6 sc; inc; (12 sc; inc)*5; 6 sc (84)
Round 51 :
(13 sc; inc)*6 (90)
Round 52 :
7 sc; inc; (14 sc; inc)*5; 7 sc (96)
Round 53 :
(15 sc; inc)*6 (102)
Round 54 :
8 sc; inc; (16 sc; inc)*5; 8 sc (108)
Round 55 :
(17 sc; inc)*6 (114)
Round 56-62 :
114 sc (114)
Round 63 :
(17 sc; dec)*6 (108)
Round 64 :
8 sc; dec; (16 sc; dec)*5; 8 sc (102)
Round 65 :
(15 sc; dec)*6 (96)
Round 66 :
7 sc; dec; (14 sc; dec)*5; 7 sc (90)
Round 67 :
(13 sc; dec)*6 (84)
Round 68 :
6 sc; dec; (12 sc; dec)*5; 6 sc (78)
Round 69 :
(11 sc; dec)*6 (72)
Round 70 :
5 sc; dec; (10 sc; dec)*5; 5 sc (66)
Round 71 :
(9 sc; dec)*6 (60)
Round 72 :
connect round 71 with round 47 (BLO) with 60 sc (60) fill with stuffing as you go, then continue to work in rounds
Round 73 :
(8 sc; dec)*6 (54)
Round 74 :
(7 sc; dec)*6 (48)
Round 75 :
(6 sc; dec)*6 (42)
Round 76 :
(5 sc; dec)*6 (36)
Round 77 :
(4 sc; dec)*6 (30)
Round 78 :
(3 sc; dec)*6 (24)
Round 79 :
(2 sc; dec)*6 (18)
Round 80 :
(1 sc; dec)*6 (12)
Round 81 :
6 dec (6) cut the yarn, pull off hole, hide a tail
— LEGS (make 2) :
Info :
With light green yarn
Round 3 :
(1 sc; inc)*6 (18)
Round 4 :
(2 sc; inc)*6 (24)
Round 5 :
(3 sc; inc)*6 (30)
Round 6 :
(4 sc; inc)*6 (36)
Round 7 :
BLO (2 sc; inc)*4; 24 sc (40)
Round 8 :
(3 sc; inc)*4; 24 sc (44)
Round 9 :
3 sc; dec; (4 sc; inc)*2; 3 sc; dec; 24 sc (44)
Round 10 :
2 sc; dec; (4 sc; dec)*2; 2 sc; dec; 24 sc (40)
Round 11 :
3 sc; (3 sc; dec)*2; 27 sc (38)
Round 12 :
3 sc; (2 sc; dec)*2; 27 sc (36)
Round 14 :
(4 sc; dec)*6 (30)
Round 15 :
(3 sc; dec)*6 (24) fill with stuffing
Round 16 :
BLO (2 sc; dec)*6 (18)
Round 17 :
(1 sc; dec)*6 (12) close the hole, leave a tail for sewing
— FEET (make 2) :
Round 3 :
(1 sc; inc)*6 (18)
Round 5 :
(2 sc; inc)*6 (24)
— NAILS (make 4 on each foot) :
Info :
With white yarn in one sc of the foot make (3 ch; 3 tr) and crochet them together, fasten off, cut the yarn, pull it through and tide a knot, then hide sticking yarn
Info :
Sew feet to legs and legs to base
— LARGE RING :
Info :
With light green yarn
Round 1 :
60 ch; slst in 1st ch (60)
Round 2 :
(9 sc; inc)*6 (66)
Round 3 :
5 sc; inc; (10 sc; inc)*5; 5 sc (72)
Round 4 :
(11 sc; inc)*6 (78)
Round 5 :
6 sc; inc; (12 sc; inc)*5; 6 sc (84)
Round 6 :
(13 sc; inc)*6 (90)
Round 7 :
7 sc; inc; (14 sc; inc)*5; 7 sc (96)
Round 8 :
(15 sc; inc)*6 (102)
Round 10 :
10 sc; change to green 32 sc; to light green 60 sc (102)
Round 11 :
5 sc; change to green 42 sc; to light green 55 sc (102)
Round 12 :
change to green 52 sc; to light green 50 sc (102)
Round 13 :
5 sc; change to green 42 sc; to light green 55 sc (102)
Round 14 :
10 sc; change to green 32 sc; to light green 60 sc (102)
Round 16 :
(15 sc; dec)*6 (96)
Round 17 :
7 sc; dec; (14 sc; dec)*5; 7 sc (90)
Round 18 :
(13 sc; dec)*6 (84)
Round 19 :
6 sc; dec; (12 sc; dec)*5; 6 sc (78)
Round 20 :
(11 sc; dec)*6 (72)
Round 21 :
5 sc; dec; (10 sc; dec)*5; 5 sc (66)
Round 22 :
(9 sc; dec)*6 (60) Sew round 22 with round 1, fill with stuffing as you go
— MIDDLE RING :
Info :
With light green yarn
Round 1 :
48 ch; slst in 1st ch (48)
Round 2 :
(7 sc; inc)*6 (54)
Round 3 :
4 sc; inc; (8 sc; inc)*5; 4 sc (60)
Round 4 :
(9 sc; inc)*6 (66)
Round 5 :
5 sc; inc; (10 sc; inc)*5; 5 sc (72)
Round 6 :
(11 sc; inc)*6 (78)
Round 7 :
6 sc; inc; (12 sc; inc)*5; 6 sc (84)
Round 8 :
(13 sc; inc)*6 (90)
Round 10 :
10 sc; change to green 26 sc; change to light green 54 sc (90)
Round 11 :
5 sc; change to green 36 sc; change to light green 49 sc (90)
Round 12 :
change to green 46 sc; change to light green 44 sc (90)
Round 13 :
5 sc; change to green 36 sc; change to light green 49 sc (90)
Round 14 :
10 sc; change to green 26 sc; change to light green 54 sc (90)
Round 16 :
(13 sc; dec)*6 (84)
Round 17 :
6 sc; dec; (12 sc; dec)*5; 6 sc (78)
Round 18 :
(11 sc; dec)*6 (72)
Round 19 :
5 sc; dec; (10 sc; dec)*5; 5 sc (66)
Round 20 :
(9 sc; dec)*6 (60)
Round 21 :
4 sc; dec; (8 sc; dec)*5; 4 sc (54)
Round 22 :
(7 sc; dec)*6 (48) Sew round 22 with round 1, fill with stuffing as you go
— SMALL RING :
Info :
With light green yarn
Round 1 :
36 ch; slst in 1st ch (36)
Round 2 :
(5 sc; inc)*6 (42)
Round 3 :
3 sc; inc; (6 sc; inc)*5; 3 sc (48)
Round 4 :
(7 sc; inc)*6 (54)
Round 5 :
4 sc; inc; (8 sc; inc)*5; 4 sc (60)
Round 6 :
(9 sc; inc)*6 (66)
Round 7 :
5 sc; inc; (10 sc; inc)*5; 5 sc (72)
Round 8 :
(11 sc; inc)*6 (78)
Round 10 :
10 sc; change to green 20 sc; to light green 48 sc (78)
Round 11 :
5 sc; change to green 30 sc; to light green 43 sc (78)
Round 12 :
change to green 40 sc; to light green 38 sc (78)
Round 13 :
5 sc; change to green 30 sc; to light green 43 sc (78)
Round 14 :
10 sc; change to green 20 sc; to light green 48 sc (78)
Round 16 :
(11 sc; dec)*6 (72)
Round 17 :
5 sc; dec; (10 sc; dec)*5; 5 sc (66)
Round 18 :
(9 sc; dec)*6 (60)
Round 19 :
4 sc; dec; (8 sc; dec)*5; 4 sc (54)
Round 20 :
(7 sc; dec)*6 (48)
Round 21 :
3 sc; dec; (6 sc; dec)*5; 3 sc (42)
Round 22 :
(5 sc; dec)*6 (36) Sew round 22 with round 1, fill with stuffing as you go
— ARMS (make 2) :
Info :
With light green yarn
Round 3 :
(1 sc; inc)*6 (18)
Round 4 :
(2 sc; inc)*6 (24)
Round 10 :
(10 sc; dec)*2 (22)
Round 16 :
(9 sc; dec)*2 (20)
Round 22 :
(8 sc; dec)*2 (18)
Round 23 :
18 sc (18) fill with a little bit of stuffing
Round 24 :
(7 sc; dec)*2 (16)
Round 25 :
Fold in half and make 8 sc, fasten off, leave long tail for sewing
— NAILS (make 3 on each hand) :
Info :
With white yarn in one sc of the hand make (2 ch; 2 dc) and crochet them together, fasten off, cut the yarn, pull it through and tide a knot, then hide sticking yarn
— HEAD :
Info :
With light green yarn
Round 3 :
(1 sc; inc)*6 (18)
Round 4 :
(2 sc; inc)*6 (24)
Round 5 :
(3 sc; inc)*6 (30)
Round 6 :
(4 sc; inc)*6 (36)
Round 7 :
(5 sc; inc)*6 (42)
Round 8 :
(6 sc; inc)*6 (48)
Round 9 :
(7 sc; inc)*6 (54)
Round 10-11 :< /h3>
54 sc (54)
Round 12 :
2 sc; BLO 5 sc; 13 sc; BLO 5 sc; 29 sc (54)
Round 13 :
(8 sc; inc)*6 (60)
Round 19 :
9 sc; 10 inc; 41 sc (70)
Round 23 :
11 sc; (1 sc; inc)*8; 43 sc (78)
Round 25 :
53 sc; 18 ch (skip 18 sc); 7 sc (78)
Round 34 :
(11 sc; dec)*6 (72)
Round 36 :
(10 sc; dec)*6 (66)
Round 38 :
(9 sc; dec)*6 (60)
Round 39 :
(8 sc; dec)*6 (54)
Round 40 :
(7 sc; dec)*6 (48)
Round 41 :
(6 sc; dec)*6 (42)
Round 42 :
(5 sc; dec)*6 (36)
Round 43 :
(4 sc; dec)*6 (30)
Round 44 :
(3 sc; dec)*6 (24)
Round 45 :
(2 sc; dec)*6 (18)
Round 46 :
(1 sc; dec)*6 (12)
Round 47 :
6 dec (6) fasten off
Info :
Now return to the hole that we left between rounds 24 and 25, continue to crochet in rounds
Round 5 :
(4 sc; dec)*6 (30)
Round 8 :
(3 sc; dec)*6 (24)
Round 11 :
(2 sc; dec)*6 (18)
Round 13 :
(1 sc; dec)*6 (12)
Round 14 :
6 dec (6) fasten off, push it inside of the head
Info :
Insert safety eyes or sew crochet eyes 10 sc apart
— NOSTRILS (make 2) :
Info :
In round 12 we left front loops, now crochet in these loops with light green yarn
Row 1 :
1 sc; 3 inc; 1 sc (8) fasten off, weave in tails
— EYES (make 2) :
Round 2 :
6 inc (12) change to white color
Round 3 :
BLO 4 sl st (4) fasten off
Info :
You can also add some personality for your Dino with needle sculpting of the face
— TAIL :
Info :
With light green yarn
Round 4 :
(2 inc; 4 sc)*2 (16)
Round 7 :
1 sc; 2 inc; 6 sc; 2 inc; 5 sc (20)
Round 10 :
2 sc; 2 inc; 8 sc; 2 inc; 6 sc (24)
Round 13 :
3 sc; 2 inc; 10 sc; 2 inc; 7 sc (28)
Round 16 :
4 sc; 2 inc; 12 sc; 2 inc; 8 sc (32)
Round 19 :
5 sc; 2 inc; 14 sc; 2 inc; 9 sc (36)
Round 22 :
6 sc; 2 inc; 16 sc; 2 inc; 10 sc (40)
Round 25 :
7 sc; 2 inc; 18 sc; 2 inc; 11 sc (44)
Round 28 :
8 sc; 2 inc; 20 sc; 2 inc; 12 sc (48)
Round 31 :
9 sc; 2 inc; 22 sc; 2 inc; 13 sc (52)
Round 34 :
10 sc; 2 inc; 24 sc; 2 inc; 14 sc (56)
Round 37 :
11 sc; 2 inc; 26 sc; 2 inc; 15 sc (60)
Round 40 :
12 sc; 2 inc; 28 sc; 2 inc; 16 sc (64) fill with stuffing
Round 41-42 :
64 sc (64) cut the yarn, leave a long tail for sewing
— LARGE PLATES (make 2) :
Round 2 :
(inc; 2 sc)*2 (8)
Round 3 :
(inc; 3 sc)*2 (10)
Round 4 :
(inc; 4 sc)*2 (12)
Round 5 :
(inc; 5 sc)*2 (14)
Round 6 :
(inc; 6 sc)*2 (16)
Round 7 :
(inc; 7 sc)*2 (18)
Round 8 :
(inc; 8 sc)*2 (20)
Round 9 :
(inc; 9 sc)*2 (22)
Round 10 :
(inc; 10 sc)*2 (24)
Round 11 :
(inc; 11 sc)*2 (26)
Round 12 :
(inc; 12 sc)*2 (28)
Round 13 :
(inc; 13 sc)*2 (30)
Round 17 :
(3 sc; dec)*6 (24)
Round 18 :
(2 sc; dec)*6 (18) change to green color fold in half, close the hole with 9 sc, fasten off, leave long tail for sewing
— MEDIUM PLATES (make 4) :
Round 2 :
(inc; 2 sc)*2 (8)
Round 3 :
(inc; 3 sc)*2 (10)
Round 4 :
(inc; 4 sc)*2 (12)
Round 5 :
(inc; 5 sc)*2 (14)
Round 6 :
(inc; 6 sc)*2 (16)
Round 7 :
(inc; 7 sc)*2 (18)
Round 8 :
(inc; 8 sc)*2 (20)
Round 9 :
(inc; 9 sc)*2 (22)
Round 10 :
(inc; 10 sc)*2 (24)
Round 14 :
(1 sc; dec)*8 (16) change to green color fold in half, close the hole with 8 sc, fasten off, leave long tail for sewing
— SMALL PLATES (make 6) :
Round 2 :
(inc; 2 sc)*2 (8)
Round 3 :
(inc; 3 sc)*2 (10)
Round 4 :
(inc; 4 sc)*2 (12)
Round 5 :
(inc; 5 sc)*2 (14)
Round 6 :
(inc; 6 sc)*2 (16)
Round 7 :
(inc; 7 sc)*2 (18)
Round 11 :
(1 sc; dec)*6 (12) change to light green color fold in half, close the hole with 6 sc, fasten off, leave long tail for sewing
— EXTRA SMALL PLATES (make 5) :
Round 2 :
(inc; 2 sc)*2 (8)
Round 3 :
(inc; 3 sc)*2 (10)
Round 4 :
(inc; 4 sc)*2 (12)
Round 7 :
6 dec (6) change to light green color fold in half, close the hole with 3 sc, fasten off, leave long tail for sewing
Info :
Fill plates with only bits of stuffing. Embroider with red yarn stripes on them
— BIG SPIKES (make 2) :
Round 3 :
(1 sc; inc)*3 (9)
Round 6 :
(2 sc; inc)*3 (12)
Round 7-11 :
12 sc (12) change to light green color
Round 12 :
FLO (1 sc; inc)*6 (18)
Round 13 :
18 sc (18) fasten off
— SMALL SPIKES (make 2) :
Round 3 :
(1 sc; inc)*3 (9)
Round 6 :
(2 sc; inc)*3 (12)
Round 7-10 :
12 sc (12) change to light green color
Round 11 :
FLO (1 sc; inc)*6 (18)
Round 12 :
18 sc (18) fasten off
This magnificent Stegosaurus pattern was designed to capture the prehistoric charm of one of the most recognizable dinosaurs through the art of crochet. With its innovative graduated ring construction and attention to anatomical details like the signature back plates and tail spikes, this pattern transforms simple stitches into an impressive display piece. The combination of multiple yarn colors and sizes of plates creates a dynamic, three-dimensional effect that brings this ancient creature to life in soft, huggable form. Whether you're a dinosaur enthusiast or looking for a challenging project that yields stunning results, this stegosaurus will become a cherished handmade treasure. 🦕🧶✨