About This Squirtle Amigurumi Pattern
Perfect for tucking into a backpack or sitting on a desk, this little turtle makes a fantastic gift for the gamers and 90s kids in your life who need a bit of desk-side moral support.
Ideal for those with basic crocheting experience, featuring slightly more advanced stitches and techniques to expand your skills.
Fits nicely into a free afternoon — 2 to 5 hours of focused, enjoyable crocheting.
Playful characters full of personality, designed to spark imagination and become cherished playtime favorites.
Perfect for tucking into a backpack or sitting on a desk, this little turtle makes a fantastic gift for the gamers and 90s kids in your life who need a bit of desk-side moral support.
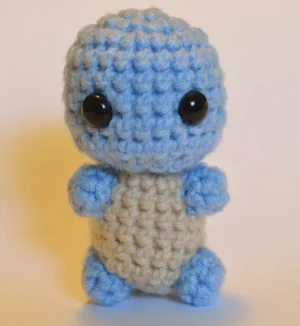
I honestly love how the shell is constructed as a separate piece—it adds so much texture and depth to the final toy. The curly tail is another favorite of mine; it is a simple folding technique that makes such a huge difference in his silhouette. It is just a really satisfying, nostalgic make!

I still remember the first time I picked Squirtle as my starter—there’s just something about that cheeky little face and the curly tail that gets me every time. When I sat down to write this pattern, I wanted to make sure he felt just as sturdy and round as he looks in the games. Working with worsted weight yarn and a 3.5mm hook is my sweet spot for amigurumi because it creates a fabric tight enough to keep the stuffing hidden but doesn't strain your hands too much.
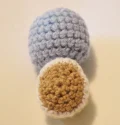
The trickiest part for me was getting the shell right. I experimented with a few different shapes before landing on this one, which uses white trim to really make the light brown pop. When you get to the body, don't be afraid to stuff it firmly! A well-stuffed Squirtle stands up better on his own, especially once you attach the tail. I usually keep mine right on my crochet shelf to keep me company while I work on new designs. I hope you enjoy making him as much as I did—he’s a true classic that never goes out of style. Happy hooking!
Ready to bring a bit of Kanto nostalgia into your craft room? This little Squirtle is the perfect project for any fan of the classic series. He is designed to be small and sturdy, featuring his iconic shell and that adorable swirled tail. You will love how quickly he comes together, and he is just the right size to sit on your desk or join you on your next adventure!
Start by making 2 ch, then work 8 sc into the very first chain you made. Alternatively, you can use a magic ring with 8 sc. (8)
Work an inc into every stitch around. (16)
(sc 1, inc) repeated 8 times around the circle. (24)
sc in every stitch around. (24)
sc in every stitch around. (24)
sc in every stitch around. (24)
sc 7, inc 1, sc 8, inc 1, sc 7. (26)
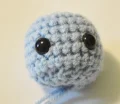
Now is a good time to place the safety eyes. Insert them 6 rounds down from the top, about 5 stitches apart, centered between the two increases you just made.
sc in each stitch around. (26)
sc 2, dec 11 times in a row, then sc 2. (15)
Stuff the head as firmly as you can before the opening gets too small.
sc 1, dec 6 times in a row, then sc 2. (9)
Add a final bit of stuffing to finish the head shape.
Cut your blue yarn, leaving a bit of a tail for sewing later, but do not fasten off. Switch to your beige yarn and tuck any loose blue ends into the head.
Using the beige yarn, inc in every stitch around. (18)
sc in every stitch around. (18)
sc in every stitch around. (18)
sc in every stitch around. (18)
sc in every stitch around. (18)
sc in every stitch around. (18)
Stuff the body firmly before you close the final round.
dec in each stitch until the opening is closed, then fo. (1)
Using light brown yarn, ch 2 and work 7 sc into the first ch, or use a magic ring with 7 sc. (7)
inc in every stitch around. (14)
(sc 3, inc 4) repeated 2 times around. (22)
Switch to white yarn and sc in every stitch around. (22)
Finish off with a sl st and leave a long tail for sewing the shell to the back.
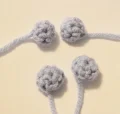
Using blue yarn, ch 2 and work 6 sc into the first ch, or use a magic ring with 6 sc. (6)
sc in each stitch around. (6)
fo with a sl st and leave a tail for assembly.
Using blue yarn, ch 2 and work 7 sc into the first ch, or use a magic ring with 7 sc. (7)
sc in each stitch around. (7)
fo with a sl st and leave a tail for assembly.
Using blue yarn, ch 2 and work 10 sc into the first ch, or use a magic ring with 10 sc. (10)
sc 2, inc 1, sc 4, inc 1, sc 2. (12)
sc in each stitch around. (12)
sc in each stitch around. (12)
sc in each stitch around. (12)
sc in each stitch around. (12)
sc in each stitch around. (12)
sc 2, dec 1, sc 4, dec 1, sc 2. (10)
sc in each stitch around. (10)
sc 4, dec 1, sc 4. (9)
sc in each stitch around, then fo with a sl st. (9)
Take the tip of the tail (where you started) and fold it over. Sew it down to create a permanent curl, then sew the base of the tail to the lower part of the shell.
I am so excited for you to finish your very own Squirtle! There is nothing quite like the feeling of seeing a pile of yarn transform into a recognizable character that brings back so many childhood memories. Whether you are keeping him for your own collection or giving him away to a fellow fan, he is sure to be a hit. Don't forget to take a moment to appreciate those tiny little arms and legs once they are all attached—they really bring the whole look together. I can't wait to see your finished work and the colors you choose! Keep on crafting and stay creative. 🧶✨🐢
You certainly can, but 10mm eyes give him that classic 'chibi' look. If you use 8mm, he might look a bit more serious, and 12mm will make him look extra kawaii! Just ensure they are secured tightly.
Yes, but your Squirtle will turn out significantly smaller. Make sure to drop your hook size to a 2.5mm or 3.0mm so your stitches stay tight enough that the stuffing won't peek through.
After finishing the tail, fold the starting end (Round 1) over towards the middle and use a small piece of blue yarn to stitch it in place. This creates that permanent 'swirl' effect.
The tail acts as a tripod! Make sure you sew the tail low enough on the shell so that it touches the ground when he is sitting. You can also add a few heavy plastic pellets in the bottom of the body before stuffing.
