🧶 Beautiful ✨ Detailed 💝 Adorable

Baby Dinosaur Hatching Eggs Amigurumi Pattern

Baby Dinosaur Hatching Eggs Amigurumi Pattern
4.0★ Rating
4-5 Hours Time Needed
3.3K Made This
✂️

Intermediate Level

Ideal for those with basic knitting experience, featuring slightly more advanced stitches and techniques to expand your skills.

⏱️

Weekend Treat

Takes 5-7 hours, making it an enjoyable project to finish over a couple of days.

🧸

Cute Companion

An adorable friend to cherish, handcrafted with love to bring comfort and joy for years to come.

About This Baby Dinosaur Hatching Eggs Amigurumi Pattern

This delightful pattern creates baby dinosaurs emerging from their decorative eggshell homes. Each piece is carefully constructed using joined rounds technique, featuring charming bobble-stitch noses and customizable spikes along their backs. The eggshells showcase a beautiful polka dot pattern achieved through strategic color changes, with scalloped edges adding an extra touch of elegance. With four color combinations to choose from, you can create an entire family of unique dino babies!

Baby Dinosaur Hatching Eggs Amigurumi Pattern crochet pattern - detailed view of completed project

The pattern breaks down into seven manageable pieces for the dinosaur (head top/bottom, mouth top/bottom, body, tail, and spikes) plus two eggshell components. Detailed photo tutorials guide you through specialty stitches and assembly, making this intermediate project achievable and rewarding.

Why You'll Love This Baby Dinosaur Hatching Eggs Amigurumi Pattern

I absolutely love how this pattern combines technical skill-building with pure cuteness! The bobble-stitch nose technique taught me a new way to add dimension to amigurumi faces, and the color-change polka dots on the eggshells are surprisingly meditative to create. What really won my heart is how the baby dinos can actually sit inside their shells—it's such a clever interactive element that makes them perfect for imaginative play or eye-catching display pieces. The satisfaction of assembling all seven pieces into one cohesive character is incredibly rewarding!

Baby Dinosaur Hatching Eggs Amigurumi Pattern step 1 - construction progress Baby Dinosaur Hatching Eggs Amigurumi Pattern step 2 - assembly progress Baby Dinosaur Hatching Eggs Amigurumi Pattern step 3 - details and accessories Baby Dinosaur Hatching Eggs Amigurumi Pattern step 4 - final assembly and finishing

Switch Things Up

I love experimenting with this pattern to create unique variations! Instead of the traditional dinosaur colors, I've tried making pastel rainbow babies using soft lavenders, mint greens, and peachy pinks—they look absolutely dreamy in a nursery setting. You could also add embroidered details like tiny hearts or stars to the eggshells for extra personality.

For a more realistic approach, I've used earth-tone yarns in browns, tans, and mossy greens to create little forest dinosaurs. The spikes look amazing when you use variegated yarn that shifts between complementary colors. I've even made holiday versions with red and green for Christmas ornaments!

If you want to make them extra special as gifts, try personalizing each one—add a tiny crocheted bow, create different facial expressions by varying eye placement, or even embroider the recipient's initial on the eggshell. The bobble-stitch nose technique can be adjusted to create different snout shapes too. Some of my favorites have been made with metallic accent yarn in the spikes for a magical, sparkly effect that kids absolutely adore!

Common Mistakes & How to Fix Them

✗ Forgetting to work in joined rounds instead of spiral—always start each round with chain 1 and join with slip stitch ✗ Skipping the slip stitches after bobble stitches in Round 5 of the head, which throws off your stitch count completely ✗ Not gluing interfacing fabric to the body bottom before continuing rounds, making your dinosaur wobbly and unable to stand properly ✗ Pulling polka dot color changes too tightly on the eggshell, causing puckering—keep consistent tension when switching between colors ✗ Sewing head pieces together without pinning first, resulting in misaligned mouth opening and uneven head shape

Baby Dinosaur Hatching Eggs Amigurumi Pattern

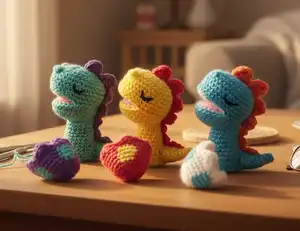
Bring these adorable baby dinosaurs to life with this charming crochet pattern! Each sleepy dino comes with its own cozy eggshell house, creating an enchanting hatching scene. Perfect for nursery decor, unique gifts, or adding whimsy to your amigurumi collection. The pattern includes four color variations and features sweet details like bobble-stitch noses, colorful spikes, and polka-dotted shells. Create magical moments with these precious prehistoric pals!

Intermediate 4-5 Hours

Materials Needed for Baby Dinosaur Hatching Eggs Amigurumi Pattern

— Main Fabric

  • 01
    Worsted weight 100% acrylic yarn in four colors: Color A (head, body, tail, and polka dots), Color B (spikes), Color C (mouth), Color D (eggshells)
  • 02
    Knit Picks Brava Worsted recommended - 100% acrylic, 100g/218yds in colors: Tranquil, Cornflower, Canary, Cotton Candy (main colors); Freesia, Orange, Rouge (spike colors); Cotton Candy, Blush, Mint (mouth colors); Freesia, White, Rouge (shell colors)

— Tools Required

  • 01
    4.5mm crochet hook (US: 7, UK: 7, JP: 7.5/0)
  • 02
    Tapestry needle
  • 03
    Scissors
  • 04
    Black wool felt for eyes
  • 05
    Interfacing fabric (or wool felt substitute)
  • 06
    Polyester fiberfill stuffing
  • 07
    Yarn glue
  • 08
    Pins or stitch markers

Progress Tracker

0% Complete

— HEAD - TOP (in color A):

Foundation:

Ch 6. Stitches are worked around both sides of the foundation chain.

Rnd 1:

Start in the second ch from hook, 4 sc, (3 sc) in the last ch. Continue on the other side of the foundation chain, 3 sc, inc [12]

Rnd 2:

Inc, 3 sc, 3 inc, 3 sc, 2 inc [18]

Rnd 3:

Sc, inc, 4 sc, [inc, sc] 3 times, 3 sc, inc, sc, inc [24]

Rnd 4:

Sc, inc, 5 sc, [inc, sc, (2-dc-bobble, sl st)] 2 times, inc, 5 sc, inc, 2 sc, inc, sc [32]

Rnd 5:

11 sc, [sc in next st BLO, skip next sl st from the previous row], 3 sc, [sc in next st BLO, skip next sl st from the previous row], 14 sc [30]

Rnd 6-9:

[Sc] around [30]

Info:

Fasten off. Weave in and hide yarn ends.

— MOUTH - TOP (in color C):

Foundation:

Ch 6. Stitches are worked around both sides of the foundation chain.

Rnd 1:

Start in the second ch from hook, 4 sc, (3 sc) in the last ch. Continue on the other side of the foundation chain, 3 sc, inc [12]

Rnd 2:

Inc, 3 sc, 3 inc, 3 sc, 2 inc [18]

Rnd 3:

Sc, inc, 4 sc, [inc, sc] 3 times, 3 sc, inc, sc, inc [24]

Rnd 4:

Sc, inc, 5 sc, [inc, sc, (2-dc-bobble, sl st)] 2 times, inc, 5 sc, inc, 2 sc, inc, sc [32]

Info:

Fasten off and leave a long tail for sewing.

— HEAD - BOTTOM (in color A):

Foundation:

Ch 4. Stitches are worked around both sides of the foundation chain.

Rnd 1:

Start in the second ch from hook, 2 sc, (3 sc) in the last ch. Continue on the other side of the foundation chain, sc, inc [8]

Rnd 2:

Inc, sc, 3 inc, sc, 2 inc [14]

Rnd 3:

Sc, inc, 2 sc, [inc, sc] 3 times, [sc, inc] 2 times [20]

Rnd 4:

Sc, inc, 3 sc, [inc, 2 sc] 3 times, sc, inc, 2 sc, inc, sc [26]

Rnd 5-6:

[Sc] around [26]

Info:

Fasten off. Weave in and hide yarn ends.

— MOUTH - BOTTOM (in color C):

Foundation:

Ch 4. Stitches are worked around both sides of the foundation chain.

Rnd 1:

Start in the second ch from hook, 2 sc, (3 sc) in the last ch. Continue on the other side of the foundation chain, sc, inc [8]

Rnd 2:

Inc, sc, 3 inc, sc, 2 inc [14]

Rnd 3:

Sc, inc, 2 sc, [inc, sc] 3 times, [sc, inc] 2 times [20]

Rnd 4:

Sc, inc, 3 sc, [inc, 2 sc] 3 times, sc, inc, 2 sc, inc, sc [26]

Info:

Fasten off and leave a long tail for sewing.

— BODY (in color A):

Rnd 1:

Start 6 sc in a magic ring [6]

Rnd 2:

[Inc] 6 times [12]

Rnd 3:

[Sc, inc] 6 times [18]

Rnd 4:

[2 sc, inc] 6 times [24]

Rnd 5:

Working in BLO, sc in each sc around [24]

Info:

Glue a piece of interfacing fabric (or felt) cut into a circle to the size of the bottom of the body on the wrong side of your piece. This makes the bottom stiff and flat so the dinosaur stands by himself.

Rnd 6-7:

[Sc] around [24]

Rnd 8:

[6 sc, dec] 3 times [21]

Rnd 9-10:

[Sc] around [21]

Rnd 11:

[5 sc, dec] 3 times [18]

Rnd 12-13:

[Sc] around [18]

Info:

Fasten off and leave a long tail for sewing.

— TAIL (in color A):

Rnd 1:

Start 4 sc in a magic ring [4]

Rnd 2:

[Sc] around [4]

Rnd 3:

Sc, 2 inc, sc [6]

Rnd 4:

[Sc] around [6]

Rnd 5:

2 sc, 2 inc, 2 sc [8]

Rnd 6:

[Sc] around [8]

Rnd 7:

3 sc, 2 inc, 3 sc [10]

Rnd 8:

[Sc] around [10]

Info:

Fasten off and leave a long tail for sewing.

— SPIKES (in color B):

Instructions:

[Ch 3, hdc into the second ch from hook] 3 times, [ch 4, 2 dc into the 3rd ch from hook] 2 times, [ch 5, 3 dc into the 4th ch from hook] 2 times [3 small spikes, 2 medium spikes and 2 large spikes]

Info:

Fasten off and leave a long tail for sewing.

— EGGSHELL - TOP (start in color D):

Rnd 1:

Start 6 sc in a magic ring [6]

Rnd 2:

[Inc] 6 times [12]

Rnd 3:

[Sc, inc] 6 times [18]

Rnd 4:

[Sc] around [18]

Info:

Continue working next few rounds to make a polka dot pattern, alternating color D and color A according to the diagram. Brown text = color D, Blue text = color A.

Rnd 5:

Sc, (sc, sc) in same st, 2 sc, [inc, 2 sc, (sc, sc) in same st, 2 sc] 2 times, inc, sc [24]

Rnd 6:

2 sc, [4 sc, 4 sc] 2 times, 4 sc, 2 sc [24]

Rnd 7:

2 sc, [sc, inc, 2 sc, sc, inc, 2 sc] 2 times, sc, inc, 2 sc, sc, inc [30]

Rnd 8:

3 sc, [4 sc, 6 sc] 2 times, 4 sc, 3 sc. Cut color A and weave in and hide yarn end and continue working in color D [30]

Rnd 9:

[4 sc, inc] 6 times [36]

Rnd 10:

[(sc, hdc, dc, hdc, sc) into same st, skip 2 st, sl st, skip 2 st] 6 times [6 shells]

Info:

Fasten off. Weave in and hide yarn ends.

— EGGSHELL - BOTTOM (start in color D):

Rnd 1:

Start 6 sc in a magic ring [6]

Rnd 2:

[Inc] 6 times [12]

Rnd 3:

[Sc, inc] 6 times [18]

Rnd 4:

[2 sc, inc] 6 times [24]

Rnd 5:

[3 sc, inc] 6 times [30]

Rnd 6:

[4 sc, inc] 6 times [36]

Info:

Continue working next few rounds to make a polka dot pattern, alternating color D and color A. Brown text = color D, Blue text = color A.

Rnd 7:

Sc, 3 sc, [6 sc, 3 sc] 3 times, 5 sc [36]

Rnd 8:

Sc, 4 sc, [5 sc, 4 sc] 3 times, 4 sc [36]

Rnd 9:

Sc, 4 sc, [5 sc, 4 sc] 3 times, 4 sc [36]

Rnd 10:

2 sc, 3 sc, [6 sc, 3 sc] 3 times, 4 sc. Change the yarn color at the last step of this round [36]

Rnd 11:

Sc, 6 sc, [3 sc, 6 sc] 3 times, 2 sc [36]

Rnd 12:

2 sc, 5 sc, [4 sc, 5 sc] 3 times, 2 sc [36]

Rnd 13:

2 sc, 5 sc, [4 sc, 5 sc] 3 times, 2 sc [36]

Rnd 14:

2 sc, 6 sc, [3 sc, 6 sc] 3 times, sc. Change the yarn color at the last step of this round [36]

Rnd 15:

[Sc] around [36]

Info:

Cut the color A and weave in and hide yarn ends.

Rnd 16 - BLO:

Working this round in BLO, sc in each st around [36]

Rnd 17:

[7 sc, dec] 4 times [32]

Rnd 18-25:

[Sc] around [32]

Rnd 26:

[6 sc, dec] 4 times [28]

Rnd 27:

[5 sc, dec] 4 times [24]

Rnd 28:

[4 sc, dec] 4 times [20]

Rnd 29:

[Dec] 5 times [10]

Info:

Fasten off and draw the yarn end through all 10 sts and pull tight to close the opening. Weave in and hide yarn ends. Push the upper half of the eggshell inwards to make it cup-shaped. Row 16 should be the border.

Rnd 16 - FLO (Scalloped Edge):

Attach yarn to any st of the remaining half front loop of Rnd 15. [(sc, hdc, dc, hdc, sc) into the same st, skip 2 sts, sl st, skip 2 sts] rep 6 times [6 scallops]

Info:

Fasten off and leave a long tail for sewing.

Assembly Instructions

  • Cut fabric (or felt) into ovals slightly smaller than each top and bottom of the mouth. Glue to the wrong side of the mouth pieces.
  • Sew the mouth pieces to the head pieces with yarn end and tapestry needle, stuffing as you sew. Pick up front loops of each piece when sewing.
  • Position the head top and bottom pieces together with the top portion slightly overhanging the bottom. Pin in place.
  • Using head color scrap yarn, sew top and bottom of head together along the back with 12 stitches equally from the center, picking up unworked half loops.
  • Place the head on top of the body at a slight angle. Sew together with whipstitches.
  • Sew the tail to the back of the body.
  • Pin the spikes onto the body along the back and head, then sew securely in place.
  • Cut black felt eyes using the template provided. Glue the eyes onto the head in desired position.

Important Notes

  • 💡This project uses joined rounds instead of spiral—always begin each round with ch 1 and join with slip stitch
  • 💡When working bobble stitches for the nose, make sure to skip the slip stitch in the following round to maintain correct stitch count
  • 💡Glue interfacing fabric to the body bottom before continuing to ensure your dinosaur stands upright and stable
  • 💡Use stitch markers or pins to position pieces before sewing for best results and proper alignment
  • 💡Manage your yarn ends carefully when creating polka dot patterns by crocheting over unused yarn to keep work neat
  • 💡The eye template can be taped to felt for easier cutting—remove tape after cutting to avoid damaging the felt
  • 💡Stuff the body and head firmly but not too tightly to maintain proper shape and allow the dinosaur to sit in the eggshell

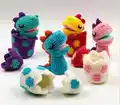
This enchanting Baby Dinosaur Hatching Eggs pattern combines technical crochet skills with pure whimsy to create an irresistible nursery decoration or gift! The joined rounds technique ensures clean, professional-looking pieces, while the bobble-stitch details and color-change polka dots add delightful texture and visual interest. Whether you choose cheerful greens, soft pinks, sunny yellows, or cool blues, each little dino develops its own personality as you bring it to life. The interactive element of nestable eggshells makes these perfect for imaginative play or charming display pieces. 🦕🥚 Happy crocheting! 🧶✨

You ask,

we answer.

FAQs

Can I use different yarn weights for this pattern?

While the pattern is designed for worsted weight yarn, you can use different weights—just remember that your finished dinosaur will be larger or smaller depending on your choice. Adjust your hook size accordingly and be sure to use interfacing fabric on the body base for stability.

What does 'joined rounds' mean and why is it used instead of spiral?

Joined rounds means you complete each round by joining with a slip stitch to the first stitch, then start the next round with a chain 1. This creates a cleaner finish than spiral rounds and is particularly important for this pattern's color changes and bobble stitches.

How do I create the polka dot pattern on the eggshell?

The polka dots are created by alternating between two yarn colors (Color D and Color A) according to the pattern diagram. You'll carry the unused yarn behind your work and crochet over it. Detailed instructions for managing yarn during color changes are included on page 4 of the pattern.

Do I need to stuff the tail and spikes?

The tail should be lightly stuffed to help it hold its shape, but the spikes are not stuffed—they're simply sewn onto the body and head as decorative elements.

Can the dinosaur actually sit inside the eggshell?

Yes! The eggshell bottom is designed to be cup-shaped (by pushing the upper half inwards at Round 16) so the dinosaur can nestle inside. This makes it perfect for interactive play or creating cute display arrangements.

What can I use instead of interfacing fabric?

You can substitute wool felt for interfacing fabric. The important thing is to use something sturdy that will stiffen the bottom of the body so your dinosaur can stand upright on its own.