🧶 Beautiful ✨ Detailed 💝 Adorable

Pua Poa Beach Swimsuit Coverup Pattern

Pua Poa Beach Swimsuit Coverup Pattern
4.1★ Rating
8-12 Hours Time Needed
3.1K Made This
✂️

Intermediate Level

Ideal for those with basic knitting experience, featuring slightly more advanced stitches and techniques to expand your skills.

⏱️

All-Day Adventure

Requires 8-10 hours, ideal for a full day of immersive knitting.

🌟

Elegant Drape

Soft flow with graceful movement, designed to flatter all body types with sophisticated comfort.

About This Pua Poa Beach Swimsuit Coverup Pattern

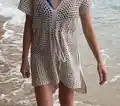
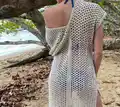
This stunning beach coverup is worked lengthwise in two identical panels that are seamed together to create a beautiful V-neckline. The airy mesh stitch pattern creates gorgeous drape while maintaining coverage, making it perfect for wearing over your swimsuit from beach to boardwalk. The design includes a handmade crochet cord belt that threads through the middle, allowing you to cinch and style it exactly how you like. With nine different size options and easily adjustable measurements, this pattern ensures a custom fit that flatters your unique shape.

Pua Poa Beach Swimsuit Coverup Pattern crochet pattern - detailed view of completed project

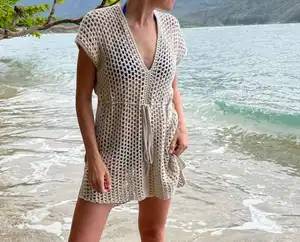
The coverup features strategic side seaming that creates comfortable arm openings and allows for freedom of movement while maintaining an elegant silhouette. The pattern includes helpful photos throughout to guide you, and the flexible gauge means you don't need to stress about perfection—this design is forgiving and beautiful no matter what.

Why You'll Love This Pua Poa Beach Swimsuit Coverup Pattern

I absolutely love how this coverup combines simplicity with sophistication. The mesh stitch is incredibly meditative to work—once you get into the rhythm, you'll fly through the rows while creating something truly stunning. I designed this because I couldn't find the perfect coverup during my time in Hawaii, and I wanted something that was elegant enough for dinner but practical enough for the beach. What I love most is how customizable it is—you can adjust the length, the neckline depth, the arm openings, and even add your own creative touches. The drape is absolutely gorgeous, and there's something so satisfying about wearing something you made yourself that fits perfectly and makes you feel confident and beautiful.

Pua Poa Beach Swimsuit Coverup Pattern step 1 - construction progress Pua Poa Beach Swimsuit Coverup Pattern step 2 - assembly progress Pua Poa Beach Swimsuit Coverup Pattern step 3 - details and accessories Pua Poa Beach Swimsuit Coverup Pattern step 4 - final assembly and finishing

Switch Things Up

I'm always amazed at how versatile this coverup pattern can be with just a few creative tweaks. First, try experimenting with color blocking by switching yarn colors every few rows to create beautiful stripes or an ombre effect that transitions from light to dark. You could also make this in a solid black or white for a more classic, sophisticated look that works beyond the beach.

For a boho vibe, add fringe along the bottom hem or sleeves by attaching strands of yarn and trimming them to your desired length. I've also seen makers add beads to the belt or weave metallic thread through some of the chain spaces for subtle sparkle. If you want more coverage, simply work a few extra rows before the final dc row, or make the arm openings smaller by adjusting the measurements in the side seaming.

Another fun variation is to make this as a layering piece over tank tops and jeans by using a heavier weight yarn and making it slightly shorter. You could even add pockets by crocheting small pouches and seaming them to the side panels before assembly. The mesh stitch also looks stunning in variegated yarn, which creates an organic, flowing color pattern without any effort. Don't be afraid to make this pattern your own!

Common Mistakes & How to Fix Them

✗ Skipping the gauge swatch can result in a coverup that's too tight or too loose—always make a test square first to ensure proper fit and drape ✗ Not trying on the coverup before finishing the center seam may lead to a neckline that's too tight or too loose—test the opening before securing it permanently ✗ Forgetting to count your foundation double crochet stitches carefully can throw off the entire width of your panel—use stitch markers every 20 stitches to keep track ✗ Seaming too tightly can eliminate the beautiful drape and flow of the fabric—keep your seaming stitches loose and flexible for the best movement ✗ Not measuring the arm openings properly can result in uncomfortable or unflattering fit—measure on your body or a similar garment to get the spacing just right

Pua Poa Beach Swimsuit Coverup Pattern

Create your perfect beach companion with this gorgeous swimsuit coverup pattern inspired by the beautiful shores of Kauai, Hawaii. This versatile design features an elegant drape with customizable sizing from XS to 5XL, making it ideal for any body type. The pattern uses a simple yet stunning mesh stitch that works up quickly and creates beautiful flow, while the adjustable belt adds a flattering touch to define your waist. With detailed instructions for creating two panels that seam together and customizable arm openings, you'll craft a coverup that fits you perfectly and becomes your go-to beach essential all summer long.

Intermediate 8-12 Hours

Materials Needed for Pua Poa Beach Swimsuit Coverup Pattern

— Main Fabric

  • 01
    Lion Brand Pima Cotton Yarn, Weight 4/Worsted/Medium, 186 yards per 100g ball
  • 02
    Color: Vintage - 4 to 7 balls depending on size (XS needs 4, 5XL needs 7)

— Tools Required

  • 01
    Crochet hook size 5.5mm
  • 02
    Tapestry needle
  • 03
    Stitch markers
  • 04
    Measuring tape
  • 05
    Scissors

Progress Tracker

0% Complete

— Panel (Make 2) :

Row 1 :

FDC 216(218, 220, 222, 224)(226, 228, 230, 232), ch 3, turn

Row 2 :

sk next st, (dc in next st, ch 1, sk 1) x across, ch 3, turn

Row 3 :

(dc in next ch sp, ch 1) x across

Row 4-17(21, 25, 29, 33)(37, 41, 45, 49) :

repeat row 3, ch 2, turn

Row 18(22, 26, 30, 34)(38, 42, 46, 50) :

dc in each st across

Info :

Fasten off and weave in end

— Belt :

Info :

Determine how long you want your belt to be and cut a length of yarn that is SEVEN (7) times that long

Step 1 :

Fold the strand of yarn to where one side is about 1/3 longer than the other side

Step 2 :

Slip knot into your hook at the fold you just made

Step 3 :

Take the shorter end of the yarn to the back and into your hand as your working end. The longer end will dangle forward towards you

Step 4 :

Yarn over from the non-working-hand yarn strand (the one dangling forward) from front to back over your hook

Step 5 :

Yarn over with your working side of the yarn strand just like a normal yarn over and pull through both loops on the hook

Step 6 :

Repeat steps 4 and 5 until the entire yarn strand has been used up

Step 7 :

When complete, pull both yarn ends through the final loops and tie off

Assembly Instructions

  • Lay the two panels lengthwise side by side with the final dc rows together in the middle, wrong side facing out
  • From the edge of the coverup moving toward center, seam the sides together through the back two loops only for 20 inches - this creates the front of the coverup
  • Repeat seaming on the opposite end for 27 inches, creating the neckline opening in the middle where your head will go through
  • Try on the coverup before tying off to ensure you're happy with the V-neckline depth, adjust if needed, then secure and weave in ends
  • Fold the coverup in half from top to bottom (wrong side out), leaving a 6 to 9 inch offset between front and back with the back being longer
  • Measure 7 to 9 inches from the shoulder for the arm opening, then whip stitch through 3 stitches down toward the hem
  • Count 14 stitches down and whip stitch through the next 3 stitches, repeat this pattern until you reach the end leaving a gap on the outer thigh
  • Weave the belt through every other loop around the middle of the coverup at your desired height

Important Notes

  • 💡The turning chain of 3 counts as your first dc stitch of each row throughout the pattern
  • 💡Foundation double crochet can be tricky - watch a tutorial video if you're unfamiliar with this technique before starting
  • 💡Gauge is flexible for this pattern due to the drape and stretch, but check measurements as you work to ensure proper fit
  • 💡Try on the coverup multiple times during assembly to customize the fit to your body and preferences
  • 💡The wrong side and right side will look very similar due to the mesh stitch pattern, so mark your chosen wrong side early
  • 💡Keep your seaming stitches loose to maintain the beautiful drape and flow of the fabric
  • 💡The offset between front and back creates a flattering longer back hem - adjust this measurement to your preference

This Pua Poa Beach Coverup pattern was born from sun-soaked days in Hawaii and the desire for the perfect beach-to-dinner piece. The flowing mesh stitch creates stunning drape while the customizable sizing ensures everyone can enjoy this elegant design. Whether you're lounging by the pool or strolling the boardwalk, this coverup will become your favorite handmade essential. The simple construction makes it achievable while the result looks incredibly sophisticated and polished. 🧶 Happy crocheting and enjoy your beach adventures! 🌺✨

You ask,

we answer.

FAQs

What if I want to make the coverup longer or shorter?

You can easily adjust the length by adding or subtracting rows in step 4 of the panel instructions. Each row adds approximately half an inch to the length, so calculate how many rows you need to add or remove based on your desired change. Just make sure both panels match!

Can I use a different yarn weight for this pattern?

Yes, but you'll need to adjust your hook size and make a new gauge swatch. Lighter weight yarns will create a more delicate, flowy coverup while heavier yarns will create more structure. Just recalculate your stitch count based on your new gauge to maintain the proper width.

How do I know which size to make?

Measure your bust circumference and compare it to the sizing chart in the pattern. The coverup is designed to be loose and flowy, so if you're between sizes, consider going with the smaller size for a more fitted look or the larger size for maximum drape and coverage.

What's the best way to learn foundation double crochet if I've never done it?

Search for foundation double crochet tutorials on YouTube - seeing it in action makes it much easier to understand. Practice making a small swatch of 20-30 stitches before starting your actual project so you can get comfortable with the technique and rhythm.

Can I make this coverup without the belt?

Absolutely! The coverup looks beautiful without the belt for a more relaxed, flowing look. You can also substitute a ribbon, chain belt, or pre-made tie instead of making the crochet cord if you prefer a different style.