🧢 Beautiful ✨ Detailed πŸ’ Adorable

Super Simple Slipper Socks Pattern

Super Simple Slipper Socks Pattern
4.8β˜… Rating
3-4 Hours Time Needed
3.2K Made This
βœ‚οΈ

Beginner Friendly Level

Perfect for those just starting their sewing journey, with clear instructions and simple techniques

⏱️

Bite-Sized Project

Complete in under 2 hoursβ€”quick, fun, and perfect for a little creative escape.

β˜•

Warm Welcome

A comforting piece for home or gifts that brings handmade warmth to everyday moments and special occasions.

About This Super Simple Slipper Socks Pattern

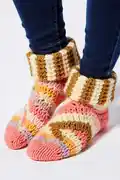
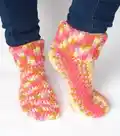
The Super Simple Slipper Socks pattern is designed for maximum comfort and ease of construction. Starting with a magic ring toe and working upward, the sock body is created in continuous rounds using half treble crochet stitches. The ribbed cuff is worked separately and then attached, giving you the flexibility to wear these socks with the cuff up or down. These versatile socks sit just above ankle height and are sized to fit adult UK shoe size 8 and below, making them perfect for most adults.

Super Simple Slipper Socks Pattern crochet pattern - detailed view of completed project

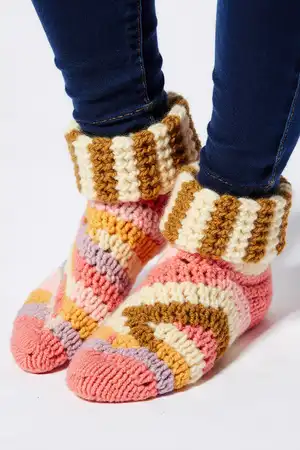
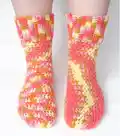
The pattern uses approximately 100g of worsted weight yarn in a 50/50 acrylic-wool blend for warmth and durability. Self-striping yarn is recommended to create beautiful color transitions and hide joins seamlessly.

Why You'll Love This Super Simple Slipper Socks Pattern

I absolutely love this pattern because it's perfect for cozy winter evenings! These socks work up so quickly that you can make a pair in just one sitting while watching your favorite show. I appreciate how the self-striping yarn does all the work of creating beautiful color patterns without any complicated color changes. The separate cuff attachment is brilliant because it gives you two wearing options - cuff up for extra warmth or cuff down for a slouchy look. Plus, they make fantastic last-minute gifts that everyone appreciates during the cold months!

Super Simple Slipper Socks Pattern step 1 - construction progress Super Simple Slipper Socks Pattern step 2 - assembly progress Super Simple Slipper Socks Pattern step 3 - details and accessories Super Simple Slipper Socks Pattern step 4 - final assembly and finishing

Switch Things Up

I love experimenting with this super versatile pattern! One of my favorite variations is making the cuff extra long - instead of stopping at row 27, I continue to row 40 for a boot-sock style that can be scrunched down or worn tall. It's perfect for those really cold winter mornings!

For a more decorative look, I sometimes work the cuff in a contrasting color to the main sock body. The color-block effect is stunning, especially when you use a neutral for the foot and a bright pop of color for the cuff. You could even make the entire sock in stripes by changing colors every few rounds.

I've also added surface crochet designs or simple embroidery to personalize these socks as gifts. Little hearts, stars, or initials on the cuff make them extra special. For kids' versions, I scale down the pattern and add fun appliquΓ©s like animals or flowers.

Another twist I enjoy is making these with chunky weight yarn and a larger hook (6-7mm) for super thick, ultra-cozy bed socks. They work up even faster and are incredibly warm! Just adjust your gauge accordingly and expect a slightly different finished size.

Common Mistakes & How to Fix Them

βœ— Not checking gauge before starting can result in socks that are too tight or too loose for your feet βœ— Forgetting to pull the magic ring tight at the beginning can leave an unsightly hole at the toe βœ— Joining rounds with slip stitches too tightly can create visible bumps and affect the sock's stretch βœ— Not flattening the sock properly before attaching the cuff can result in misaligned or twisted seams βœ— Overstuffing or understuffing makes the sock lose its shape and comfort - these should not be stuffed at all βœ— Working the cuff rows too loosely can make the ribbing look sloppy and reduce the stretchy fit

Super Simple Slipper Socks Pattern

Create your own cozy slipper socks with this beginner-friendly crochet pattern! These comfortable ankle-height socks are perfect for lounging at home and make wonderful handmade gifts. The pattern uses simple half treble stitches worked in the round, starting from a magic ring and building up to create a seamless sock with a ribbed cuff. Made with worsted weight yarn and a 5mm hook, these socks work up quickly and are ideal for keeping your feet warm during chilly evenings. The self-striping yarn option adds beautiful color variation without any complicated color changes.

Beginner Friendly 3-4 Hours

Materials Needed for Super Simple Slipper Socks Pattern

β€” Main Fabric

  • 01
    100g (1 ball) of worsted weight yarn in acrylic/wool mix (50/50 blend)
  • 02
    Aldi's So Crafty acrylic/wool mix or similar alternatives
  • 03
    Cascade Pacific Multis (alternative option)
  • 04
    Stylecraft Life Heritage (alternative option)
  • 05
    Self-striping yarn recommended for easy color variation

β€” Tools Required

  • 01
    5mm crochet hook
  • 02
    Scissors
  • 03
    Tapestry needle for weaving in ends
  • 04
    Stitch markers (optional but helpful)

Progress Tracker

0% Complete

β€” Main Sock :

Round 1 :

Work 9 Htr stitches into a magic ring. Pull the ring closed and Sl St to the beginning Htr. (9)

Round 2 :

Ch2 (does not count as a stitch). Htr Inc in the stitch at the bottom of the Ch2, Htr inc into each st around. (18)

Round 3 :

Ch2 (does not count as a stitch). Htr in the stitch at the bottom of the Ch2, 2HTr into the next stitch. *Htr 1, Htr inc into the next*. Repeat from *to* around. Sl St to the top of the first Htr. (27)

Rounds 4-37 :

Ch2 (does not count as a stitch), work 1Htr into the stitch at the bottom of the Ch2, 1Htr into each stitch around.

Info :

At the end of Round 37 FO. We will work the cuff of the sock separately and attach to the sock at the end.

β€” Sock Cuff :

Row 1 :

Ch 14, 1Htr into the 3rd Ch from the hook and each of the next 11 stitches. Ch 2 and turn.

Row 2 :

1 Htr into the BL of each stitch to the end. Ch2 and turn.

Rows 3-27 :

1Htr into the BL of each stitch, Ch2 and turn. At the end of row 27 omit the Ch2 and turn DO NOT FASTEN OFF.

β€” Attaching the Cuff :

Info :

With the WS of the sock facing you flatten the sock and determine the central point. We will begin attaching the cuff using a simple DC at the central point of the sock when flat.

Attachment Process :

Insert your hook through one row of the cuff and one stitch of the sock top, yarn over and pull through, yarn over and pull through both loops to make a stitch. Continue around the top of the sock attaching the cuff in this manner. One stitch on the sock body will coincide with the top of each of the rows on the cuff.

Seaming :

When you reach the end of the top rim do not fasten off, we will now seam the cuff. DC the cuff seam together in the same way as you attached the cuff to the sock. You will have 12 stitches down the seam.

Finishing :

Once you have completed the cuff seam FO and weave in the ends.

Assembly Instructions

  • Flatten the completed sock body with the wrong side facing you to identify the central point for cuff attachment
  • Begin attaching the ribbed cuff at the center point using double crochet stitches through both the cuff row edge and sock top stitches
  • Work around the entire sock opening, matching one sock stitch to each cuff row end for even distribution
  • When you reach the starting point, continue with double crochet to seam the two short ends of the cuff together creating 12 stitches down the seam
  • Fasten off securely and weave in all yarn ends using your tapestry needle for a professional finish
  • Block lightly if desired by gently steaming to even out stitches and improve drape

Important Notes

  • πŸ’‘Always check your gauge before starting to ensure the socks will fit properly - 13 Htr x 11 rows should equal 4 inches square
  • πŸ’‘Self-striping yarn is highly recommended as it disguises the joins between rounds and eliminates color change work
  • πŸ’‘The Ch2 at the beginning of rounds does not count as a stitch throughout this pattern
  • πŸ’‘Work the back loops only (BL) sections carefully to create the ribbed texture effect on the cuff
  • πŸ’‘The socks are reversible and can be worn with cuff up (32cm length) or cuff down (40cm length) for different looks
  • πŸ’‘These socks are designed as slipper socks for indoor wear and are not suitable for wearing inside shoes
  • πŸ’‘Make a second sock immediately while the pattern is fresh in your mind to ensure they match perfectly

These Super Simple Slipper Socks are the perfect introduction to crochet sock-making without any complicated heel shaping or complex techniques. The pattern combines basic half treble stitches with a clever separately-worked cuff that gives you styling flexibility. Whether you're making them for yourself or as thoughtful handmade gifts, these cozy socks will keep feet warm and comfortable all winter long. The self-striping yarn creates beautiful color variations that make each pair unique and special. 🧢 Happy crocheting! 🧡✨

You ask,

we answer.

FAQs

Can I adjust the size of these socks for larger or smaller feet?

Yes! To make larger socks, continue the increase pattern in the early rounds until you reach your desired width, then work more rounds before starting the cuff. For smaller sizes, work fewer increase rounds at the beginning. Always check your gauge and adjust accordingly.

What is the difference between UK and US crochet terms for this pattern?

This pattern uses UK terminology. The main stitch used is Half Treble (Htr) which is called Half Double Crochet (HDC) in US terms. The DC used for joining is called Single Crochet (SC) in US terminology.

Can I use regular yarn instead of self-striping yarn?

Absolutely! You can use any worsted weight yarn in solid colors or work with multiple colors by changing yarns at the end of rounds. Just be aware that joins may be more visible with solid colors.

Why is the cuff worked separately instead of directly onto the sock?

Working the cuff separately allows you to create the ribbed texture by working into back loops only in flat rows, which creates better stretch and definition. It also gives you the option to wear the socks cuff-up or cuff-down.

How do I ensure my socks match when making a pair?

If using self-striping yarn, start both socks at the same point in the color sequence. Take notes while making the first sock about any adjustments you made, and refer to these when making the second. Consider making both simultaneously, working a few rounds on each alternately.

Can these socks be machine washed?

This depends on your yarn choice. The recommended acrylic-wool blend can typically be machine washed on a gentle cycle, but always check your yarn's care instructions. Hand washing is recommended to extend the life of your handmade socks.