🧢 Beautiful ✨ Detailed πŸ’ Adorable

Spring Teapot House Crochet Pattern

Spring Teapot House Crochet Pattern
4.4β˜… Rating
12-15 Hours Time Needed
3.0K Made This
βœ‚οΈ

Advanced Level

Designed for experienced knitters, these patterns involve intricate designs and complex techniques to challenge and inspire.

⏱️

Slow & Steady

A 10-12 hour projectβ€”great for savoring the process over several sessions.

🏑

Cozy Accent

A warm touch for your space that transforms ordinary corners into inviting nooks filled with handmade charm.

About This Spring Teapot House Crochet Pattern

Spring Teapot House Crochet Pattern crochet pattern - detailed view of completed project

The floral embellishments are the crowning glory of this piece, with handcrafted pink flowers and green leaves arranged in cascading patterns that evoke the fresh beauty of springtime gardens. Brown embroidered branches connect the blooms in an organic, natural design that brings the entire composition to life.

Why You'll Love This Spring Teapot House Crochet Pattern

I absolutely love this pattern because it challenges you to combine structural crochet work with delicate decorative elements in ways that feel both rewarding and magical. The process of watching a simple teapot transform into a whimsical dwelling is incredibly satisfying, and I find myself constantly amazed by how the flowers and leaves bring everything together. What I appreciate most is how this pattern teaches you advanced shaping techniques while encouraging creative freedom in placement and design. The finished piece becomes a conversation starter and a cherished decoration that captures the essence of spring all year round.

Spring Teapot House Crochet Pattern step 1 - construction progress Spring Teapot House Crochet Pattern step 2 - assembly progress Spring Teapot House Crochet Pattern step 3 - details and accessories Spring Teapot House Crochet Pattern step 4 - final assembly and finishing

Switch Things Up

I love how versatile this teapot house pattern can be when you start experimenting with different seasonal themes and color combinations. While the original spring design features fresh mint green with pink blossoms, I've found that transforming it into an autumn version with burnt orange, deep burgundy, and golden yellow creates an entirely different mood - perfect for fall decorating.

For a winter wonderland version, I recommend using icy blue or pure white as the base color with silver or light blue flowers to represent snowflakes and frost. You could even add tiny silver beads to the flowers for extra sparkle. The summer variation works beautifully with bright turquoise or sunny yellow as the main color, adorned with vibrant tropical-colored flowers in hot pink, coral, and sunny orange.

I've also experimented with making this pattern more whimsical by adding tiny crocheted birds perched on the handle or butterflies scattered among the flowers. Some crafters have even created fairy doors instead of regular doors, complete with tiny round windows and miniature garden accessories.

Another fun variation I've tried is making the windows functional by leaving them unstitched at the top so you can peek inside. You could even add a small LED tea light inside for a magical glowing effect in the evening. The architectural elements are very forgiving - I've made versions with two doors, versions with four windows arranged symmetrically, and even one with a tiny crocheted chimney on top.

For those who want to add more dimension, consider making climbing vines that spiral up from the base using chain stitches with leaves attached at intervals. You could also create a small crocheted garden base or platform for the teapot house to sit on, complete with tiny flowers and a fence.

Common Mistakes & How to Fix Them

βœ— Forgetting to work through back loops only when specified can throw off the entire dimensional structure of the teapot house βœ— Insufficient stuffing in the spout's narrow section causes it to droop and lose its characteristic teapot shape over time βœ— Attaching flowers before embroidering branches results in awkward positioning and makes it difficult to create natural flowing vine patterns βœ— Not using a plastic base insert causes the bottom to warp and prevents the teapot house from standing upright properly βœ— Sewing the handle without proper wire reinforcement leads to a floppy handle that cannot maintain its curved teapot shape

Spring Teapot House Crochet Pattern

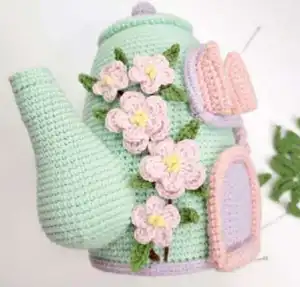
Transform ordinary yarn into an enchanting spring teapot house that blooms with handmade charm! This whimsical crochet pattern combines functionality with fantasy, featuring a mint-colored teapot base adorned with delicate pink flowers, charming shuttered windows, and a welcoming lilac door. Perfect for adding a touch of springtime magic to your home decor or creating a unique gift that celebrates the season of renewal. Watch as your stitches bring this adorable floral cottage to life, complete with intricate details like climbing vines, blooming petals, and cozy architectural elements.

Advanced 12-15 Hours

Materials Needed for Spring Teapot House Crochet Pattern

β€” Main Fabric

  • 01
    Yarn Art Jeans (55% cotton, 45% acrylic, 160 m/50 g) in mint 79 - slightly more than 1 skein
  • 02
    Yarn Art Jeans in lilac 19, light yellow 88, light pink 18, green 69, brown 40 - small quantities of each
  • 03
    Alize Cotton Gold Hobby (55% cotton, 45% acrylic, 165 m/50 g) in pink 393

β€” Tools Required

  • 01
    2.25 mm crochet hook
  • 02
    Big eyed needle
  • 03
    Hot glue gun
  • 04
    Scissors
  • 05
    Water erasable marker
  • 06
    Sewing pins
  • 07
    Synthetic fiberfill
  • 08
    Hard plastic piece (thick plastic folder or cutting board)
  • 09
    Chenille wire (pipe cleaners) 4 pieces of 30 cm long
  • 10
    Stitch markers
  • 11
    Contrasting color yarn for marking rounds

Progress Tracker

0% Complete

β€” Teapot Bottom and Body :

Round 1 :

6 sc in AR

Round 2 :

inc*6=12 sc

Round 3 :

(1 sc, inc)*6=18 sc

Round 4 :

1 sc, inc, (2 sc, inc)*5, 1 sc=24 sc

Round 5 :

(3 sc, inc)*6=30 sc

Round 6 :

2 sc, inc, (4 sc, inc)*5, 2 sc=36 sc

Round 7 :

(5 sc, inc)*6=42 sc

Round 8 :

3 sc, inc, (6 sc, inc)*5, 3 sc=48 sc

Round 9 :

(7 sc, inc)*6=54 sc

Round 10 :

4 sc, inc, (8 sc, inc)*5, 4 sc=60 sc

Round 11 :

(9 sc, inc)*6=66 sc

Round 12 :

5 sc, inc, (10 sc, inc)*5, 5 sc=72 sc

Round 13 :

(11 sc, inc)*6=78 sc

Round 14 :

6 sc, inc, (12 sc, inc)*5, 6 sc=84 sc

Info :

Finish with a sl st, do not cut the yarn. Cut out from plastic a circle according to the size of crocheted detail and glue it on the wrong side.

Round 15 :

84 sc through the back loops

Round 16-24 :

9 rounds of 84 sc

Round 25 :

(12 sc, dec)*6=78 sc

Round 26-34 :

9 rounds of 78 sc

Round 35 :

(11 sc, dec)*6=72 sc

Round 36-43 :

8 rounds of 72 sc

Round 44 :

(10 sc, dec)*6=66 sc

Round 45-50 :

6 rounds of 66 sc

Round 51 :

(9 sc, dec)*6=60 sc

Round 52 :

60 sc

Round 53 :

(8 sc, dec)*6=54 sc

Round 54 :

(7 sc, dec)*6=48 sc

Info :

Stuff the teapot body firmly

Round 55 :

Change yarn to lilac, sc 48 through the back loops

Round 56 :

48 sc through both loops

Round 57 :

(6 sc, dec)*6=42 sc

Round 58 :

(5 sc, dec)*6=36 sc

Round 59 :

(4 sc, dec)*6=30 sc

Round 60 :

(3 sc, dec)*6=24 sc

Round 61 :

(2 sc, dec)*6=18 sc

Round 62 :

(1 sc, dec)*6=12 sc

Round 63 :

Dec every st until the opening closes (add fiberfill if necessary). Cut the yarn and fix the end

Info :

Join the mint yarn to the 54th round and crochet through the front loops: 3 sc, inc, (7 sc, inc)*5, 4 sc=54 sc. Crochet 2 rounds more of 54 sc each. Finish with a sl st, leave a long end. Thread the end of the yarn into the needle. Fold the edge inward and stitch around.

Info :

Join lilac yarn to the bottom line and sl st through the front loops. Sc 1 round through the back loops of sl st. Sl st one more round. Cut the yarn and fix the end.

β€” Spout :

Round 1 :

6 sc in AR

Round 2 :

inc*6=12 sc

Round 3 :

(1 sc, inc)*6=18 sc. Crochet one more sc after the last inc and finish with a sl st. Do not cut the yarn.

Round 4 :

18 sc through the back loops

Round 5-7 :

18 sc

Round 8 :

inc, 17 sc=19 sc

Round 9 :

2 sc, inc, 16 sc=20 sc

Round 10 :

2 sc, inc, 17 sc=21 sc

Round 11 :

2 sc, inc, 18 sc=22 sc

Round 12 :

2 sc, inc, 19 sc=23 sc

Round 13 :

2 sc, inc, 20 sc=24 sc

Round 14 :

24 sc

Round 15 :

(3 sc, inc)*6=30 sc

Round 16-17 :

30 sc

Round 18 :

(4 sc, inc)*6=36 sc

Round 19-20 :

36 sc

Round 21 :

(5 sc, inc)*6=42 sc

Round 22-23 :

42 sc

Round 24 :

(6 sc, inc)*6=48 sc

Round 25-27 :

48 sc

Round 28 :

(6 sc, dec)*6=42 sc

Round 29 :

(5 sc, dec)*6=36 sc

Info :

Stuff the narrow part tightly and the wide part looser

Round 30 :

(4 sc, dec)*6=30 sc

Round 31 :

(3 sc, dec)*6=24 sc

Round 32 :

(2 sc, dec)*6=18 sc

Round 33 :

(1 sc, dec)*6=12 sc

Round 34 :

dec*6. Cut the yarn and fix the end

Info :

Join yarn to the 3rd round and sc 18 through the front loops. Crochet one more round of 18 sc and the last one 18 sl st. Cut the yarn and fix the end.

β€” Handle :

Round 1 :

6 sc in AR

Round 2 :

inc*6

Info :

Then crochet spiral rounds up without inc. Put 4 chenille wires together, fold in half and twist them together. Crochet the handle of the fitting length. Put the wire inside and sew the opened end with the end of the yarn.

β€” Lid Handle :

Round 1 :

6 sc in AR

Round 2 :

inc*6=12 sc

Round 3-4 :

2 rounds of 12 sc. Stuff.

Round 5 :

dec*6, cut the yarn, leave a long end

β€” Door :

Info :

Crochet with lilac yarn. Chain 10, crochet U-shaped rows with a turning ch in the beginning of every row.

Row 1 :

8 sc, 3 inc the last loop, 8 sc along the bottom side of the chain=19 sc

Row 2 :

8 sc, inc*3, 8 sc=22 sc

Row 3 :

8 sc, (1 sc, inc)*3, 8 sc=25 sc

Row 4 :

8 sc, (2 sc, inc)*3, 8 sc=28 sc

Row 5 :

8 sc, (3 sc, inc)*3, 8 sc=31 sc

Row 6 :

8 sc, (4 sc, inc)*3, 8 sc=34 sc

Row 7 :

Change yarn to the pink, crochet through the back loops: 8 sc, (5 sc, inc)*3, 8 sc=37 sc

Row 8 :

Crochet through the back loops 37 sc

Row 9-10 :

2 more rows of 37 sc through both loops. Leave a long end.

Info :

Thread the end of the pink yarn into the needle. Fold the pink part in half (outwards) and sew the edge to the front loops of the 7th row. Join the pink yarn to the bottom side of the door and sc 7 rows of 13 sc. Leave a long end. Roll the pink part inwards and sew with the end of the yarn. Sew the corners.

β€” Window :

Info :

Crochet with light yellow yarn. Chain 8, crochet like the door U-shaped rows.

Row 1 :

6 sc, 3 sc in the last loop, 6 sc along the bottom side of the chain=15 sc

Row 2 :

6 sc, inc*3, 6 sc=18 sc

Row 3 :

6 sc, (1 sc, inc)*3, 6 sc=21 sc

Row 4 :

6 sc, (2 sc, inc)*3, 6 sc=24 sc

Row 5 :

change yarn to the lilac, crochet through the back loops: 6 sc, (3 sc, inc)*3, 6 sc=30 sc

Row 6 :

30 sc through the back loops

Row 7-8 :

2 rows of 30 sc through the both loops. Leave a long end.

Info :

Fold the lilac part outwards and sew. Sc 4 rows of 10 sc with lilac yarn along the bottom side of the window. Fold inwards, sew with the end of the yarn. Sew the corners. Stitch a cross-shaped frame on the window.

β€” Shutters :

Info :

Crochet in pink: make 2 pcs like light yellow parts of the window. Leave long ends. Fold in half and sew all the opened sides over the edge. Sew to the window.

β€” Flowers :

Info :

Crochet with light pink yarn: Chain 5, close into the ring with a sl st. Crochet in the ring (not into every loop) 2 ch, 2 dc, 2 ch, sl st – it should be one petal. Repeat 4 more times, total 5 petals. Cut the yarn and fix the end.

Two-Layer Flowers :

Crochet the same flower with 5 petals, do not cut the yarn. Bring the working loop to the wrong side, crochet 2 ch, then sl st in the first ch of the next petal to get a jumper under the first petal. Repeat 4 more times – get 5 jumpers under all petals. Crochet petals in those jumpers: 2 ch, 3 dc, 2 ch, sl st. Repeat 4 more times. To move to the next petal just make a sl st in the next jumper. Cut the yarn and fix the end.

Info :

Make 6 big and 8 small flowers (or as many as you want). Embroider the stamens with a French knot with light yellow yarn - 2 st for small ones, 3 st for large ones.

β€” Leaves :

Info :

Crochet with green yarn: chain 7, crochet 1 sl st, 1 sc, 2 hdc, 1 sc, 1 sl st. If you will sew the leaves, leave a long end. If you will glue them, tie the ends and cut. Make about 30 pcs.

Assembly Instructions

  • Attach the spout to the teapot body, ensuring the marker on the first rows faces toward the teapot. Slightly flatten the lower wide part and pin in place before sewing from the lower center point outward.
  • Bend the flat end of the handle and sew it to the upper portion of the teapot body. Sew the second end close to the bottom for proper teapot shape.
  • Sew the lid handle to the center top of the lilac lid using the yarn tail.
  • Glue or sew the door to the front of the teapot body and position one window directly above it.
  • Attach the second window at the opposite side of the teapot for balanced design.
  • Place flowers around the teapot house and secure with pins. Use water erasable marker to outline branch patterns between flowers.
  • Remove flowers temporarily and embroider brown branches along marked lines. Reposition flowers with pins, then glue or sew leaves under each flower before permanently attaching flowers on top.

Important Notes

  • πŸ’‘Use a contrasting color yarn as a stitch marker to easily track your rounds throughout the entire project
  • πŸ’‘The plastic base insert is crucial for stability - ensure it fits perfectly before gluing to the wrong side
  • πŸ’‘Work through back loops only when specified as this creates the dimensional texture and structural lines
  • πŸ’‘Stuff the spout's narrow section very tightly to prevent drooping, but keep the wide part looser for easier shaping
  • πŸ’‘Pin all architectural elements (door, windows) in place before final attachment to ensure proper positioning and symmetry
  • πŸ’‘Create and arrange all flowers and leaves with pins before permanent attachment to visualize the final design
  • πŸ’‘The chenille wire in the handle must be twisted tightly together and folded for proper reinforcement and shaping

This enchanting Spring Teapot House pattern brings together whimsical architecture and delicate floral artistry to create a truly unique home decoration. The combination of structural crochet techniques with creative embellishment makes this project both challenging and deeply rewarding for experienced crocheters. Every stitch contributes to the magical transformation of a simple teapot into a blooming cottage that celebrates the beauty of spring. Display it proudly as a centerpiece or gift it to someone special who appreciates handcrafted artistry. 🌸🏑 Happy crocheting! 🧢✨

You ask,

we answer.

FAQs

Can I use different yarn weights for this pattern?

While the pattern specifies Yarn Art Jeans and Alize Cotton Gold Hobby, you can substitute with similar weight yarns (approximately DK/light worsted). However, be sure to adjust your hook size accordingly and note that your finished teapot house may be larger or smaller than the stated 18.5 cm height.

What if I can't find chenille wire for the handle?

You can substitute with floral wire or craft wire of similar thickness (around 1mm). The key is to use 4 pieces twisted together for adequate strength. Alternatively, you could stuff the handle very firmly, though it won't hold its curved shape as well over time.

How do I prevent the teapot from tipping over?

The plastic base insert is essential for stability. Make sure to cut it precisely to fit the crocheted bottom and glue it securely. You can also add small weight beads or rice inside the bottom before stuffing to create a lower center of gravity.

Can I customize the number and placement of flowers?

Absolutely! The pattern suggests 6 big and 8 small flowers, but you can adjust this to your preference. Use pins to arrange them in different patterns before permanently attaching. This is where your creative vision can truly shine and make your teapot house unique.

What's the best way to attach the flowers and leaves?

For a permanent hold, sewing is recommended using the yarn tails. However, hot glue works well for quicker assembly, especially for the leaves. If using glue, apply small amounts to avoid seepage through the stitches and allow adequate drying time between elements.

How do I create neat color changes between mint and lilac?

Complete the last stitch of the old color until you have two loops on your hook, then pull through with the new color to complete the stitch. This creates a clean transition. Working through back loops only (as specified in round 55) also helps create a distinct color change line.