🧢 Beautiful ✨ Detailed πŸ’ Adorable

Lemon Gnome Amigurumi Pattern

Lemon Gnome Amigurumi Pattern
4.3β˜… Rating
6-8 Hours Time Needed
3.7K Made This
βœ‚οΈ

Intermediate Level

Ideal for those with basic knitting experience, featuring slightly more advanced stitches and techniques to expand your skills.

⏱️

All-Day Adventure

Requires 8-10 hours, ideal for a full day of immersive knitting.

🧸

Cute Companion

An adorable friend to cherish, handcrafted with love to bring comfort and joy for years to come.

About This Lemon Gnome Amigurumi Pattern

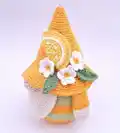
This whimsical Lemon Gnome pattern is designed for crocheters ready to tackle a charming intermediate project. The pattern features color changes, detailed shaping, and multiple small components that come together to create a personality-filled character. With its striped body, fluffy beard, and pointy hat adorned with lemon slices and flowers, this gnome captures the essence of cheerful citrus charm in an irresistibly huggable form.

Lemon Gnome Amigurumi Pattern crochet pattern - detailed view of completed project

The finished gnome stands approximately 5 inches tall when made with the recommended cotton yarn and hook size. Each element is carefully designed to create a balanced, stable figure with delightful details.

Why You'll Love This Lemon Gnome Amigurumi Pattern

I absolutely love this pattern because it combines practical techniques with creative embellishments that make each gnome truly special. The color-changing stripes keep the work interesting without being overwhelming, and I find the process of bringing all the tiny pieces together incredibly satisfying. There's something magical about watching the personality emerge as you add the beard, nose, and decorative hat elements. Plus, these little gnomes make wonderful gifts that always bring smiles, and the lemon theme feels fresh and cheerful year-round!

Lemon Gnome Amigurumi Pattern step 1 - construction progress Lemon Gnome Amigurumi Pattern step 2 - assembly progress Lemon Gnome Amigurumi Pattern step 3 - details and accessories Lemon Gnome Amigurumi Pattern step 4 - final assembly and finishing

Switch Things Up

I love experimenting with this pattern by changing up the color schemes to create different seasonal or themed gnomes. Instead of lemon yellow and green, try red and white for a strawberry gnome, or orange and brown for a pumpkin spice version perfect for autumn. You could even go with blue and white for a blueberry theme or pink and green for watermelon!

I've also found that varying the decorations on the hat opens up endless possibilities. Replace the lemon slice with other fruit designs, add tiny crocheted butterflies or bees, or use felt shapes for quick embellishments. For holiday versions, swap the flowers for holly leaves and berries, or add tiny stars and moons for a celestial gnome.

Another fun modification I enjoy is adjusting the beard style. You can make it fuller by increasing more rounds, create a braided effect with surface stitches, or even leave it off entirely for a clean-shaven gnome. I've experimented with different yarn textures too - using a fuzzy yarn for the beard creates an adorable fluffy effect that really brings personality to life.

Common Mistakes & How to Fix Them

βœ— Forgetting to crochet Row 10 through the back loops only, which creates the important base definition for the gnome's body structure βœ— Not placing a plastic or paper circle at the bottom before stuffing, resulting in a wobbly gnome that won't stand properly βœ— Overstuffing the beard or hands, making them too rigid when they should remain soft and foldable for proper shaping βœ— Missing the color changes at specified rows, which disrupts the striped pattern and overall design aesthetic of the gnome

Lemon Gnome Amigurumi Pattern

Create an enchanting lemon-themed gnome that brings sunshine and whimsy to any space! This delightful pattern combines cheerful yellow and green stripes with adorable details including a fluffy beard, pointy hat, and charming lemon slice decoration. Standing at approximately 5 inches tall, this little character is perfect for spring dΓ©cor, citrus lovers, or anyone who appreciates handmade charm. The pattern includes complete instructions for the gnome's body, accessories, and decorative elements like tiny crocheted flowers and leaves.

Intermediate 6-8 Hours

Materials Needed for Lemon Gnome Amigurumi Pattern

β€” Main Fabric

  • 01
    YarnArt Begonia yarn (100% cotton, 169m/50g) in yellow color
  • 02
    YarnArt Begonia yarn in green color
  • 03
    YarnArt Begonia yarn in light beige color
  • 04
    YarnArt Begonia yarn in beige color
  • 05
    YarnArt Begonia yarn in white color

β€” Tools Required

  • 01
    Crochet hook size 1.75mm (US 4)
  • 02
    Sewing needle
  • 03
    Scissors
  • 04
    Stitch marker
  • 05
    Poly fiber fill
  • 06
    Plastic or paper circle for base

Progress Tracker

0% Complete

β€” The Body of a Gnome (Yellow Yarn):

Round 1:

6 sc in MR (6)

Round 2:

(inc) x 6 (12)

Round 3:

(1 sc, inc) x 6 (18)

Round 4:

(2 sc, inc) x 6 (24)

Round 5:

(3 sc, inc) x 6 (30)

Round 6:

(4 sc, inc) x 6 (36)

Round 7:

(5 sc, inc) x 6 (42)

Round 8:

(6 sc, inc) x 6 (48)

Round 9:

(7 sc, inc) x 6 (54)

Round 10:

54 sc (1 row) - crochet this row for the back wall of the loops

Round 11:

54 sc (1 row)

Round 12:

(8 sc, inc) x 6 (60)

Round 13:

60 sc (1 row)

Round 14:

(9 sc, inc) x 6 (66)

Info:

Change to green yarn

Round 15-19:

66 sc (5 rows)

Info:

Change to yellow yarn

Round 20-24:

66 sc (5 rows)

Info:

Change to green yarn

Round 25-26:

66 sc (2 rows)

Round 27:

(20 sc, dec) x 3 (63)

Round 28-29:

63 sc (2 rows)

Info:

Change to yellow yarn

Round 30:

(19 sc, dec) x 3 (60)

Round 31-32:

60 sc (2 rows)

Round 33:

(18 sc, dec) x 3 (57)

Round 34-35:

57 sc (2 rows)

Round 36:

(17 sc, dec) x 3 (54)

Round 37:

54 sc (1 row)

Round 38:

(7 sc, dec) x 6 (48)

Round 39:

48 sc (1 row)

Round 40:

(6 sc, dec) x 6 (42)

Round 41:

42 sc (1 row)

Round 42:

(5 sc, dec) x 6 (36)

Round 43:

36 sc (1 row)

Round 44:

(7 sc, dec) x 4 (32)

Round 45:

(6 sc, dec) x 4 (28)

Round 46:

(5 sc, dec) x 4 (24)

Round 47:

24 sc (1 row)

Round 48:

(4 sc, dec) x 4 (20)

Round 49:

20 sc (1 row)

Round 50:

(3 sc, dec) x 4 (16)

Round 51:

(2 sc, dec) x 4 (12)

Round 52:

(1 sc, dec) x 4 (8)

Round 53:

(dec) x 4 (4)

Info:

Do not forget to put a plastic or paper circle on the bottom of the gnome's body (the diameter of the circle should correspond to the diameter of the bottom of the body). After that, fill the body with fiber fill.

β€” Nose (Make 1, Beige Yarn):

Round 1:

7 sc in MR (7)

Round 2:

(inc) x 7 (14)

Round 3:

(1 sc, inc) x 7 (21)

Round 4-5:

21 sc (2 rows)

Round 6:

(1 sc, dec) x 7 (14)

Round 7:

(dec) x 7 (7)

Info:

Fill the nose with fiber fill. Fasten off and leave a long tail for sewing

β€” Beard (Make 1, Light Beige Yarn):

Round 1:

6 sc in MR (6)

Round 2:

6 sc (1 row)

Round 3:

(1 sc, inc) x 3 (9)

Round 4:

(2 sc, inc) x 3 (12)

Round 5:

(2 sc, inc) x 4 (16)

Round 6:

(3 sc, inc) x 4 (20)

Round 7:

(4 sc, inc) x 4 (24)

Round 8:

24 sc (1 row)

Round 9:

(5 sc, inc) x 4 (28)

Round 10:

(6 sc, inc) x 4 (32)

Round 11:

(7 sc, inc) x 4 (36)

Round 12:

(8 sc, inc) x 4 (40)

Round 13-19:

40 sc (7 rows)

Round 20:

(8 sc, dec) x 4 (36)

Round 21:

(7 sc, dec) x 4 (32)

Round 22-23:

32 sc (2 rows)

Info:

Don't stuff with fiber fill. Fold the part in half and knit 1 row, tying both halves together. Fasten off and leave a long tail for sewing

β€” Hands (Make 2, Light Beige Yarn):

Round 1:

6 sc in MR (6)

Round 2:

(inc) x 6 (12)

Round 3:

(2 sc, inc) x 4 (16)

Round 4-7:

16 sc (4 rows)

Info:

Change to yellow yarn

Round 8-11:

16 sc (4 rows)

Round 12:

(6 sc, dec) x 2 (14)

Round 13-20:

14 sc (8 rows)

Info:

Don't stuff with fiber fill. Fold the part in half and knit 1 row, tying both halves together. Fasten off and leave a long tail for sewing

β€” Gnome Hat (Make 1, Yellow Yarn):

Round 1:

8 sc in MR (8)

Round 2:

8 sc (1 row)

Round 3:

(1 sc, inc) x 4 (12)

Round 4:

12 sc (1 row)

Round 5:

(2 sc, inc) x 4 (16)

Round 6:

16 sc (1 row)

Round 7:

(3 sc, inc) x 4 (20)

Round 8:

20 sc (1 row)

Round 9:

(4 sc, inc) x 4 (24)

Round 10:

24 sc (1 row)

Round 11:

(5 sc, inc) x 4 (28)

Round 12:

28 sc (1 row)

Round 13:

(6 sc, inc) x 4 (32)

Round 14:

32 sc (1 row)

Round 15:

(7 sc, inc) x 4 (36)

Round 16:

36 sc (1 row)

Round 17:

(5 sc, inc) x 6 (42)

Round 18:

42 sc (1 row)

Round 19:

(6 sc, inc) x 6 (48)

Round 20:

48 sc (1 row)

Round 21:

(7 sc, inc) x 6 (54)

Round 22:

54 sc (1 row)

Round 23:

(8 sc, inc) x 6 (60)

Round 24:

60 sc (1 row)

Round 25:

(9 sc, inc) x 6 (66)

Round 26:

66 sc (1 row)

Round 27:

(10 sc, inc) x 6 (72)

Round 28:

72 sc (1 row)

Round 29:

(8 sc, inc) x 8 (80)

Round 30:

80 sc (1 row)

Round 31:

(9 sc, inc) x 8 (88)

Round 32:

(10 sc, inc) x 8 (96)

Round 33:

96 sc (1 row)

Round 34:

(11 sc, inc) x 8 (104)

Round 35-36:

104 sc (2 rows)

Info:

Fasten off and leave a long tail for sewing

β€” Slice of Lemon (Make 1, Yellow Yarn):

Round 1:

6 sc in MR (6)

Round 2:

(inc) x 6 (12)

Round 3:

(1 sc, inc) x 6 (18)

Round 4:

(2 sc, inc) x 6 (24)

Round 5:

(3 sc, inc) x 6 (30)

Info:

Change to white yarn

Round 6:

(4 sc, inc) x 6 (36)

Info:

Change to yellow yarn

Round 7:

(5 sc, inc) x 6 (42)

Info:

Don't stuff with fiber fill. Fold the part in half and knit 1 row, tying both halves together. Fasten off and leave a long tail for sewing

β€” Flowers (Make 3, Yellow Yarn):

Round 1:

6 sc in MR (6)

Info:

Change to white yarn

Petals:

Crochet 6 flower petals, 1 petal in each of the 6 loops: 1 sl st, 2 ch, 2 dc, 2 ch, 1 sl st in the same loop (in the one in which we knit the petal)

β€” Small Leaf (Make 1, Green Yarn):

Instructions:

Make 12 ch. From the 2nd ch from hook: 1 sl st, 1 sc, 1 HDC, 2 dc, 2 tr, 2 dc, 1 HDC, 1 sl st

β€” Big Leaf (Make 1, Green Yarn):

Instructions:

Make 12 ch. From the 2nd ch from hook: 1 sl st, 1 sc, 1 HDC, 2 dc, 2 tr, 2 dc, 1 HDC, 3 sc in 1 loop; further crochet the second half of the braid 1 HDC, 2 dc, 2 tr, 2 dc, 1 HDC, 1 sc, 1 sl st

β€” Assembly:

Step 1:

Sew the beard and nose to the body

Step 2:

Sew the hands to the body

Step 3:

Sew the hat to the top of the gnome, gradually filling it with fiber fill during sewing

Step 4:

Make the design of the hat by sewing a slice of lemon, leaves and flowers (see photo)

Assembly Instructions

  • Sew the beard onto the front of the gnome's body where you'd like the face to be positioned.
  • Attach the nose centered on top of the beard, stuffing it firmly before closing.
  • Sew the hands to both sides of the body at an appropriate height for the gnome's arms.
  • Position the hat on top of the gnome's body and begin sewing it in place, gradually stuffing with fiber fill as you work around.
  • Create the lemon slice decoration and attach it to the front of the hat.
  • Sew the small and big leaves near the lemon slice on the hat.
  • Finish by attaching the three small white flowers around the lemon and leaf arrangement on the hat.

Important Notes

  • πŸ’‘Always use a stitch marker to track the beginning of each round, especially with frequent color changes
  • πŸ’‘Remember to crochet Round 10 of the body through back loops only to create proper base structure
  • πŸ’‘Don't forget to insert the plastic or paper circle at the bottom before final stuffing
  • πŸ’‘Fold and flatten pieces like the beard, hands, and lemon slice rather than stuffing them
  • πŸ’‘Stuff the hat gradually while sewing it to the body for the best shape
  • πŸ’‘Use needle join technique when fastening off for neater, more professional-looking results

This cheerful Lemon Gnome pattern brings a burst of sunshine to your crochet projects! Combining playful yellow and green stripes with charming details like a fluffy beard and decorative lemon slice, this little character is perfect for brightening any space. The pattern teaches valuable intermediate techniques including color changes, back loop stitching, and assembly of multiple components. Whether you're making it for spring dΓ©cor, as a gift for citrus enthusiasts, or simply to add whimsy to your collection, this gnome is sure to bring smiles! πŸ‹πŸ§Άβœ¨

You ask,

we answer.

FAQs

What size will my finished Lemon Gnome be?

When using YarnArt Begonia yarn with a 1.75mm hook as recommended, your gnome will be approximately 13cm (5.1 inches) tall. You can make it larger or smaller by using different yarn weights with an appropriately sized hook.

Do I need to stuff all the parts of the gnome?

No, only the body, nose, and hat should be stuffed with fiber fill. The beard, hands, and lemon slice should NOT be stuffed - instead, fold them flat and crochet the edges together as instructed.

Why do I need a plastic or paper circle for the bottom?

The circle provides a stable base so your gnome can stand upright without tipping over. Cut the circle to match the diameter of the gnome's bottom and place it inside before final stuffing.

What does it mean to crochet through the back wall of loops in Round 10?

This means inserting your hook only through the back loop of each stitch rather than under both loops. This creates a ridge that defines the base of the gnome's body and helps with structure.

Can I use different colors for my gnome?

Absolutely! While the pattern uses yellow and green for a lemon theme, you can customize the colors to create different fruit-themed gnomes or match your personal dΓ©cor preferences.