🧶 Beautiful ✨ Detailed 💝 Adorable

Adorable Dinosaur Pillow Crochet Pattern

Adorable Dinosaur Pillow Crochet Pattern
4.5★ Rating
8-10 Hours Time Needed
3.2K Made This
✂️

Intermediate Level

Ideal for those with basic knitting experience, featuring slightly more advanced stitches and techniques to expand your skills.

⏱️

All-Day Adventure

Requires 8-10 hours, ideal for a full day of immersive knitting.

🧸

Cute Companion

An adorable friend to cherish, handcrafted with love to bring comfort and joy for years to come.

About This Adorable Dinosaur Pillow Crochet Pattern

This dinosaur pillow pattern is designed to bring joy and comfort to anyone who loves prehistoric creatures. Using super soft plush yarn, you'll create a huggable pillow that's both functional and decorative. The pattern includes detailed instructions for creating the main pillow body, a dimensional nose with personality, adorable little arms and legs, and a striking frilled crest that runs along the top. The combination of different textures and colors creates visual interest while maintaining the cuddly softness that makes this pillow perfect for snuggling.

Adorable Dinosaur Pillow Crochet Pattern crochet pattern - detailed view of completed project

What makes this pattern special is the attention to detail in the construction of the frilled crest, which features a beautiful scalloped edge created with yellow yarn accents. The pattern guides you through assembling multiple components including brow horns and a nose horn that add three-dimensional charm to your finished piece.

Why You'll Love This Adorable Dinosaur Pillow Crochet Pattern

I absolutely love this pattern because it combines functionality with adorable design! There's something so satisfying about creating a project that's both practical and decorative. The plush yarn works up quickly, which means you can see your dinosaur come to life in just a day or two. I especially enjoy the creative aspect of adding the frilled crest with its scalloped edges—it's those little details that make this pillow truly special. Plus, watching the recipient's face light up when they receive this handmade treasure makes every stitch worthwhile. It's versatile enough to suit any décor style while maintaining that playful, whimsical charm that makes people smile.

Adorable Dinosaur Pillow Crochet Pattern step 1 - construction progress Adorable Dinosaur Pillow Crochet Pattern step 2 - assembly progress Adorable Dinosaur Pillow Crochet Pattern step 3 - details and accessories Adorable Dinosaur Pillow Crochet Pattern step 4 - final assembly and finishing

Switch Things Up

I love customizing this dinosaur pillow to match different personalities and preferences! One of my favorite variations is changing the color scheme—instead of traditional green, try soft pastels like lavender and pink for a dreamy unicorn-dino hybrid, or go bold with bright blues and oranges for a more vibrant look. You could even work in stripes by changing colors every few rounds on the main pillow body.

For the frilled crest, I sometimes experiment with different edge treatments. Instead of the scalloped edge, you could try picot stitches for a more delicate look, or even add small pompoms along the top for extra texture and fun. If you're making this for a baby, consider using softer safety eyes or embroidering the eyes entirely for added safety.

I've also played with sizing—making mini versions (about 15x20cm) that work perfectly as decorative cushions or travel pillows for kids. You can adjust by starting with fewer chains and working fewer rounds. Another fun twist is adding a pocket to the belly using contrasting yarn, perfect for hiding small treasures or pajamas.

For a more elaborate version, I sometimes add embroidered details like scales along the body using surface crochet or simple embroidery stitches. You could also create different expressions by positioning the eyebrows differently—raised for surprise, angled for determination, or curved for a sweet, sleepy look. The possibilities are endless, and that's what makes this pattern so rewarding to make again and again!

Common Mistakes & How to Fix Them

✗ Not using a stitch marker to track the beginning of rounds, which leads to uneven shaping and misaligned features when assembling the pillow ✗ Underfilling or overfilling the pillow body, resulting in either a floppy structure or distorted shape—aim for firm but not overly tight stuffing throughout ✗ Rushing through the frilled crest assembly without properly aligning the two parts before sewing, causing a twisted or uneven crest appearance ✗ Failing to leave long enough tails for sewing components, making it difficult to securely attach parts and hide thread ends properly inside ✗ Not filling the corners and angles of the pillow adequately, which creates flat spots and an unprofessional finish in the final piece

Adorable Dinosaur Pillow Crochet Pattern

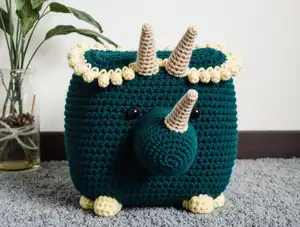
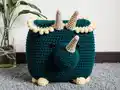
Create your own cuddly prehistoric friend with this charming dinosaur pillow crochet pattern! This delightful project combines plush yarn techniques to craft a soft, huggable pillow measuring approximately 30x40 centimeters. Perfect for dinosaur lovers of all ages, this pattern features adorable details including a frilled crest with decorative scallops, cute little arms and legs, and distinctive horns that bring your dino to life. The combination of green, yellow, and beige colors creates a friendly, approachable character that will become a cherished companion for children or a whimsical décor piece for adults. Whether you're looking to create a special gift or add a playful touch to your home, this pattern offers a rewarding crochet experience with professional-looking results.

Intermediate 8-10 Hours

Materials Needed for Adorable Dinosaur Pillow Crochet Pattern

— Main Fabric

  • 01
    YarnArt Dolce plush yarn in green color (3 skeins, 120m/100g each)
  • 02
    YarnArt Dolce plush yarn in yellow color (1 skein, 120m/100g)
  • 03
    YarnArt Dolce plush yarn in beige color (1 skein, 120m/100g)
  • 04
    Alternative plush yarns: Himalaya Dolphin Baby or similar soft plush yarn
  • 05
    Small amount of white yarn for eye details
  • 06
    Black acrylic or cotton yarn for eyebrows

— Tools Required

  • 01
    Crochet hook size 3.5-5mm (3.5mm recommended)
  • 02
    Black beads or buttons for eyes (22mm diameter)
  • 03
    Hollofayber or polyester fiberfill stuffing
  • 04
    Yarn needle for sewing
  • 05
    Stitch markers or pins
  • 06
    Scissors
  • 07
    Crochet hook for hiding thread ends

Progress Tracker

0% Complete

— Pillow :

Round 1 :

90 ch, connect with the first loop
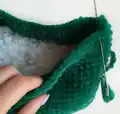
Round 2-37 :

90 sc

Info :

Leave a long thread and sew the top of the pillow. Fasten the thread and hide inside the pillow. Fill tightly and evenly. Fill the angle of the pillow well. Sew and fasten the thread and hide inside the pillow.

— Nose :

Round 1 :

6 sc in magic ring {6}

Round 2 :

(inc) repeat 6 times {12}

Round 3 :

(1 sc, inc) repeat 6 times {18}

Round 4 :

(2 sc, inc) repeat 6 times {24}

Round 5 :

(3 sc, inc) repeat 6 times {30}

Round 6 :

(4 sc, inc) repeat 6 times {36}

Round 7 :

(5 sc, inc) repeat 6 times {42}

Round 8-14 :

42 sc

Info :

Leave a long thread for sewing

— Leg (2 details) :

Round 1 :

6 sc in magic ring {6}

Round 2 :

(inc) repeat 6 times {12}

Round 3 :

(1 sc, inc) repeat 6 times {18}

Round 4 :

18 sc

Info :

Leave a long thread for sewing

— Arm (2 details) :

Round 1 :

6 sc in magic ring {6}

Round 2 :

(inc) repeat 6 times {12}

Round 3 :

12 sc

Info :

Leave a long thread for sewing

— Brow Horn (2 details) :

Round 1 :

6 sc in magic ring

Round 2 :

5 sc, inc {7}

Round 3 :

6 sc, inc {8}

Round 4 :

(3 sc, inc) repeat 2 times {10}

Round 5 :

(4 sc, inc) repeat 2 times {12}

Round 6 :

(5 sc, inc) repeat 2 times {14}

Round 7-12 :

14 sc

Info :

Fill. Leave a long thread for sewing

— Nose Horn :

Round 1 :

6 sc in magic ring

Round 2 :

5 sc, inc {7}

Round 3 :

6 sc, inc {8}

Round 4 :

7 sc, inc {9}

Round 5 :

8 sc, inc {10}

Info :

Fill. Leave a long thread for sewing

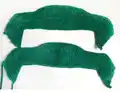
— Frilled Crest (2 details) :

Row 1 :

Make 69 ch

Row 2 :

Begin from second loop from hook: dec, 10 sc, inc, 42 sc, inc, 10 sc, dec, 1 ch

Row 3 :

Begin from second loop from hook: dec, 9 sc, inc, 44 sc, inc, 9 sc, dec, 1 ch

Row 4 :

Begin from second loop from hook: dec, 9 sc, inc, 44 sc, inc, 9 sc, dec, 1 ch

Row 5 :

Begin from second loop from hook: dec, 9 sc, inc, 44 sc, inc, 9 sc, dec, 1 ch

Row 6 :

Begin from second loop from hook: dec, 9 sc, inc, 13 sc, hdc, 16 dc, hdc, 13 sc, inc, 9 sc, dec, 1 ch

Row 7 :

Begin from second loop from hook: dec, 9 sc, inc, 13 sc, hdc, 16 dc, hdc, 13 sc, inc, 9 sc, dec, 1 ch

Row 8 :

Begin from second loop from hook: dec, 9 sc, inc, 12 sc, hdc, 18 sc, hdc, 12 sc, inc, 9 sc, dec, 1 ch

Row 9 :

Begin from second loop from hook: dec, 9 sc, inc, 11 sc, hdc, 20 sc, hdc, 11 sc, inc, 9 sc, dec, 1 ch

Row 10 :

Begin from second loop from hook: dec, 9 sc, inc, 12 sc, hdc, 18 sc, hdc, 12 sc, inc, 9 sc, dec

Info :

Add two parts. Use green yarn and sew two parts with sc. Fill tightly and sew bottom of frilled crest with sc. Leave a long thread for sewing

— Crest Scallop Edge :

Info :

Use yellow yarn and crochet top part. The scallop: make 4 ch, begin from second loop from hook: sc, hdc, dc. Skip one loop of previous row and make 1 sc, then 2 sc. Repeat: 4 ch, begin from second loop from hook: sc, hdc, dc. Skip one loop of previous row and make 1 sc, 2 sc. Repeat this way to the end of the top of the frilled crest

— Assembly :

Infos :

Sew frilled crest. Fill and sew nose between rounds 12 and 22. Sew eyes between rounds 22 and 23 with distance between eyes 12 sc. Use white yarn and make eyes. Insert the needle through the bottom of the nose. Leave the thread for the node. Do not pull the thread around the eye. Make a knot and hide the thread inside the nose with a hook. Sew nose horn and brow horn. Fill arms and legs and sew. Use black yarn and make eyebrows

Assembly Instructions

  • Sew the frilled crest along the top center of the pillow, positioning it so it runs from front to back
  • Position and sew the nose to the front of the pillow between rounds 12 and 22, ensuring it's firmly stuffed before attaching
  • Attach safety eyes or sew beads between rounds 22 and 23, spacing them 12 single crochets apart for proper placement
  • Create white yarn highlights around the eyes by inserting needle through bottom of nose, looping around eyes without pulling tight, then knotting and hiding thread inside
  • Sew the nose horn to the front center of the nose, and attach the two brow horns above the eyes for dimensional detail
  • Stuff arms and legs firmly, then sew them to appropriate positions on the sides and bottom of the pillow body
  • Use black yarn to embroider eyebrows above the eyes, giving your dinosaur a friendly expression

Important Notes

  • 💡Always use stitch markers to track the beginning of each round, especially when working with plush yarn where stitches can be difficult to see
  • 💡Plush yarn can be challenging to work with—maintain consistent tension and use a larger hook if stitches feel too tight
  • 💡Fill the pillow firmly and evenly, paying special attention to corners and angles to maintain a professional shape
  • 💡Leave extra-long yarn tails when finishing each component to make sewing and assembly easier and more secure
  • 💡Pin all components in place before final sewing to ensure proper positioning and symmetry of features
  • 💡When sewing the frilled crest, align both pieces carefully before joining to avoid twisting or uneven edges
  • 💡The scallop edge on the crest requires changing stitch heights—work slowly to maintain even, consistent scallops across the entire edge

This adorable dinosaur pillow pattern was lovingly designed to bring prehistoric charm into any space while providing ultimate comfort! Using luxuriously soft plush yarn, you'll create a huggable companion that's perfect for children's rooms, play areas, or anyone who loves dinosaurs. The dimensional features including the frilled crest, cute horns, and tiny limbs add character and charm that make this more than just a pillow—it's a friend! This pattern is perfect for gift-giving or adding a playful handmade touch to your home décor. 🦕🧶✨

You ask,

we answer.

FAQs

Can I use a different type of yarn instead of plush yarn?

While the pattern is designed for plush yarn like YarnArt Dolce or Himalaya Dolphin Baby, you can use other yarn types, but your finished size and texture will differ significantly. Standard worsted weight yarn will create a smaller, firmer pillow without the ultra-soft plush texture.

How do I prevent the plush yarn from splitting while crocheting?

Plush yarn can be tricky! Use a larger hook than you might normally use, work in good lighting, and go slowly. Insert your hook carefully through both loops, and use stitch markers religiously since it's hard to see individual stitches in plush yarn.

What's the best type of stuffing to use for this pillow?

Hollofayber or high-quality polyester fiberfill works best. These materials are washable, hypoallergenic, and maintain their shape well. Stuff firmly but not overly tight—you want the pillow to be huggable while maintaining its shape.

Can I make the pillow larger or smaller?

Yes! To make it larger, use a bigger hook and thicker yarn, or add more chains to the initial foundation chain. For a smaller version, use a smaller hook or reduce the number of foundation chains. Just remember to adjust stuffing amounts accordingly.

How do I attach the frilled crest securely?

Pin the crest in position first, running from front to back along the center top. Using the long tail left from crocheting, whip stitch it securely to the pillow body, working through both the crest edge and the pillow surface. Make sure it's centered before you start sewing.

Is this pattern suitable for beginners?

This pattern is best suited for those with some crochet experience. While the stitches themselves are basic, working with plush yarn and assembling multiple components requires patience and familiarity with amigurumi techniques. Beginners should try a simpler plush yarn project first.