๐Ÿงถ Beautiful โœจ Detailed ๐Ÿ’ Adorable

Spring Bunny Garland Amigurumi Pattern

Spring Bunny Garland Amigurumi Pattern
4.3โ˜…Rating
2-5 HoursTime Needed
1.1KMade This
โœ‚๏ธ

Beginner Friendly Level

Perfect for those just starting their crocheting journey, with clear instructions and simple techniques

โฑ๏ธ

Quick Craft

Fits nicely into a free afternoon โ€” 2 to 5 hours of focused, enjoyable crocheting.

๐ŸŽ„

Holiday Cheer

Festive fun for the season, bringing handmade magic to celebrations and creating new family traditions.

About This Spring Bunny Garland Amigurumi Pattern

Spring Bunny Garland Amigurumi Pattern crochet pattern - detailed view

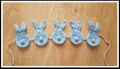
This charming garland is a wonderful way to add a soft, handmade touch to a nursery or a child's playroom. It also makes a thoughtful and unique baby shower gift that parents will cherish for years.

Why You'll Love This Spring Bunny Garland Amigurumi Pattern

I honestly adore this pattern because it is the ultimate scrap-buster! I found myself reaching for all those beautiful leftover cotton bits in my stash to create a colorful, eclectic mix of bunnies. It is incredibly satisfying to see a pile of yarn transform into a whimsical garland so quickly, and the repetitive nature of the bunny shapes makes it a very meditative and low-stress project to work on while relaxing.

Spring Bunny Garland Amigurumi Pattern step 1 Spring Bunny Garland Amigurumi Pattern step 2 Spring Bunny Garland Amigurumi Pattern step 3 Spring Bunny Garland Amigurumi Pattern step 4

Switch Things Up

Thereโ€™s something so refreshing about starting a project that you can actually finish in a single afternoon. I remember making my first set of these bunnies while sitting on my porch as the first signs of spring were popping up in the garden. Itโ€™s one of those patterns where you donโ€™t have to overthink thingsโ€”just put on a good podcast and let your hands do the work.

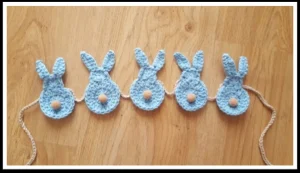
What I love most is how customizable they are. While the blue is classic and sweet, Iโ€™ve seen people make these in muted earth tones like sage and terracotta for a more modern nursery vibe, and they look absolutely stunning. The little pompom tails are the real star of the show, though! They add that perfect bit of 3D texture that makes everyone want to reach out and touch them. If youโ€™re like me and have a basket overflowing with cotton scraps, this garland is the ultimate way to clear some space while making something truly darling. Itโ€™s a low-stress, high-reward craft that brings a little bit of handmade magic into any room.

Common Mistakes & How to Fix Them
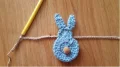
โœ— Forgetting to turn the bunny to the back side before starting the ears can result in the stitches facing the wrong way once you flip it back to the front.โœ— If you don't skip exactly one stitch before and after the 7 treble crochets for the head, the bunny's face will look lopsided or crowded against the body.โœ— Placing the garland cord too high on the head will cause the bunnies to tip forward; make sure to anchor your slip stitches right at the neck join.โœ— Using too much fabric glue for the pompom tails can seep through the yarn and leave a stiff, shiny patch on the front of your bunny.

Spring Bunny Garland Amigurumi Pattern

There is nothing quite like a handmade touch to bring a little extra magic to a nursery or a festive Easter display. You are going to love how quickly these sweet little bunnies come together! This pattern is designed to be a relaxing project that you can easily finish in a single afternoon, leaving you with a beautiful piece of decor that looks like it came straight from a boutique. Whether you are making this for your own home or as a thoughtful baby shower gift, the process is just as delightful as the finished result.

Beginner Friendly 2-5 Hours

Materials Needed for Spring Bunny Garland Amigurumi Pattern

โ€” Main Fabric

  • 01
    Cotton yarn in your choice of color for the bunnies (approx. 5g per bunny)
  • 02
    Soft brown cotton yarn for the garland cord (approx. 5g total)

โ€” Tools Required

  • 01
    3.5 mm crochet hook
  • 02
    Small 1cm (0.4 inch) pompoms in a color that matches your cord
  • 03
    Fabric or craft glue
  • 04
    Yarn needle for weaving in ends
  • 05
    Scissors

Progress Tracker

0% Complete

โ€” 1. The Bunny Body :

Round 1 :

Start by creating a magic loop. Chain 2, which will act as your first double crochet, then work 11 more dc into the center of the loop. Pull the tail to close the circle and finish with a sl st. (12)

Round 2 :

Chain 2, which counts as the first dc of the round. Work another dc right into that same base stitch. Now, place 2 dc into every stitch around the circle. Close the round with a sl st. (24)

โ€” 2. The Head :

Info :

We will now build the head directly onto the body circle you just finished.

Row 1 :

Skip the next stitch on your circle. In the following stitch, work 7 tr all into that same spot to create the head shell. Skip one more stitch and finish the head by making a sl st into the next stitch.

โ€” 3. The Ears :

Info :

The ears are positioned on the 3rd and 5th treble crochet stitches of the head shell.

Step 1 :

Flip the bunny over so the back side is facing you. Work 3 sl st across the back of the head to reach the starting point for the first ear.

Step 2 :

Ch 7.

Step 3 :

Skip the chain closest to the hook. Work 1 sc into each of the next 2 chains, then work 1 dc into each of the remaining 4 chains. Finish the ear by making a sl st into the same stitch on the head where you began the chain.

Step 4 :

Work 1 sl st into each of the next 2 stitches on the head to move into position for the second ear.

Step 5 :

Repeat the ear process: ch 7, skip 1, 2 sc, 4 dc, and sl st back into the head stitch where you started. Fasten off and weave in your ends.

โ€” 4. The Garland Cord :

Step 1 :

Using the cord color, start by making a ch 50.

Step 2 :

Pick up your first bunny. With the back side facing you, work a sl st across the neck area where the head and body meet.

Step 3 :

Ch 30 to create the space between this bunny and the next one.

Step 4 :

Attach the next bunny by slip stitching across its neck area on the back side. Repeat this for all your bunnies.

Step 5 :

Once the last bunny is attached, finish the garland with a final ch 50. Fasten off and tidy up any remaining yarn tails.

Assembly Instructions

  • Weave in all loose ends on each individual bunny before starting the garland assembly.
  • Glue a 1cm pompom to the center of the Round 1 circle on each bunny to create the tail.
  • Lay your bunnies out to decide on the color order and spacing before you start chaining the cord.
  • When attaching the cord, make sure the bunny is facing forward so the slip stitches are hidden on the back side.
  • Secure the final chain of the garland with a knot and weave it back through a few stitches for extra strength.

Important Notes

  • ๐Ÿ’กUse a cotton yarn for better stitch definition and a sturdier garland that won't stretch over time.
  • ๐Ÿ’กIf your magic ring feels loose, pull the tail tight and sew it through the first round to lock it in place.
  • ๐Ÿ’กYou can make the garland as long as you like by simply adding more bunnies and adjusting the chain counts.
  • ๐Ÿ’กBlock your bunnies lightly with steam if the ears or edges tend to curl after you finish them.

I really hope you enjoy making this bunny garland as much as I did! Itโ€™s such a cheerful project to have on your hook, and the end result is just pure whimsy. Whether youโ€™re hanging it in a little oneโ€™s room or using it to brighten up your home for the spring season, these bunnies are sure to be a hit. Donโ€™t be afraid to play around with different colors or even vary the spacing on the cord to fit your space perfectly. Happy crocheting, and may your home be filled with handmade joy! ๐Ÿงถ โœจ

You ask,

we answer.

FAQs

What yarn weight works best for these bunnies?

I recommend using a DK weight cotton yarn. It provides the right balance of softness and structure so the bunnies keep their shape while hanging.

Can I sew the pompoms on instead of using glue?

Absolutely! If you prefer not to use glue, you can use a scrap of matching yarn to sew the pompoms through the center of the body for a more permanent fix.

My ears are curling forward, how do I fix that?

This usually happens if your tension is a bit tight. You can gently pull them into shape or give them a quick press with a cool iron and a damp cloth.

How do I make the garland longer for a large window?

You can easily extend it by increasing the starting and ending chains to 75 or 100, and adding more bunnies with 30-40 chains between each one.