🧢 Beautiful ✨ Detailed πŸ’ Adorable

Pocket Wall Hanging Pattern

Pocket Wall Hanging Pattern
4.7β˜… Rating
4-5 Hours Time Needed
4.0K Made This
βœ‚οΈ

Intermediate Level

Ideal for those with basic knitting experience, featuring slightly more advanced stitches and techniques to expand your skills.

⏱️

Weekend Treat

Takes 5-7 hours, making it an enjoyable project to finish over a couple of days.

🏑

Cozy Accent

A warm touch for your space that transforms ordinary corners into inviting nooks filled with handmade charm.

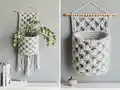
About This Pocket Wall Hanging Pattern

Pocket Wall Hanging Pattern crochet pattern - detailed view of completed project

Perfect for displaying in your entryway, bedroom, or office, this wall hanging combines style with function. The wooden dowel hanging system and decorative bead-adorned tassels add finishing touches that elevate this from simple storage to a true statement piece.

Why You'll Love This Pocket Wall Hanging Pattern

I absolutely love this pattern because it takes your crochet skills to the next level with front post treble crochet techniques that create such a stunning visual impact. The diamond stitch pattern looks incredibly complex, but once you get into the rhythm, it becomes almost meditative to work. What I really appreciate is how this project serves double dutyβ€”it's not just beautiful wall art, it's genuinely useful for organizing those little things that always seem to get lost. The combination of texture, tassels, and that sweet little bead detail makes every finished piece feel special and unique. Plus, there's something so satisfying about working with just one color of yarn and watching such an intricate pattern emerge from simple stitches.

Pocket Wall Hanging Pattern step 1 - construction progress Pocket Wall Hanging Pattern step 2 - assembly progress Pocket Wall Hanging Pattern step 3 - details and accessories Pocket Wall Hanging Pattern step 4 - final assembly and finishing

Switch Things Up

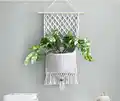
I love experimenting with different yarn colors to completely transform the look of this wall hanging. Instead of the classic light grey, I've tried deep burgundy for a rich, autumn vibe, or soft sage green for a fresh, botanical feel. You could even work the diamond section in one color and switch to a contrasting shade for the pocket to really make it pop.

For a more textured look, I sometimes use a variegated or self-striping yarn that creates gentle color transitions throughout the diamond pattern. The geometric design really shows off color changes beautifully. Another fun variation is to add small embroidered details or appliques to the pocket frontβ€”little flowers, leaves, or even a monogram make it feel extra special.

If you want to go bigger, try using bulkier yarn with a larger hook to create a statement piece that fills more wall space. I've also experimented with adding multiple pockets by creating several pocket sections and sewing them at different heights, which is perfect for organizing different categories of items.

The tassels offer endless customization tooβ€”instead of the bead detail, you could add wooden rings, colorful beads in a pattern, or even small charms. Some makers skip the tassels entirely and add macrame fringe or pom-poms for a playful twist. The beauty of this pattern is that the foundation technique stays the same while your creativity makes each piece uniquely yours.

Common Mistakes & How to Fix Them

βœ— Skipping stitches incorrectly after completing FPtr or FPtr2tog stitches, which throws off the diamond pattern alignment throughout the piece βœ— Forgetting to work into the back loop only during pocket rows, resulting in a pocket that doesn't fold properly or lies flat βœ— Not counting turning chains correctly or accidentally counting them as stitches, causing stitch count errors that accumulate over rows βœ— Pulling front post stitches too tight or too loose, creating uneven diamond shapes and distorting the overall geometric texture pattern

Pocket Wall Hanging Pattern

Create a stunning boho-inspired pocket wall hanging that perfectly blends decorative beauty with practical storage. This elegant pattern features intricate diamond stitch texture created through front post treble crochet techniques, forming eye-catching geometric designs. Complete with a functional pocket at the bottom and charming tassels with a bead detail, this 8x17 inch wall hanging adds bohemian warmth to any space while keeping your essentials organized and within reach.

Intermediate 4-5 Hours

Materials Needed for Pocket Wall Hanging Pattern

β€” Main Fabric

  • 01
    225 yards of light grey yarn (size 4 medium worsted weight)
  • 02
    Craftsmart Value in Mushroom color recommended

β€” Tools Required

  • 01
    5mm crochet hook
  • 02
    Yarn needle
  • 03
    Wooden dowel
  • 04
    Small brass or wooden bead
  • 05
    Scissors

Progress Tracker

0% Complete

β€” Diamond Stitch Section :

Row 1 :

ch 30. Starting in the 2nd ch from the hook, sc into the back bump of each ch (29)

Row 2 :

dc into each st (29)

Row 3 :

Work a FPtr into the 2nd st from the right of row 1. [Skip a st and then sc into the next 3 sts of row 2. FPtr2tog by working into the same st as the last FPtr st worked, skip the next 3 sts of row 1, and then work into the 4th st] 6 times. When you have 5 sts left in the row, skip a st and then sc into the next 3 sts of row 2. FPtr into the same st as the last FPtr worked from row 1, but stop before completing the stitch (with 2 loops left on the hook). Work a sl st by inserting your hook into the last stitch of the row, pulling up a loop and then pulling that loop through both loops on the hook (29)

Row 4 :

dc into each st (29)

Row 5 :

sc 2. FPtr2tog by working around the first FPtr from row 3 and then around the following FPtr2tog (around the entire upside down "V"). [Skip a st and then sc into the next 3 sts of row 4. FPtr2tog by working around the last FPtr2tog from row 3 that you just worked around and then around the following FPtr2tog from row 3] 5 times. When there are 7 stitches left in the row, skip a st and then sc into the next 3 sts of row 4. FPtr2tog by working around the last FPtr2tog from row 3 that you just worked around and then around the final FPtr from row 3. Skip a st and then sc into the last 2 sts (29)

Row 6 :

dc into each st (29)

Row 7 :

FPtr around the first FPtr2tog from row 5. [Skip a st and then sc into the next 3 sts of row 6. FPtr2tog by working around the last FPtr2tog you just worked around and then around the following FPtr2tog from row 5] 6 times. When you have 5 sts left in the row, skip a st and then sc into the next 3 sts of row 6. FPtr around the last FPtr2tog that you just worked around from row 5, but stop before completing the stitch (with 2 loops left on the hook). Work a sl st by inserting your hook into the last stitch, pulling up a loop and then pulling that loop through both loops on the hook (29)

Rows 8-39 :

Repeat the same sequence [rows 4-7] 8 times (29)

β€” Pocket Section :

Rows 40-42 :

sc into the BLO of each st (29)

Row 43 :

[sc 9, inc, sc 9, inc, sc 9] into the BLO of each st (31)

Row 44 :

sc into the BLO of each st (31)

Row 45 :

[sc 10, inc, sc 9, inc, sc 10] into the BLO of each st (33)

Row 46 :

sc into the BLO of each st (33)

Row 47 :

[sc 10, inc, sc 11, inc, sc 10] into the BLO of each st (35)

Row 48 :

sc into the BLO of each st (35)

Row 49 :

[sc 17, inc, sc 17] into the BLO of each st (36)

Row 50 :

sc into the BLO of each st (36)

Row 51 :

[sc 17, inc, sc 18] into the BLO of each st (37)

Rows 52-67 :

sc into the BLO of each st (37)

Info :

Fasten off and weave in ends

β€” Tassels :

Step 1 :

Cut 30 strands of 5.5 inch yarn, and 7 strands of 8.5 inch yarn

Step 2 :

Use 2 strands of the 5.5 inch yarn for each tassel. There will be 15 tassels placed on every other stitch, starting in one corner

Step 3 :

To make a tassel, fold the 2 strands in half. Insert your hook up through the back of the stitch and pull up a loop of the strands. Pull the ends through the loop and tighten

Step 4 :

Make a tassel using one strand of the 8.5 inch yarn on top of each of the 7 center tassels you already created

Step 5 :

Take one strand from each long tassel (or both if your bead is larger), and thread through the bead. Make a knot underneath the bead if you need to

Step 6 :

Trim the remaining long strands not used in the bead to make them level with the shorter strands

Assembly Instructions

  • Fold the pocket section upward to overlap the bottom portion of the diamond pattern section
  • Using your yarn needle and matching yarn, carefully sew the two layers together along both side edges to create the pocket opening
  • Attach the wooden dowel to the top edge by threading yarn around the dowel and through each stitch with a yarn needle
  • To prevent the hanging yarn from pinching the corners of your work, secure the yarn to each end of the wooden dowel
  • Weave in any remaining loose ends throughout the piece for a clean, professional finish

Important Notes

  • πŸ’‘At the start of each row, chain 1 for sc rows and FPtr rows, chain 2 for dc rows, and do not count the turning chains as stitches
  • πŸ’‘After completing a FPtr or FPtr2tog stitch, always make sure you skip a stitch before working the next 3 single crochets to maintain the diamond pattern
  • πŸ’‘This pocket wall hanging is not meant for very large or heavy items due to its lightweight construction and hanging method
  • πŸ’‘If the items inside your pocket are too heavy, use tacks to pin either edge of the wall hanging to the wall just below the inside of the pocket to add stability
  • πŸ’‘The gauge for this pattern is 8 stitches x 6 rows for diamond stitch and 9 stitches x 11 rows for the pocket section using a 5mm hook
  • πŸ’‘Work all pocket rows into the back loop only to create the proper fold and structure for the functional pocket

This beautiful Pocket Wall Hanging pattern combines the elegance of textured diamond stitches with practical everyday function. The intricate front post treble crochet techniques create stunning geometric patterns that look complex but become wonderfully rhythmic once you master the flow. With charming tassels adorned with a delicate bead and a functional pocket perfect for storing mail, small plants, or daily essentials, this project brings bohemian warmth and organization to any space. Whether displayed in your entryway, bedroom, or office, this handmade piece transforms simple yarn into a statement of style and craftsmanship. 🧢 Happy crocheting! 🏑✨

You ask,

we answer.

FAQs

What is FPtr2tog and how do I work this stitch?

FPtr2tog (front post treble crochet two together) creates an upside-down V shape by working two front post treble crochets together. Work the first FPtr around one post stopping at step 4 with 2 loops on hook, then YO twice and work around the next required post, YO and pull through first 2 loops, YO and pull through next 2 loops, then YO and pull through all 3 remaining loops on the hook to complete the stitch.

How do I keep track of which stitches to work into for the diamond pattern?

The key is to remember that FPtr and FPtr2tog stitches are worked around the posts of stitches from previous rows, not into the current row. Use stitch markers to mark your FPtr posts, and remember to skip a stitch after each FPtr or FPtr2tog before working your 3 single crochets. Following the pattern row by row carefully will help you establish the rhythm.

Why does my pocket not fold properly?

Make sure you're working into the back loop only (BLO) for all pocket rows from row 40 onwards. Working into both loops will prevent the natural fold line from forming. The BLO creates a ridge that allows the fabric to fold cleanly where the pocket section begins.

Can I make this wall hanging larger or smaller?

Yes, but you'll need to adjust your foundation chain to a multiple that works with the diamond pattern repeat. The pattern repeats every 4 stitches, so calculate accordingly. You'll also need to adjust the number of times you repeat rows 4-7 for length, and modify the pocket dimensions proportionally.

What if I don't have a wooden dowel?

You can use alternatives like a wooden hanger with the metal removed, a sturdy stick or branch, a piece of bamboo, or even a thick knitting needle. Just make sure whatever you choose is sturdy enough to support the weight of the hanging and any items placed in the pocket.

How can I prevent heavy items from pulling the wall hanging down?

Use small tacks or pins to secure the edges of the wall hanging to the wall, placing them just below the inside edge of the pocket where they'll be hidden. This provides extra stability and keeps the piece flush against the wall when holding heavier items like planters or books.