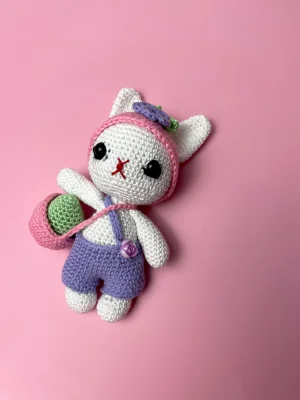
Bring a splash of handmade joy to your spring decor with this darling little bunny. You will love watching this sweet character come to life, from the tiny floppy ears to the custom-fit suspender shorts and miniature Easter basket. It is a wonderful project to curl up with on a quiet afternoon, and the finished toy makes a heartwarming keepsake or a magical addition to any holiday basket.
Progress Tracker
0% Complete
— 1. Legs :
Round 1 :
Start with white yarn and work 6 sc into a magic ring (6)
Round 2 :
Work 1 inc in each of the next 6 st (12)
Round 3 :
Repeat [1 sc, 1 inc] 6 times around (18)
Round 4 :
Work 1 sc in each st around (18)
Round 5 :
Work 1 sc in each st around (18)
Round 6 :
Work 1 sc in each st around (18)
Round 7 :
Work 4 sc, decrease 4 times consecutively, then work 4 sc (14)
Round 8 :
Work 5 sc, decrease 2 times consecutively, then work 5 sc (12)
Round 9 :
Work 1 sc in each st around (12)
Round 10 :
Work 1 sc in each st around (12)
Round 11 :
Work 1 sc in each st around (12)
Info :
Fasten off the first leg. Repeat the steps to make a second leg, but do not cut the yarn on the second leg as we will connect them next. Stuff both legs firmly.
— 2. Body :
Round 12 :
Join the legs by working 1 sc in each of the 12 st of the first leg, then 1 sc in each of the 12 st of the second leg (24)
Round 13 :
Repeat [3 sc, 1 inc] 6 times around (30)
Round 14 :
Work 1 sc in each st around (30)
Round 15 :
Repeat [4 sc, 1 inc] 6 times around (36)
Round 16 :
Work 1 sc in each st around (36)
Round 17 :
Work 1 sc in each st around (36)
Round 18 :
Work 1 sc in each st around (36)
Round 19 :
Work 1 sc in each st around (36)
Round 20 :
Work 1 sc in each st around (36)
Round 21 :
Repeat [4 sc, 1 dec] 6 times around (30)
Round 22 :
Work 1 sc in each st around (30)
Round 23 :
Repeat [3 sc, 1 dec] 6 times around (24)
Round 24 :
Work 1 sc in each st around (24)
Round 25 :
Repeat [2 sc, 1 dec] 6 times around (18)
Round 26 :
Work 1 sc in each st around (18)
Round 27 :
Repeat [1 sc, 1 dec] 6 times around (12)
Round 28 :
Work 1 sc in each st around (12)
Round 29 :
Work 1 sc in each st around (12)
Round 30 :
Work 1 sc in each st around (12)
Round 31 :
Work 1 sc in each st around (12)
Info :
Fasten off and leave a long tail. Stuff the body firmly, adding extra filling to the neck area to support the head.
— 3. Head :
Round 1 :
Using white yarn, work 8 sc into a magic ring (8)
Round 2 :
Work 1 inc in each of the next 8 st (16)
Round 3 :
Repeat [1 sc, 1 inc] 8 times around (24)
Round 4 :
Repeat [2 sc, 1 inc] 8 times around (32)
Round 5 :
Repeat [3 sc, 1 inc] 8 times around (40)
Round 6 :
Repeat [4 sc, 1 inc] 8 times around (48)
Round 7 :
Work 1 sc in each st around (48)
Round 8 :
Work 1 sc in each st around (48)
Round 9 :
Work 1 sc in each st around (48)
Round 10 :
Work 1 sc in each st around (48)
Round 11 :
Work 1 sc in each st around (48)
Round 12 :
Repeat [7 sc, 1 inc] 6 times around (54)
Round 13 :
Work 1 sc in each st around (54)
Round 14 :
Work 1 sc in each st around (54)
Round 15 :
Work 1 sc in each st around (54)
Round 16 :
Repeat [8 sc, 1 inc] 6 times around (60)
Round 17 :
Repeat [8 sc, 1 dec] 6 times around (54)
Round 18 :
Work 3 sc, repeat [7 sc, 1 dec] 5 times, then work 4 sc (48)
Round 19 :
Repeat [6 sc, 1 dec] 6 times around (42)
Round 20 :
Work 2 sc, repeat [5 sc, 1 dec] 5 times, then work 3 sc (36)
Round 21 :
Repeat [4 sc, 1 dec] 6 times around (30)
Info :
Insert safety eyes between Rounds 13 and 14, leaving a space of 9 stitches between them. Fill the head firmly with stuffing.
Round 22 :
Work 1 sc, repeat [3 sc, 1 dec] 5 times, then work 2 sc (24)
Round 23 :
Repeat [1 sc, 1 dec] 8 times around (16)
Info :
Fasten off and leave a long thread for sewing the head to the body.
— 4. Bonnet Hat :
Round 1 :
Using pink yarn, work 6 sc into a magic ring (6)
Round 2 :
Work 1 inc in each of the next 6 st (12)
Round 3 :
Repeat [1 sc, 1 inc] 6 times around (18)
Round 4 :
Repeat [2 sc, 1 inc] 6 times around (24)
Round 5 :
Repeat [3 sc, 1 inc] 6 times around (30)
Round 6 :
Repeat [4 sc, 1 inc] 6 times around (36)
Round 7 :
Repeat [5 sc, 1 inc] 6 times around (42)
Round 8 :
Repeat [6 sc, 1 inc] 6 times around (48)
Round 9 :
Work 1 sc in each st around (48)
Round 10 :
Work 1 sc in each st around (48)
Round 11 :
Work 1 sc in each st around (48)
Round 12 :
Work 1 sc in each st around (48)
Round 13 :
Work 1 sc in each st around (48)
Round 14 :
Work 1 sc in each st around (48)
Round 15 :
Work 1 hdc in each st around (48)
Info :
Fasten off and weave in the ends.
— 5. Arms :
Round 1 :
Using white yarn, work 6 sc into a magic ring (6)
Round 2 :
Work 1 inc in each of the next 6 st (12)
Round 3 :
Work 1 sc in each st around (12)
Round 4 :
Work 1 sc in each st around (12)
Round 5 :
Work 1 sc in each st around (12)
Round 6 :
Work 1 sc in each st around (12)
Round 7 :
Work 1 sc in each st around (12)
Round 8 :
Work 1 sc in each st around (12)
Round 9 :
Work 1 sc in each st around (12)
Round 10 :
Work 1 sc in each st around (12)
Round 11 :
Work 1 sc in each st around (12)
Round 12 :
Work 1 sc in each st around (12)
Round 13 :
Work 1 sc in each st around (12)
Round 14 :
Work 1 sc in each st around (12)
Round 15 :
Work 1 sc in each st around (12)
Info :
Lightly stuff the lower half of the arm, leaving the upper portion unstuffed so it sits naturally against the body.
Round 16 :
Flatten the opening and work 6 sc through both layers to close. Fasten off, leaving a long thread to sew.
— 6. Ears :
Round 1 :
Using white yarn, work 6 sc into a magic ring (6)
Round 2 :
Work 1 inc in each of the next 6 st (12)
Round 3 :
Work 1 sc in each st around (12)
Round 4 :
Repeat [5 sc, 1 inc] 2 times around (14)
Round 5 :
Work 1 sc in each st around (14)
Round 6 :
Repeat [6 sc, 1 inc] 2 times around (16)
Round 7 :
Work 1 sc in each st around (16)
Round 8 :
Repeat [7 sc, 1 inc] 2 times around (18)
Round 9 :
Work 1 sc in each st around (18)
Round 10 :
Repeat [8 sc, 1 inc] 2 times around (20)
Round 11 :
Work 1 sc in each st around (20)
Round 12 :
Repeat [9 sc, 1 inc] 2 times around (22)
Round 13 :
Work 1 sc in each st around (22)
Round 14 :
Work 1 sc in each st around (22)
Round 15 :
Repeat [3 sc, 1 dec] 4 times, then work 2 sc (18)
Round 16 :
Repeat [2 sc, 1 dec] 4 times, then work 2 sc (14)
Round 17 :
Flatten the opening and work 7 sc through both layers. Fasten off, leaving a long tail for assembly.
— 7. Basket :
Round 1 :
Using pink yarn, work 6 sc into a magic ring (6)
Round 2 :
Work 1 inc in each of the next 6 st (12)
Round 3 :
Repeat [1 sc, 1 inc] 6 times around (18)
Round 4 :
Repeat [2 sc, 1 inc] 6 times around (24)
Round 5 :
Work 1 sc in blo of each st around (24)
Round 6 :
Repeat [3 sc, 1 inc] 6 times around (30)
Round 7 :
Work 1 sc in each st around (30)
Round 8 :
Work 1 sc in each st around (30)
Round 9 :
Work 1 sc in each st around (30)
Round 10 :
Work 1 sc in each st around (30)
Round 11 :
ch 30 to create the basket strap, then attach it to the opposite side of the basket with a slst. Fasten off and weave in ends.
— 8. Green Egg :
Round 1 :
Using green yarn, work 6 sc into a magic ring (6)
Round 2 :
Work 1 inc in each of the next 6 st (12)
Round 3 :
Repeat [5 sc, 1 inc] 2 times around (14)
Round 4 :
Repeat [6 sc, 1 inc] 2 times around (16)
Round 5 :
Repeat [7 sc, 1 inc] 2 times around (18)
Round 6 :
Repeat [8 sc, 1 inc] 2 times around (20)
Round 7 :
Repeat [9 sc, 1 inc] 2 times around (22)
Round 8 :
Repeat [10 sc, 1 inc] 2 times around (24)
Round 9 :
Work 1 sc in each st around (24)
Round 10 :
Work 1 sc in each st around (24)
Round 11 :
Work 1 sc in each st around (24)
Round 12 :
Work 1 sc in each st around (24)
Info :
Stuff the egg firmly with fiberfill before closing.
Round 13 :
Repeat [2 sc, 1 dec] 6 times around (18)
Round 14 :
Repeat [1 sc, 1 dec] 6 times around (12)
Round 15 :
Decrease 6 times around (6)
Info :
Fasten off and pull the yarn tail tightly to close the opening, then weave in the end.
— 9. Bonnet Flower & Leaf :
Round 1 :
Using lavender yarn, work 10 sc into a magic ring (10)
Round 2 :
Repeat [1 sc, 3 dc in next st] 5 times around to create the petals. Fasten off, leaving a long tail for sewing.
Leaf :
Using green yarn, ch 10, turn, work 1 hdc in each of the next 10 ch. Repeat this once more to make a second leaf. Fasten off and leave a long tail.
— 10. Suspender Shorts :
Info :
Make two separate leg pieces first.
Round 1 :
Using lavender yarn, ch 21, then join with a slst to form a ring (21)
Round 2 :
ch 1, work 20 sc around, join with a slst (20)
Round 3 :
ch 1, work 20 sc around, join with a slst (20)
Round 4 :
ch 1, work 20 sc around, join with a slst (20)
Info :
Fasten off the first leg piece. Repeat the process for the second leg piece, but do not cut the yarn. We will join them next.
Round 5 :
To connect the legs, work 1 sc in each of the 20 st of the first leg, then 1 sc in each of the 20 st of the second leg (40)
Round 6 :
Work 1 sc in each st around (40)
Round 7 :
Work 1 sc in each st around (40)
Round 8 :
Work 1 sc in each st around (40)
Round 9 :
Repeat [3 sc, 1 dec] 8 times around (32)
Round 10 :
Work 1 sc in each st around (32)
Round 11 :
Work 1 sc in each st around (32)
Round 12 :
Work 3 sc, then ch 20 to create the strap. Turn your work.
Round 13 :
Work 1 hdc in each of the 20 ch. Fasten off and weave in all loose ends.
I hope you enjoyed creating this little spring bunny as much as I did! There is nothing quite like the feeling of watching a handful of yarn transform into an adorable, character-filled companion. Place your finished bunny on a sunny windowsill, tuck it into a loved one's Easter basket, or let it bring a smile to your desk. Don't forget to share your finished creations with our wonderful crafting community—we all love to see your unique personal touches! Happy stitching! 🧶✨🐰