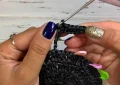
Spook up your coffee table with a touch of handmade charm! This delightful spider coaster is the perfect blend of gothic whimsy and practical crafting. Working with textured raffia gives it a wonderfully rustic feel, making it an absolute joy to stitch up for your autumn decor or Halloween parties. You'll love watching this little eight-legged friend come to life right under your hook!
Progress Tracker
0% Complete
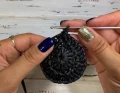
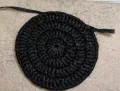
— 1. Spider Body Base :
Round 1 :
ch 3. Work 15 dc in the 3rd ch from hook, sl st to first stitch to join. (15)
Round 2 :
Work 1 inc in each of the 15 stitches around, sl st to join, work 1 ecs. (30)
Round 3 :
Repeat (1 dc, 1 inc) 15 times around, sl st to join, work 1 ecs. (45)
Round 4 :
Repeat (2 dc, 1 inc) 15 times around, sl st to join. Do not cut the yarn. (60)
Info :
Steam the completed flat circle with an iron over a damp cloth, then shape it with your hands. The raffia yarn takes shape beautifully!
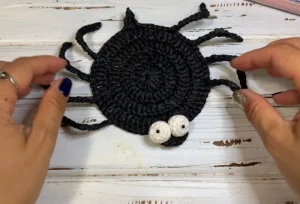
— 2. Legs and Head Trim :
Info :
Before beginning the trim, place stitch markers into the 8th, 12th, 16th, 20th, 30th, 40th, 44th, 48th, and 52nd loops of Round 4.
Step 1 :
Work 8 sl st along the edge of the circle.
Leg 1 :
ch 12, starting in the 2nd ch from hook work 6 sc, then work 3 sc in the next ch, work 4 sc down the remaining chains, work 1 sl st into the 8th marked loop of the base.
Step 3 :
Work 3 sl st along the edge of the circle.
Leg 2 :
ch 12, starting in the 2nd ch from hook work 6 sc, then work 3 sc in the next ch, work 4 sc down the remaining chains, work 1 sl st into the 12th marked loop of the base.
Step 5 :
Work 3 sl st along the edge of the circle.
Leg 3 :
ch 12, starting in the 2nd ch from hook work 6 sc, then work 3 sc in the next ch, work 4 sc down the remaining chains, work 1 sl st into the 16th marked loop of the base.
Step 7 :
Work 3 sl st along the edge of the circle.
Leg 4 :
ch 12, starting in the 2nd ch from hook work 6 sc, then work 3 sc in the next ch, work 4 sc down the remaining chains, work 1 sl st into the 20th marked loop of the base.
Step 9 :
Work 7 sl st along the edge of the circle.
Head :
Skip 2 loops, work 8 dc into the 30th marked loop, skip 2 loops.
Step 11 :
Work 8 sl st along the edge of the circle.
Leg 5 :
ch 12, starting in the 2nd ch from hook work 6 sc, then work 3 sc in the next ch, work 4 sc down the remaining chains, work 1 sl st into the 40th marked loop of the base.
Step 13 :
Work 3 sl st along the edge of the circle.
Leg 6 :
ch 12, starting in the 2nd ch from hook work 6 sc, then work 3 sc in the next ch, work 4 sc down the remaining chains, work 1 sl st into the 44th marked loop of the base.
Step 15 :
Work 3 sl st along the edge of the circle.
Leg 7 :
ch 12, starting in the 2nd ch from hook work 6 sc, then work 3 sc in the next ch, work 4 sc down the remaining chains, work 1 sl st into the 48th marked loop of the base.
Step 17 :
Work 3 sl st along the edge of the circle.
Leg 8 :
ch 12, starting in the 2nd ch from hook work 6 sc, then work 3 sc in the next ch, work 4 sc down the remaining chains, work 1 sl st into the 52nd marked loop of the base.
Tail :
Work 7 sl st along the edge, then work 3 dc together in the final stitch to form the tail. Cut the yarn and weave in the ends.
— 3. Eyes (Make 2) :
Round 1 :
Using white or ivory yarn, ch 2, then work 6 sc into the 2nd ch from your hook. (6)
Round 2 :
Work 1 inc in each of the 6 stitches around. Pull the starting yarn tail to the front side to hide it. (12)
Round 3 :
Work 12 sc around. (12)
Round 4 :
Work 12 sc around. (12)
Info :
Firmly stuff the small eye piece with a bit of fiberfill before closing.
Round 5 :
Work 6 dec around. (6)
Info :
Pull the remaining opening closed, fasten off, and weave in all yarn ends.
Bring a bit of cozy, handmade magic to your home this season! Whether you're setting down a hot mug of spiced cider or gifting a complete set to a fellow Halloween enthusiast, this little spider is sure to spark smiles. Keep your stitches snug, have fun shaping those wiggly legs, and enjoy every single stitch. Happy making! 🧶✨🕷️