🧢 Beautiful ✨ Detailed πŸ’ Adorable

Hello Kitty Amigurumi Pattern

Hello Kitty Amigurumi Pattern
4.8β˜… Rating
3-4 Hours Time Needed
3.3K Made This
βœ‚οΈ

Beginner Friendly Level

Perfect for those just starting their sewing journey, with clear instructions and simple techniques

⏱️

Bite-Sized Project

Complete in under 2 hoursβ€”quick, fun, and perfect for a little creative escape.

🧸

Cute Companion

An adorable friend to cherish, handcrafted with love to bring comfort and joy for years to come.

About This Hello Kitty Amigurumi Pattern

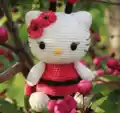
This Hello Kitty amigurumi pattern brings the beloved Sanrio character to life in a huggable size perfect for display or cuddles. The design features her iconic proportions with a large round head, small body, and adorable details like her signature red bow. Working in continuous rounds with simple increases and decreases, you'll create a sturdy yet soft figure that captures Hello Kitty's timeless charm and innocent expression.

Hello Kitty Amigurumi Pattern crochet pattern - detailed view of completed project

The pattern uses basic amigurumi techniques including magic rings, single crochet, and strategic stuffing to achieve the perfect shape. Color changes are minimal, making this an ideal project for practicing fundamental skills while creating something truly special.

Why You'll Love This Hello Kitty Amigurumi Pattern

I absolutely love this Hello Kitty pattern because it captures such an iconic character in the most huggable form! There's something magical about watching those simple rounds transform into that recognizable silhouette we all grew up loving. The satisfaction of adding that signature red bow and seeing Hello Kitty come to life is unmatched. Plus, it's quick enough to finish in an afternoon but detailed enough to feel like a real accomplishment. Whether you're making it for yourself or as a gift, this pattern brings pure nostalgia and joy to every stitch!

Hello Kitty Amigurumi Pattern step 1 - construction progress Hello Kitty Amigurumi Pattern step 2 - assembly progress Hello Kitty Amigurumi Pattern step 3 - details and accessories Hello Kitty Amigurumi Pattern step 4 - final assembly and finishing

Switch Things Up

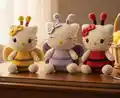
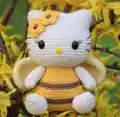
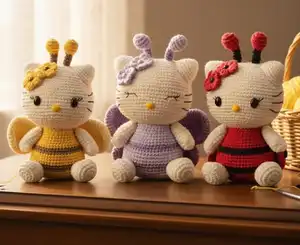
I love experimenting with this Hello Kitty pattern to create unique variations that reflect different personalities and styles! Try making a seasonal version by adding a tiny crocheted scarf and hat for winter, or create a summer Hello Kitty with a flower crown instead of the traditional bow. You could also work with sparkly yarn or add small sequins to make a glamorous version perfect for display.

Consider making Hello Kitty in pastel rainbow colors for an adorable twist on the classic design, or use variegated yarn to create a tie-dye effect that's totally unique. I've even made versions with different sized bows - oversized bows make her look extra sweet and dramatic, while tiny bows give a more minimalist, modern aesthetic.

For a truly special gift, personalize your Hello Kitty by adding small crocheted accessories like a tiny purse, sunglasses, or even miniature clothing items. You can also adjust the proportions slightly - making the head a bit larger creates an even cuter chibi-style Hello Kitty, while keeping proportions more even gives a sophisticated look. The possibilities are endless, and each variation tells its own story while keeping that signature Hello Kitty charm we all adore!

Common Mistakes & How to Fix Them

βœ— Forgetting to stuff the head firmly enough before closing, which results in a floppy appearance that loses Hello Kitty's signature round shape βœ— Placing the eyes too far apart or at uneven heights, disrupting the balanced and symmetrical look that defines her sweet face βœ— Not securing the bow properly to the ear area, causing it to droop or shift position and lose that iconic Hello Kitty silhouette βœ— Overstuffing the body which creates an unnatural bulge and throws off the proportions between the large head and smaller body

Hello Kitty Amigurumi Pattern

Create your own adorable Hello Kitty with this charming amigurumi crochet pattern! This iconic character comes to life through simple stitches and careful assembly, perfect for gifting or adding to your collection. With her signature red bow and sweet expression, this Hello Kitty will bring smiles to crafters and recipients alike. The pattern guides you through creating her round head, cute body, and all the tiny details that make Hello Kitty so recognizable and beloved worldwide.

Beginner Friendly 3-4 Hours

Materials Needed for Hello Kitty Amigurumi Pattern

β€” Main Fabric

  • 01
    White yarn (cotton or acrylic) for the head, body, arms, and legs
  • 02
    Red yarn for the iconic bow and nose
  • 03
    Yellow yarn for the nose detail
  • 04
    Small amount of black yarn for facial features embroidery

β€” Tools Required

  • 01
    Crochet hook size 2.5mm or 3mm
  • 02
    Black safety eyes (6-8mm)
  • 03
    Yarn needle for sewing
  • 04
    Scissors
  • 05
    Stitch markers
  • 06
    Polyester fiberfill stuffing
  • 07
    Pins for assembly

Progress Tracker

0% Complete

β€” Head :

Round 1 :

6 sc in magic ring (6)

Round 2 :

6 inc (12)

Round 3 :

(1 sc, 1 inc) x 6 (18)

Round 4 :

(2 sc, 1 inc) x 6 (24)

Round 5 :

(3 sc, 1 inc) x 6 (30)

Round 6 :

(4 sc, 1 inc) x 6 (36)

Round 7 :

(5 sc, 1 inc) x 6 (42)

Round 8-14 :

1 sc in each st (42)

Round 15 :

(5 sc, 1 dec) x 6 (36)

Round 16 :

(4 sc, 1 dec) x 6 (30)

Round 17 :

(3 sc, 1 dec) x 6 (24)

Info :

Place safety eyes between rounds 11-12, approximately 6 stitches apart

Info :

Stuff head firmly before continuing

Round 18 :

(2 sc, 1 dec) x 6 (18)

Round 19 :

(1 sc, 1 dec) x 6 (12)

Round 20 :

6 dec (6)

Info :

Fasten off and close the opening

β€” Body :

Round 1 :

6 sc in magic ring (6)

Round 2 :

6 inc (12)

Round 3 :

(1 sc, 1 inc) x 6 (18)

Round 4 :

(2 sc, 1 inc) x 6 (24)

Round 5-8 :

1 sc in each st (24)

Round 9 :

(2 sc, 1 dec) x 6 (18)

Round 10 :

(1 sc, 1 dec) x 6 (12)

Info :

Stuff body before closing

Round 11 :

6 dec (6)

Info :

Fasten off leaving long tail for sewing

β€” Arms :

Info :

Make 2 pieces

Round 1 :

5 sc in magic ring (5)

Round 2-6 :

1 sc in each st (5)

Info :

Do not stuff arms, fasten off leaving tail for sewing

β€” Legs :

Info :

Make 2 pieces

Round 1 :

6 sc in magic ring (6)

Round 2 :

6 inc (12)

Round 3-4 :

1 sc in each st (12)

Round 5 :

(2 sc, 1 dec) x 3 (9)

Round 6-7 :

1 sc in each st (9)

Info :

Stuff legs lightly, fasten off leaving tail for sewing

β€” Ears :

Info :

Make 2 pieces

Round 1 :

4 sc in magic ring (4)

Round 2 :

4 inc (8)

Round 3 :

(1 sc, 1 inc) x 4 (12)

Round 4 :

1 sc in each st (12)

Info :

Do not stuff ears, flatten and sew to head

β€” Bow :

Info :

Using red yarn

Step 1 :

Chain 10, turn

Step 2 :

Starting in 2nd chain from hook, 9 sc, turn

Step 3 :

Repeat for 4 more rows

Info :

Wrap yarn around middle several times and secure to create bow shape

β€” Nose :

Info :

Using yellow yarn

Round 1 :

6 sc in magic ring (6)

Info :

Fasten off leaving tail for sewing

β€” Facial Features :

Info :

Embroider whiskers using black yarn on each side of nose (3 lines per side)

Info :

Embroider small vertical lines for eyes if not using safety eyes

Assembly Instructions

  • Sew the head securely to the body, ensuring it's centered and positioned at a slight forward tilt for that classic Hello Kitty posture
  • Attach ears to the top sides of the head at rounds 8-9, spacing them evenly and angling them slightly outward
  • Position the red bow on the left ear (or right, depending on preference) and sew it securely in place
  • Sew the yellow nose to the center of the face just below the eyes
  • Attach arms to sides of body at rounds 2-3, allowing them to hang naturally at the sides
  • Sew legs to the bottom of the body, positioning them to allow Hello Kitty to sit upright
  • Embroider the whiskers and any additional facial details using black yarn with neat, even stitches

Important Notes

  • πŸ’‘Use stitch markers to track your rounds, especially when working on the head where symmetry is crucial for Hello Kitty's iconic look
  • πŸ’‘Stuff the head very firmly to maintain the round shape, but keep the body moderately stuffed for a balanced appearance
  • πŸ’‘When placing safety eyes, use pins first to test positioning before securing permanently to ensure perfect symmetry
  • πŸ’‘Keep tension consistent throughout to achieve smooth, even fabric that showcases Hello Kitty's clean, polished design
  • πŸ’‘The bow can be made larger or smaller by adjusting the chain count and number of rows to customize your Hello Kitty
  • πŸ’‘Weave in all ends securely as they may be visible on white yarn if not properly hidden

This adorable Hello Kitty amigurumi pattern brings one of the world's most beloved characters into your hands! With simple techniques and careful attention to her signature features, you'll create a timeless companion that captures the sweet innocence and charm that has made Hello Kitty an icon for generations. The pattern is perfect for beginners looking to build confidence while creating something truly special. 🧢 Happy crocheting! πŸŽ€βœ¨

You ask,

we answer.

FAQs

What size will my finished Hello Kitty be?

Using the recommended yarn weight and hook size, your finished Hello Kitty will be approximately 10-12cm (4-5 inches) tall when sitting. You can adjust the size by using thicker or thinner yarn with an appropriate hook size.

Can I use different colors for Hello Kitty?

Absolutely! While classic Hello Kitty is white with a red bow, you can customize colors to create unique variations. Try pink, blue, or even rainbow colors for a personalized touch.

Do I need to use safety eyes or can I embroider them?

You can use either method! Safety eyes give a polished look and are more secure for toys, while embroidered eyes are safer for very young children and give a softer, more handmade appearance.

How do I prevent the head from being too heavy and tipping over?

Make sure to stuff the body adequately and consider adding a bit more stuffing to the bottom portion. You can also sew the head slightly forward rather than straight up to help with balance.

Can I make the bow removable?

Yes! Instead of sewing the bow permanently, you can attach a small snap fastener or velcro to make it removable, allowing you to change bows or wash them separately.