🧶 Beautiful ✨ Detailed 💝 Adorable

Cosmopolitan Gloves Crochet Pattern

Cosmopolitan Gloves Crochet Pattern
4.7★ Rating
2-3 Hours Time Needed
4.0K Made This
✂️

Intermediate Level

Ideal for those with basic knitting experience, featuring slightly more advanced stitches and techniques to expand your skills.

⏱️

Bite-Sized Project

Complete in under 2 hours—quick, fun, and perfect for a little creative escape.

🧣

Snug Essential

Everyday comfort with practical charm, designed for both functionality and style through changing seasons.

About This Cosmopolitan Gloves Crochet Pattern

Cosmopolitan Gloves Crochet Pattern crochet pattern - detailed view of completed project

With options for both short and extended cuffs, you can customize the length to suit your preference. The pattern includes detailed adjustment ideas to ensure a perfect fit for every hand size.

Why You'll Love This Cosmopolitan Gloves Crochet Pattern

I absolutely love this pattern because it strikes the perfect balance between quick gratification and impressive results. The alpine stitch creates such a professional, intricate look that people are always amazed when I tell them how fast these work up. I also appreciate how the pattern guides you through customizing the fit—no more guessing whether your handmade gloves will actually fit comfortably. The ribbed cuff technique creates such a polished, store-bought appearance while remaining stretchy and comfortable. Plus, being able to make matching pairs for my whole family or friends makes gift-giving so much more meaningful and personal.

Cosmopolitan Gloves Crochet Pattern step 1 - construction progress Cosmopolitan Gloves Crochet Pattern step 2 - assembly progress Cosmopolitan Gloves Crochet Pattern step 3 - details and accessories Cosmopolitan Gloves Crochet Pattern step 4 - final assembly and finishing

Switch Things Up

I love experimenting with this versatile glove pattern in so many creative ways! One of my favorite variations is using variegated or self-striping yarn—the alpine stitch really showcases color changes beautifully, creating an almost geometric effect without any extra work. For a more dramatic look, I've tried using two contrasting colors: one for the cuff and horizontal ribbing, and another for the alpine stitch body, which creates a stunning color-blocked effect.

When making these as gifts, I sometimes add small embellishments like tiny buttons, embroidered initials, or even delicate beadwork along the cuff edge for extra personalization. For a cozy winter version, I've made extended cuffs that reach nearly to my elbows, perfect for layering under coat sleeves. I've also experimented with making the body section in a different stitch pattern entirely—try moss stitch or even a simple textured stitch if alpine stitch feels too advanced.

For kids' versions, I love adding a small crochet flower or animal appliqué on the back of the hand. You can also make these more functional by adding small loops or ties to keep pairs together in storage. The pattern is incredibly adaptable, so don't be afraid to make it your own!

Common Mistakes & How to Fix Them

✗ Working slip stitches too tightly in the cuff causes stiffness and lack of stretch—work them loosely for proper elasticity and comfort ✗ Missing the last stitch in ribbing rows creates uneven edges—use a stitch marker to mark the final stitch clearly ✗ Making horizontal ribbing narrower than the cuff causes pulling and poor fit—ensure rows 2-6 match the cuff width when laid flat ✗ Forgetting to work slip stitches in back loops only creates wrong texture—always check you're working in BLO for ribbing sections ✗ Placing thumb opening incorrectly makes gloves uncomfortable—always try on and adjust stitch markers before final seaming for best fit

Cosmopolitan Gloves Crochet Pattern

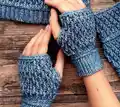
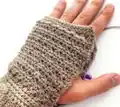
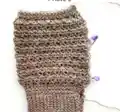
Create stunning fingerless gloves that combine elegance with comfort in this detailed crochet pattern. Featuring a stretchy ribbed cuff and beautiful alpine stitch design, these gloves are perfect for keeping your hands warm while maintaining dexterity. Whether you're crafting for yourself, your family, or stocking up for craft fairs, these customizable gloves work up quickly in just a couple of hours. The pattern includes five sizes from toddler to adult large, making it versatile for the whole family.

Intermediate 2-3 Hours

Materials Needed for Cosmopolitan Gloves Crochet Pattern

— Main Fabric

  • 01
    CYC 2 fine/sport/baby weight yarn or CYC 3 DK/light weight yarn
  • 02
    Scheepjes Stonewashed (sport weight) or any sport/DK yarn that meets gauge
  • 03
    Fingering weight yarn also works with gauge adjustments

— Tools Required

  • 01
    3.5mm crochet hook for cuff
  • 02
    5mm crochet hook for body
  • 03
    Tape measure
  • 04
    Scissors
  • 05
    Darning needle
  • 06
    2 stitch markers

Progress Tracker

0% Complete

— CUFF (3.5MM HOOK) :

Row 1A (short cuff) :

CH 9 (9, 10, 11, 11), working in the top loop of CH, SL ST in 2nd CH from hook and in each CH across. Turn. (8, 8, 9, 10, 10 SL ST)

Row 2A :

CH 1, bloSLST in each SL ST across. Turn. (8, 8, 9, 10, 10 bloSLST)

Row 1B (extended cuff) :

CH 21 (23, 25, 27, 29), working in the top loop of CH, SL ST in 2nd CH from hook and in each CH across. Turn. (20, 22, 24, 26, 28 SL ST)

Row 2B :

CH 1, bloSLST in each SL ST across. Turn. (20, 22, 24, 26, 28 bloSLST)

Info :

Repeat row 2 until the cuff fits snugly around the wrist. End with an even number of rows. Note how many rows you work so you can repeat for the other glove. Do not fasten off. Move to Body.

— BODY (5MM HOOK) :

Row 1 (RS) :

CH 1 and place 20 (24, 28, 32, 36) SC evenly across, working in between each of the ribbing ridges. Turn. (20, 24, 28, 32, 36 ST)

Row 2 :

CH 1, SL ST in 1st ST and in each ST across. Turn.

Row 3 :

CH 1, bloSLST in 1st ST and in each ST across. Turn.

Rows 4-6 :

Repeat row 3.

Row 7 :

CH 2, bloDC in 1st ST and in each ST across. Turn.

Row 8 :

CH 1, SC in 1st ST and in each ST across. Turn.

Row 9 :

CH 2, FPDC around first DC from 2 rows below, SK 1st SC from prev row and DC in next SC, *FPDC around next DC from 2 rows below, SK next SC from prev row and DC in next SC. Repeat from * across. Turn.

Row 10 :

CH 1, SC in 1st ST and in each ST across. Turn.

Row 11 :

CH 2, DC in first SC from prev row, SK next FPDC from 2 rows below and FPDC around next DC, *DC in next SC from prev row, SK next FPDC from 2 rows below and FPDC around next DC. Repeat from * across until 2 STS rem. DC in last 2 STS. Turn.

Row 12 :

CH 1, SC in 1st ST and in each ST across. Turn.

Info :

Size 1 only: Repeat rows 9-11, 1 more time. Go to row 17. Size 2 only: Repeat rows 9-11, 1 more time. Go to row 13. Size 3 only: Repeat rows 9-12, 2 more times, ending last rep at row 11 (7 total rows). Go to row 13. Size 4 only: Repeat rows 9-12, 3 more times, ending last rep at row 9 (9 total rows). Go to row 13. Size 5 only: Repeat rows 9-12, 3 more times, ending last rep at row 11 (11 total rows). Go to row 13.

Row 13 :

Repeat row 2.

Rows 14-17 :

Repeat row 3.

Info :

Your last row will be on the WS. Fasten off, leaving a long tail and go to Assembly.
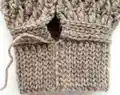
— ASSEMBLY :

Step 1 :

Fold the glove with RS facing out and use the beg tail to join together the ribbing, going through both loops of the last row of ribbing and both loops of the foundation chain using mattress stitch.

Step 2 :

Turn the glove inside out and fold it again. Roughly separate the glove in thirds using stitch markers. Try the glove on at this point and adjust the placement of the stitch markers to find the best position of the thumb opening.

Step 3 :

Continue using the beg tail to join the edges up to the first stitch marker. Still working with WS facing out, use the finishing tail to join the edges up to the second stitch marker.

Step 4 :

Check that the hole created fits the thumb comfortably and make any necessary adjustments. When you are happy with the fit, seam the edges again going in the opposite direction for a more secure join. Fasten off and go to Thumb.

— THUMB :

Finishing :

With RS facing out and using your main hook, join yarn with a SL ST anywhere along the open edge, CH 1 and place 2 SC in the side of every DC row and 1 SC in the side of every SC row. Go around and SL ST in top of 1st SC. Fasten off, weave in ends.

Assembly Instructions

  • Fold glove with right side facing out and use beginning tail to join ribbing edges using mattress stitch through both loops
  • Turn glove inside out and fold again, then use stitch markers to roughly divide glove into thirds for thumb placement
  • Try on the glove and adjust stitch marker placement to find the most comfortable thumb opening position for your hand
  • Join edges from bottom up to first marker using beginning tail, then join from top down to second marker using finishing tail
  • Check thumb hole fit and make adjustments if needed before seaming edges again in opposite direction for security
  • With right side facing out, add single crochet edging around thumb opening: 2 SC per DC row and 1 SC per SC row
  • Weave in all remaining yarn ends securely and block gloves gently if desired for best finished appearance

Important Notes

  • 💡Work all slip stitches loosely throughout the pattern to maintain proper stretch and elasticity in the ribbing
  • 💡Mark the last stitch in ribbing rows with a stitch marker to avoid accidentally skipping it
  • 💡Ensure horizontal ribbing (rows 2-6) matches the width of the cuff when laid flat to prevent pulling
  • 💡Pull the cuff band horizontally every few rows while working to even out stitches that tend to tighten
  • 💡Keep track of total row count for the first cuff to ensure both gloves match perfectly
  • 💡Try on glove before final assembly to adjust thumb opening placement for optimal comfort and fit
  • 💡Consider going up a hook size for rows 2-6 if horizontal ribbing tends to be tighter than cuff

The Cosmopolitan Gloves pattern brings together timeless elegance and modern functionality in a quick-to-make accessory you'll reach for again and again. With its stretchy ribbed cuff and stunning alpine stitch texture, these fingerless gloves are as practical as they are beautiful. The pattern's flexibility allows you to customize length and fit, making it perfect for crafters of all levels looking to create wearable art. Whether you're keeping your own hands warm or creating thoughtful handmade gifts, these gloves will quickly become a favorite project. 🧶 Happy crocheting! 🧣✨

You ask,

we answer.

FAQs

Can I use fingering weight yarn instead of sport or DK weight?

Yes! Pattern testers have successfully used fingering weight yarn with great results. You may need to adjust your hook size to achieve proper gauge, and the finished gloves will be slightly more delicate and fitted.

What if my horizontal ribbing is narrower than my cuff?

This is a common issue that can cause pulling after assembly. Try working rows 2-6 with a larger hook (go up a full size if needed), work stitches extra loosely, or follow the adjustment instructions in the pattern to increase stitch count temporarily.

How do I know where to place the thumb opening?

The pattern recommends dividing the glove roughly into thirds with stitch markers, then trying it on before final seaming. Adjust the marker placement until the opening feels comfortable and natural for your thumb position.

Can I make these gloves longer or with full fingers?

Absolutely! For longer fingerless gloves, simply repeat the alpine stitch pattern (rows 9-12) additional times before working the final ribbing rows. For full fingers, you would need to modify the pattern significantly by working in rounds for each finger.

Why do my slip stitches keep getting too tight?

Slip stitches naturally tend to tighten up, especially when worked in back loops only. Focus on keeping your tension very loose, and remember to pull the band horizontally every few rows to even out the stitches and restore stretch.