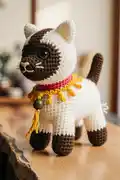
Bring the elegance of a Siamese cat to life with Toby, a charming 4.3-inch amigurumi companion! This detailed pattern features beautiful color transitions from cream to brown, capturing the distinctive markings of a Siamese breed. Complete with adorable blue ocean eyes, a decorative collar with bell, and carefully embroidered facial features, Toby is a delightful project for cat lovers. The pattern includes intricate details like whiskers, eyelids, and a sweet expression that will melt hearts. Perfect as a gift or a special addition to your handmade collection!
Progress Tracker
0% Complete
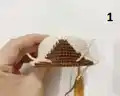
— HEAD (brown and cream yarn) :
Info :
Use the cream yarn to make magic ring, work in a continuous spiral. Black word: cream yarn. Red word: brown yarn.
Round 1 :
8sc into magic ring (8)
Round 3 :
(sc, inc)*8 (24)
Round 4 :
(2sc, inc)*8 (32)
Round 5 :
(3sc, inc)*8 (40)
Round 6 :
(4sc, inc)*8 (48)
Round 7 :
(5sc, inc)*8 (56)
Round 9 :
(6sc, inc)*8 (64)
Round 11 :
36sc, 3sc, 25sc (64)
Round 12 :
35sc, 5sc, 24sc (64)
Round 13 :
34sc, 7sc, 23sc (64)
Round 14 :
33sc, 9sc, 22sc (64)
Round 15 :
31sc, 13sc, 20sc (64)
Round 16 :
30sc, 15sc, 19sc (64)
Round 17 :
15sc, (sc, inc)*7, sc, inc, 14sc, sc, inc, (sc, inc)*7, 3sc (80)
Round 18 :
35sc, 6sc, mark the point, 9sc, mark the point, 6sc, 24sc (80)
Round 19 :
34sc, 23sc, 23sc (80)
Round 20-22 :
33sc, 25sc, 22sc (80)
Round 23 :
(8sc, dec)*3, 3sc, 5sc, dec, 8sc, dec, 8sc, dec, (8sc, dec)*2 (72)
Round 24 :
(7sc, dec)*3, 4sc, 3sc, dec, 7sc, dec, 7sc, dec, (7sc, dec)*2 (64)
Round 25 :
(6sc, dec)*3, 5sc, sc, dec, 6sc, dec, 6sc, dec, (6sc, dec)*2 (56)
Round 26 :
(5sc, dec)*4, sc, 4sc, dec, 4sc, sc, dec, (5sc, dec)*2 (48)
Round 27 :
(4sc, dec)*8 (40)
Round 28 :
BLO (3sc, dec)*8 (32)
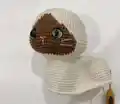
Infos :
Insert the safety eyes between round 18-19 with 7 sts apart. Stuff the head. Use white yarn to sew mouth and whiskers between round 20-22. Use white and black yarn to sew eyelid. Use orange blush on the nose. Now continue to crochet body.
— BODY (cream yarn) :
Info :
Use the cream yarn, work in a continuous spiral
Round 1 :
Make a chain of 10ch, start in the 2nd chain from hook, place the stitch marker after crocheting the 1st stitch, this is the 1st stitch of round 1 of body: inc, 8sc, 32sc on the head, work on the other side of the chain: 8sc, inc (52)
Round 2 :
2inc, 48sc, 2inc (56)
Round 3 :
(sc, inc)*2, 15sc, inc, 16sc, inc, 15sc, (sc, inc)*2 (62)
Round 4 :
(sc, inc, sc)*2, 7sc, inc, 34sc, inc, 7sc, (sc, inc, sc)*2 (68)
Round 5 :
(3sc, inc)*2, 52sc, (3sc, inc)*2 (72)
Round 6 :
(11sc, inc)*6 (78)
Round 7 :
(12sc, inc)*6 (84)
Round 14 :
(12sc, dec)*6 (78)
Info :
Don't cut the yarn, now we start to crochet the legs
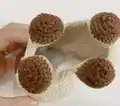
— LEGS (4 pieces - cream, brown and light brown yarn) :
Info :
Use the cream yarn, work in a continuous spiral. 2sc, chain 10, skip 14sts, 7sc, chain 10, skip 14sts, 4sc, chain 10, skip 14sts, 7sc, chain 10, skip 14sts, slst. Fasten off, weave in the yarn end. There are 4 holes and we crochet 4 legs in there. Start with the 1st leg.
Round 1 :
14sc, 10sc on the chain (24)
Round 2-4 :
Change to light brown yarn 24sc (24)
Round 5 :
Change to brown yarn 24sc (24)
Round 6 :
(sc, dec)*8 (16)
Info :
Fasten off, leaving a long tail about 15cm for sew the FLO of each remaining stitches and pull it tight to close. Weave in end. Crochet the remaining legs similar to the 1st leg.
— STOMACH (cream yarn) :
Info :
Use the cream yarn, work in round
Round 1 :
Attach yarn to the 1st stitch next the front leg. 7sc, 1ch, turn (7)
Round 2 :
7sc, 1ch, turn (7)
Round 3 :
7sc, 7ch, rotation (7)
Round 4 :
Start in the 2nd loop from hook: 13sc, 7ch, rotation (13)
Round 5 :
Start in the 2nd loop from hook: 19sc, 1ch, turn (19)
Round 6 :
19sc, 1ch, turn (19)
Round 7 :
13sc, 1ch, turn (13)
Round 8-10 :
7sc, 1ch, turn (7)
Info :
Fasten off, leaving a long tail about 50cm for sewing. Stuff while sewing.
— EARS (2 pieces - brown and cream yarn) :
Info :
Use the brown yarn to make magic ring, work in a continuous spiral. Black word: brown yarn. Red word: cream yarn.
Round 1 :
4sc into magic ring (4)
Round 3 :
(sc, inc)*4 (12)
Round 4 :
2sc, inc, 2sc, inc, (2sc, inc)*2 (16)
Round 5 :
3sc, inc, 2sc, sc, inc, (3sc, inc)*2 (20)
Round 6 :
4sc, inc, 2sc, 2sc, inc, (4sc, inc)*2 (24)
Round 7 :
5sc, inc, 2sc, 3sc, inc, (5sc, inc)*2 (28)
Round 8 :
9sc, 5sc, 14sc (28)
Info :
Stuff the ears. Fasten off, leave a long tail for sewing.
— TAIL (brown yarn) :
Info :
Use the brown yarn to make magic ring, work in a continuous spiral
Round 1 :
5sc into magic ring (5)
Round 3 :
(sc, inc)*5 (15)
Info :
Fasten off, leave a long tail for sewing. Stuff the tail.
— COLLAR (red and honey yarn) :
Info :
Use the red yarn, work in round
Round 1 :
Make a chain of 42ch, start from the 7th chain from hook: (hdc, hdc inc)*18, turn (54)
Round 2 :
Change to honey yarn ch, 54sc, turn (54)
Round 3 :
(ch6, sk2, slst)*18 (126)
Info :
Fasten off, weave in the yarn end. Sew the button and the bell to the collar. Wear collar for the cat.
This charming Toby the Siamese Cat pattern was lovingly designed to capture the elegant beauty and distinctive markings of this beloved breed in miniature form! With detailed color work, expressive embroidered features, and adorable accessories including a decorative collar with bell, this pattern creates a truly special amigurumi companion. The 4.3-inch finished size makes Toby perfect for display, gifting, or cuddling. Whether you're a cat enthusiast or simply love creating detailed amigurumi characters, this pattern will bring joy to your crafting journey. 🐱🧶 Happy crocheting! ✨