🧢 Beautiful ✨ Detailed πŸ’ Adorable

Paris At Night Shawl Pattern

Paris At Night Shawl Pattern
4.6β˜… Rating
15-20 Hours Time Needed
3.1K Made This
βœ‚οΈ

Intermediate Level

Ideal for those with basic knitting experience, featuring slightly more advanced stitches and techniques to expand your skills.

⏱️

Slow & Steady

A 10-12 hour projectβ€”great for savoring the process over several sessions.

✨

Stylish Touch

An elegant detail to elevate any look, combining traditional techniques with contemporary design sensibilities.

About This Paris At Night Shawl Pattern

This Paris At Night shawl pattern is a tribute to the romance and elegance of French evenings. Designed as part of an Outlander-inspired collection, it captures the sophistication of 18th-century France while remaining perfectly wearable for modern occasions. The pattern features delicate lace sections alternating with beaded rows, creating texture and sparkle that catches the light beautifully. With its triangular construction worked from the center spine outward, you'll watch your shawl grow organically with each row.

Paris At Night Shawl Pattern crochet pattern - detailed view of completed project

Using just one skein of luxurious sock-weight yarn, this design showcases the beauty of simple materials elevated by thoughtful construction. The beaded accents and fringe finishing add movement and elegance without overwhelming the delicate lace patterns.

Why You'll Love This Paris At Night Shawl Pattern

I absolutely love how this pattern transforms a single skein into something truly special. The meditative rhythm of the lace rows combined with the sparkle of beads makes every knitting session feel luxurious. What really captures my heart is how versatile it isβ€”I can imagine wearing it to a summer wedding or draping it over my shoulders on a cool evening. The row-by-row instructions mean I never feel lost, and watching the triangular shape emerge from that tiny cast-on is pure magic. Plus, there's something deeply satisfying about adding those beads as you go, knowing each one adds to the overall sparkle. The fringe finishing touch makes it feel utterly complete and professionally crafted.

Paris At Night Shawl Pattern step 1 - construction progress Paris At Night Shawl Pattern step 2 - assembly progress Paris At Night Shawl Pattern step 3 - details and accessories Paris At Night Shawl Pattern step 4 - final assembly and finishing

Switch Things Up

I love experimenting with this pattern by changing up the colorways to match different occasions. For a winter wedding, I used deep burgundy yarn with gold beads that caught the candlelight beautifully. The silk-merino blend recommended in the pattern is absolutely divine, but I've also had success with pure merino sock yarn when I wanted a more budget-friendly option.

One of my favorite modifications is adjusting the fringe length. The pattern calls for 23cm pieces, but I've gone shorter for a more modern look and longer for dramatic evening wear. You could even skip the fringe entirely and add a simple crocheted edge if that's more your style.

For knitters who want less beading, you could eliminate the beads in Section 2 and just work the lace pattern plain. The structure would remain the same, giving you a lighter, more casual shawl. Alternatively, add beads to Section 1 as well if you love maximum sparkle.

I've also played with the bead colors tremendously. Clear beads create an icy, ethereal effect while bronze or copper beads add warmth. Matching your beads exactly to your yarn creates subtle texture, while contrasting colors make a bold statement.

The pattern is also wonderful for using up that special single skein you've been saving. Since it only requires 400m, it's perfect for those luxury mini-skeins that are too precious to use on just anything. This way, your special yarn becomes a wearable work of art you'll treasure for years.

Common Mistakes & How to Fix Them

βœ— Forgetting to pre-thread all 188 beads onto your yarn before starting, which means having to break yarn and rejoin later βœ— Losing track of your place in pattern repeats especially in Sections 2 and 4 where bead placement is critical βœ— Pulling beaded stitches too tight which distorts the lace pattern and prevents proper blocking later on βœ— Skipping the blocking step which is essential for opening up the eyelet sections and achieving the proper drape βœ— Not using stitch markers consistently at the center spine causing misaligned increases and an asymmetrical finished shawl βœ— Cutting fringe pieces too short or unevenly making the edging look unfinished and unprofessional after assembly

Paris At Night Shawl Pattern

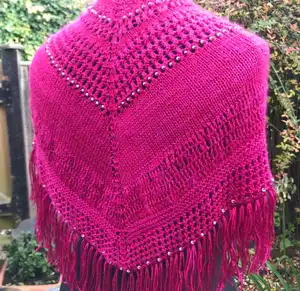
Create this elegant Paris At Night shawl inspired by Jamie and Claire's time in France from Outlander. This delicate triangular shawl features beautiful beadwork and a sophisticated fringe edging that drapes gracefully over the shoulders. Perfect for special occasions like weddings or formal events, this single-skein design combines lace patterns with sparkling beads to create a timeless accessory. The row-by-row written instructions make it accessible for knitters ready to explore beadwork techniques.

Intermediate 15-20 Hours

Materials Needed for Paris At Night Shawl Pattern

β€” Main Fabric

  • 01
    4ply/Sock weight yarn suitable for 3.75mm needles, approximately 400m total
  • 02
    Green Tea Yarns in Bush Berries colorway on White Cloud base (50% silk 50% merino) 1 x 100g skein
  • 03
    Size 6 beads (188 beads total), smoke gray lustre recommended

β€” Tools Required

  • 01
    3.75mm knitting needles (US size 5)
  • 02
    2 stitch markers
  • 03
    Size 6 beads - 188 beads (smoke gray lustre recommended)
  • 04
    Tapestry needle for finishing
  • 05
    Scissors
  • 06
    Crochet hook for fringe attachment
  • 07
    Blocking pins and blocking mat

Progress Tracker

0% Complete

β€” Set Up

Cast On:

Cast on 6 stitches

Setup Row 1:

K2, pm, k2, pm, k2

Setup Row 2:

Slp1, kfb, m1r, sm, k2, sm, m1l, kfb, k1

Setup Row 3:

Slp1, yo, k3, m1r, sm, k2, sm, m1l, k3, yo, k1 (14 sts)

β€” Section 1

Row 1:

Slp1, yo, kfb, (yo, k2, pass yo over the k2) repeat the bracket to the marker, m1r, sm, k2, sm, m1l, (yo, k2, pass yo over the k2) repeat the bracket to the last 2sts, kfb, yo, k1

Row 2:

Slp1, yo, k1, purl to the marker, sm, k2, sm, purl to the last 2sts, k1, yo, k1

Info:

Repeat these 2 rows another 4 times (26.2.26)

β€” Section 2

Row 1:

Slp1, yo, kfb, (yo, pb, k2tg) repeat the bracket to the marker, m1r, sm, k2, sm, m1l, (k2tg, pb, yo) repeat the bracket to the last 2sts, kfb, yo, k1

Row 2:

Slp1, yo, (k2tg, yo) repeat the bracket to the marker, sm, k2, sm, (yo, k2tg) repeat the bracket to the last stitch, yo, k1

Row 3:

Slp1, yo, kfb, knit to the marker, yo, sm, k2, sm, yo, knit to the last 2sts, kfb, yo, k1

Row 4:

Slp1, yo, k1, purl to the marker, sm, k2, sm, purl to the last 2 sts, k1, yo, k1

Row 5:

Slp1, yo, kfb, (yo, k2tg) repeat the bracket to the marker, m1r, sm, k2, sm, m1l, (k2tg, yo) repeat the bracket to the last 2sts, kfb, yo, k1

Row 6:

Slp1, yo, (k2tg, yo) repeat the bracket to the marker, sm, k2, sm, (yo, k2tg) repeat the bracket to the last st, yo, k1

Row 7:

Slp1, yo, kfb, knit to the marker, yo, sm, k2, sm, yo, knit to the last 2sts, kfb, yo, k1

Row 8:

Slp1, yo, k1, purl to the marker, sm, k2, sm, purl to the last 2 sts, k1, yo, k1

Row 9:

Slp1, yo, kfb, knit to the marker, yo, sm, k2, sm, yo, knit to the last 2sts, kfb, yo, k1

Row 10:

Slp1, yo, k1, purl to the marker, sm, k2, sm, purl to the last 2 sts, k1, yo, k1 (46.2.46)

β€” Section 3

Row 1:

Slp1, yo, kfb, (yo, k2, pass the yo over the k2) repeat the bracket to the marker, m1r, sm, k2, sm, m1l, (yo, k2, pass the yo over the k2) repeat the bracket to the last 2sts, kfb, yo, k1

Row 2:

Slp1, yo, k1, purl to the marker, sm, k2, sm, purl to the last 2 sts, k1, yo, k1

Row 3:

Slp1, yo, kfb, k1, (k2tg, yo) repeat the bracket to the last stitch before the marker, kfb, sm, k2, sm, kfb, (yo, k2tg) repeat the bracket to the last 3 sts, k1, kfb, yo, k1

Row 4:

Slp1, yo, knit to the marker, sm, k2, sm, knit to the last stitch, yo, k1

Info:

Repeat these 4 rows another 3 times (78.2.78)

β€” Section 4

Row 1:

Slp1, yo, kfb, (yo, pb, k2tg) repeat the bracket to the marker, m1r, sm, k2, sm, m1l, (k2tg, pb, yo) repeat the bracket to the last 2sts, kfb, yo, k1

Row 2:

Slp1, yo, (k2tg, yo) repeat the bracket to the marker, sm, k2, sm, (yo, k2tg) repeat the bracket to the last stitch, yo, k1

Info:

Repeat these 2 rows another 12 times (130.2.130)

β€” Section 5

Row 1:

Slp1, kfb, yo, knit each stitch twice to the marker, yo, sm, k2 twice, sm, yo, knit each stitch twice to the last 2 sts, yo, kfb, k1

Row 2:

Slp1, yo, k1, purl each stitch twice to the marker, sm, p2 twice, sm, purl each stitch twice to the last 2sts, k1, yo, k1

Info:

Repeat these 2 rows twice more (142.2.142)

β€” Section 6

Row 1:

Slp1, yo, kfb, knit to the marker, yo, sm, k2, sm, yo, knit to the last 2 sts, kfb, yo, k1

Row 2:

Slp1, yo, knit to the marker, sm, k2, sm, knit to the last stitch yo, k1

Info:

Repeat these 2 rows another 3 times (158.2.158)

β€” Section 7

Row 1:

Slp1, yo, kfb, (yo, k2tg) repeat the bracket to the marker, yo, sm, k2, sm, yo, (k2tg, yo) repeat the bracket to the last 2sts, kfb, yo, k1

Row 2:

Slp1, yo, knit to the marker, sm, k2, sm, knit to the last stitch, yo, k1

Info:

Repeat these 2 rows another 3 times (174.2.174)

β€” Section 8

Row 1:

Slp1, yo, kfb, (yo, k2tg) repeat the bracket to the marker, yo, sm, k2, sm, yo, (k2tg, yo) repeat the bracket to the last 2sts, kfb, yo, k1

Row 2:

(k4, pb) repeat the bracket across the row removing the markers

Row 3:

Knit across the row

Cast Off:

Cast off all stitches

Assembly Instructions

  • Block the finished shawl to open up the eyelet sections and achieve proper drape, paying special attention to the bottom lace edge.
  • Cut approximately 80-90 pieces of yarn, each measuring 23cm long for the fringe edging.
  • Using a crochet hook and two strands of yarn together, create tassels through each bottom eyelet along the cast-off edge.
  • Work systematically across the edge, adjusting any beads that have slipped to the wrong side as you attach the fringe.
  • Weave in all yarn ends securely on the wrong side of the work.
  • Give the fringe a final trim to ensure all tassels are even in length.
  • Steam block lightly if needed to settle the fringe and ensure even drape across the wingspan.

Important Notes

  • πŸ’‘Pre-thread all 188 beads onto your yarn ball before beginning to knit the pattern
  • πŸ’‘Use stitch markers religiously at the center spine to maintain symmetry throughout construction
  • πŸ’‘The numbers in brackets after each section indicate stitch count on either side of center spine
  • πŸ’‘Gauge is provided as 12 sts x 15 rows in stockinette if you wish to adjust size
  • πŸ’‘Blocking is essential for this pattern to open the lace and achieve the proper finished dimensions
  • πŸ’‘Read through the entire pattern before beginning to familiarize yourself with the construction method
  • πŸ’‘Keep notes on which repeat you're on in sections that require multiple repeats of row pairs

This Paris At Night shawl pattern brings Outlander-inspired elegance into your knitting repertoire with its delicate beadwork and romantic lace construction. The single-skein design proves that luxury doesn't require excess, while the row-by-row instructions ensure you'll never feel lost in the lace. Whether you're dressing up for a special occasion or simply want to add a touch of Parisian sophistication to your wardrobe, this shawl delivers timeless beauty. The fringe edging adds the perfect finishing flourish, making this a truly special handmade treasure. 🧢✨

You ask,

we answer.

FAQs

Can I use a different yarn weight for this pattern?

While the pattern is written for 4ply/sock weight yarn, you can use a different weight if you adjust your needle size accordingly and are comfortable with the finished size changing. Keep in mind that using heavier yarn will create a larger, heavier shawl that may not drape as delicately.

Do I need to use the exact beads specified?

No, size 6 beads are standard but you can choose any color that complements your yarn. Just ensure your beads have holes large enough to slide onto your yarn before you begin knitting. Test one bead first to make sure it fits.

How do I pre-thread beads onto my yarn?

Thread a thin beading needle or use a loop of sewing thread to help transfer beads from their container onto your yarn ball before you start knitting. Thread all 188 beads at once so they're ready as you need them during the pattern.

What if I lose my place in the pattern repeats?

Count your stitches between markers regularly and compare them to the numbers provided in brackets after each section. Using a row counter or making notes on paper can help track which repeat you're on, especially in Sections 2, 4, and 7.

Is blocking really necessary for this shawl?

Yes, blocking is essential for this pattern. The lace sections need to be opened up to show the pattern clearly, and blocking ensures the triangular shape is symmetrical with proper drape. Without blocking, the eyelets will remain closed and the shawl won't achieve its intended dimensions of 128cm wingspan by 42cm depth.

Can I make this shawl larger?

Yes, you can add additional repeats to Sections 4, 6, or 7 to increase the size. Just remember you'll need more yarn and additional beads. Each repeat of Section 4 adds beaded lace rows, while repeats in Sections 6 and 7 add plain stockinette and eyelet sections respectively.