🧶 Beautiful ✨ Detailed 💝 Adorable

Splashy Magikarp Amigurumi Pattern

Splashy Magikarp Amigurumi Pattern
4.7★Rating
3-5 HoursTime Needed
1.6KMade This
✂️

Intermediate Level

Ideal for those with basic crocheting experience, featuring slightly more advanced stitches and techniques to expand your skills.

⏱️

Quick Craft

Fits nicely into a free afternoon — 2 to 5 hours of focused, enjoyable crocheting.

🐰

Whimsical Buddy

Playful characters full of personality, designed to spark imagination and become cherished playtime favorites.

About This Splashy Magikarp Amigurumi Pattern

Splashy Magikarp Amigurumi Pattern crochet pattern - detailed view

Whether you're making a gift for a lifelong Pokémon fan or just want a quirky desk companion, this little fish is sure to make everyone smile. It's a great conversation starter for any shelf or gaming setup.

Why You'll Love This Splashy Magikarp Amigurumi Pattern

I honestly had so much fun with the fins on this one. Getting that jagged, crown-like shape on the back fin feels really satisfying when it all comes together. Plus, the way the lips are added at the end really gives him that perfect carp pout that we all know and love! It’s a project that feels fast but looks impressive.

Splashy Magikarp Amigurumi Pattern step 1 Splashy Magikarp Amigurumi Pattern step 2 Splashy Magikarp Amigurumi Pattern step 3 Splashy Magikarp Amigurumi Pattern step 4

Switch Things Up

I remember the first time I saw a Magikarp in the games—I was so confused why anyone would want a fish that only splashes! But there's something so endearing about its persistence, right? Crocheting this little guy brought back all those nostalgic feelings.

One thing I discovered while making my own version is that the stuffing is everything. If you pack it too tight, he loses that sleek fish profile and starts looking like an orange orange! I like to stuff the middle firmly but leave the areas near the tail and mouth a bit softer. This allows you to flatten him slightly so he sits perfectly on a shelf. Also, don't be afraid to get creative with the feelers! I used a slightly thinner yellow yarn for them so they would drape more naturally and look a bit more 'whiskery.'

If you're feeling adventurous, you could even try making a 'shiny' version in gold yarn instead of orange. It makes for a really special addition to any collection and is a great way to challenge yourself. I hope you enjoy every stitch of this splashy friend!

Common Mistakes & How to Fix Them

✗ When you're working on the body's Round 16, make sure you only hit the front loops, because you'll need those leftover back loops later to attach the mouth and lips.✗ It's very easy to overstuff the body, which makes it look like a ball rather than a fish; remember to keep the stuffing light so you can flatten it slightly for that authentic Magikarp shape.✗ For the pectoral fins, if you slip stitch the orange edging on the same side for both, you'll end up with two left fins—be sure to flip one over before starting the edging to get a mirrored pair.✗ When embroidering the black lines on the tail and fins, don't pull your yarn too tight or you'll cause the crochet fabric to bunch up and lose its flat shape.

Splashy Magikarp Amigurumi Pattern

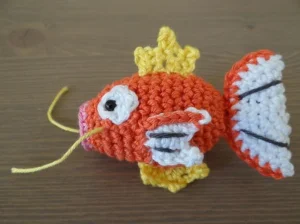
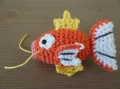
Catch your very own "weakest" Pokémon with this super fun project! Even though Magikarp is famous for just splashing around, this little guy is a total winner in the world of crochet. You'll love seeing his goofy expression come to life as you work through the rounds. It's a fantastic way to use up those scraps of orange and yellow yarn you've been saving to create something truly iconic for your collection.

Intermediate 3-5 Hours

Materials Needed for Splashy Magikarp Amigurumi Pattern

— Main Fabric

  • 01
    Medium weight yarn in a vibrant orange for the main body
  • 02
    Crisp white yarn for the eyes, tail, and pectoral fins
  • 03
    Bright yellow yarn for the top and bottom fins and the feelers
  • 04
    Soft pink yarn for the prominent lip detail
  • 05
    Small amount of black or dark grey yarn for the inner mouth and embroidery

— Tools Required

  • 01
    4.5mm crochet hook
  • 02
    Two 4.5mm safety eyes
  • 03
    Polyester fiberfill stuffing
  • 04
    Yarn needle for assembly and embroidery
  • 05
    Scissors
  • 06
    Stitch markers

Progress Tracker

0% Complete

— 1. Eyes (Make 2) :

Info :

Start with white yarn and ch 2.

Round 1 :

Work 4 sc into the 2nd ch from your hook (4)

Round 2 :

Work 1 inc into every st around (8)

Info :

fo and leave a long tail for sewing the eyes to the face later.

— 2. Body :

Info :

Start with orange yarn and ch 2. Do not join rounds unless noted.

Round 1 :

Work 6 sc into the 2nd ch from your hook (6)

Round 2 :

Work 1 inc into every st around (12)

Round 3 :

Work 1 sc into every st around (12)

Round 4 :

Repeat *1 sc, 1 inc* 6 times (18)

Round 5-6 :

Work 1 sc into every st around (18)

Round 7 :

Repeat *2 sc, 1 inc* 6 times (24)

Round 8-11 :

Work 1 sc into every st around (24)

Round 12 :

Repeat *2 sc, 1 dec* 6 times (18)

Round 13-14 :

Work 1 sc into every st around (18)

Round 15 :

Repeat *1 sc, 1 dec* 6 times (12)

Round 16 :

Work 1 sc into every st around using FLO only (12)
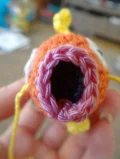
Info :

fo. Attach the white eye circles and insert safety eyes. Stuff the body lightly, ensuring it can still be flattened slightly for the fish shape.

— 3. Mouth & Lips :

Info :

Using black or dark grey yarn, join to the BLO of Round 16 on the body.

Round 1 :

Work 1 sc into every st around (12)

Round 2 :

Work 6 dec (6)

Info :

fo and weave in the tail, sewing the small gap closed. Now, join pink yarn to the remaining loops of Round 16.

Round 1 :

Work 1 sc into every st around to create the lips (12)

Info :

fo and weave in all remaining pink ends.

— 4. Tail :

Info :

Start with white yarn and ch 2.

Round 1 :

Work 6 sc into the 2nd ch from your hook (6)

Round 2 :

Work 1 inc into every st around (12)

Round 3 :

Repeat *1 sc, 1 inc* 6 times (18)

Round 4 :

Repeat *2 sc, 1 inc* 6 times (24)

Round 5 :

Repeat *3 sc, 1 inc* 6 times (30)

Info :

Switch to orange yarn. Fold the tail piece flat and sc through both layers across the top to close it, using about 15 sc. fo and leave a long tail. Use black yarn to embroider two vertical lines on the tail.
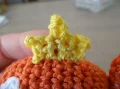
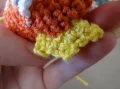
— 5. Back Fin :

Info :

Using yellow yarn, work in rows.

Row 1 :

ch 4, turn.

Row 2 :

Starting in the 2nd ch from hook, sc 3, ch 1, turn (3)

Row 3 :

Work 1 sc into every st, ch 3, turn.

Row 4 :

Starting in the 2nd ch from hook, sc 5, ch 1, turn (5)

Row 5 :

sc 2, ch 2, turn.

Row 6 :

Starting in the 2nd ch from hook, sc 3.

Info :

fo and leave a long tail for sewing to the top of the body.

— 6. Belly Fin :

Info :

Using yellow yarn, work in rows.

Row 1 :

ch 3, turn.

Row 2 :

Starting in the 2nd ch from hook, sc 2, ch 1, turn.

Row 3 :

sc 1, ch 2, turn.

Row 4 :

sc 2, ch 1, turn.

Row 5 :

sc 1, ch 3, turn.

Row 6 :

sc 3, ch 1, do not turn.

Row 7 :

Work a row of sc along the raw side of the piece to tidy it up.

Info :

fo and leave a tail for attaching to the bottom of the body.

— 7. Pectoral Fins (Make 2) :

Info :

Using white yarn, work in rows.

Row 1 :

ch 7, turn.

Row 2 :

sc 6, ch 1, turn.

Row 3 :

sc 4, ch 3, turn.

Row 4 :

sc 6, fo.

Info :

Join orange yarn to the side. ss around the side and top edges. Make sure to mirror the second fin by working the ss on the opposite side. Embroider two black lines across each fin.

— 8. Feelers :

Info :

Cut two lengths of yellow yarn. Knot one end of each heavily. Thread into a needle and pull through the body from the inside out, just below the eyes. Trim to your preferred length.

Assembly Instructions

  • Position the white eye circles on the sides of the head near the front and sew them down firmly.
  • Insert the safety eyes through the center of the white eye circles and secure them inside the body.
  • Attach the tail to the back end of the body where the orange join was worked, ensuring it sits vertically.
  • Sew the yellow back fin along the center top of the body, starting a few rounds behind the eyes.
  • Place the belly fin on the bottom center of the fish and sew it securely in place.
  • Attach the pectoral fins to each side of the body, roughly level with the bottom of the eyes.
  • Pull the yellow feelers through the face so the knots are hidden inside and trim the ends evenly.

Important Notes

  • 💡Maintain a consistent tension throughout to ensure the fins stay flat and the body remains sturdy.
  • 💡Leave long yarn tails on every piece you finish to make sewing everything together much easier at the end.
  • 💡Use stitch markers to keep track of your progress, especially during the body rounds where counts change frequently.
  • 💡If you find the row-based fins tricky, you can substitute them with felt cut-outs for a simpler alternative.
  • 💡Be careful when attaching the mouth and lips to Round 16; using the correct loops ensures the face looks tidy.

I am so excited for you to finish your very own Magikarp! There is something incredibly rewarding about seeing those bright colors come together into such a recognizable character. Whether he's destined for a shelf, a desk, or a gift for a fellow trainer, he's bound to be a favorite. Don't forget to give him a little squeeze and a 'Splash' once he's all sewn up! I hope you enjoyed this pattern as much as I enjoyed writing it for you. Happy crocheting, and may all your Magikarps eventually evolve into something even more amazing! 🧶 🧵 ✨

You ask,

we answer.

FAQs

Can I use a different yarn weight for this Magikarp?

Absolutely! Just remember that using a bulkier yarn like worsted weight will make your fish significantly larger, and you'll need to size up your hook and safety eyes accordingly.

The back fin looks a bit floppy, how can I fix that?

If your fin isn't standing up straight, you can try using a slightly smaller hook to create a stiffer fabric, or you can sew a small piece of plastic canvas or stiff felt inside the fin before attaching it.

How do I make the feelers stay in place?

The trick is making a very large knot at the end of the yellow yarn. When you pull it through from the inside, the knot should catch against the crochet stitches, keeping it from pulling out.

I'm struggling with the pectoral fins being mirrored, any tips?

Think of them like your hands. After you finish the white part, flip one fin over before you start the orange slip stitch edging. This ensures the 'right' side of the stitches faces out on both sides of the body.