🧢 Beautiful ✨ Detailed πŸ’ Adorable

Little Fox Amigurumi Pattern

Little Fox Amigurumi Pattern
4.1β˜… Rating
3-4 Hours Time Needed
3.4K Made This
βœ‚οΈ

Beginner Friendly Level

Perfect for those just starting their sewing journey, with clear instructions and simple techniques

⏱️

Weekend Treat

Takes 5-7 hours, making it an enjoyable project to finish over a couple of days.

🐰

Whimsical Buddy

Playful characters full of personality, designed to spark imagination and become cherished playtime favorites.

About This Little Fox Amigurumi Pattern

This Little Fox pattern brings the magic of the forest right into your hands! Working with soft plush or velvet yarn, you'll create an enchanting woodland companion with distinctive orange and white markings that capture the fox's natural beauty. The pattern includes complete instructions for all body parts including the head with color changes for facial markings, a rounded body, four legs, pointed ears, and a fluffy tail. The finished fox sits at a perfect cuddle size and makes an ideal gift for children or fox lovers of any age.

Little Fox Amigurumi Pattern crochet pattern - detailed view of completed project

What makes this pattern special is the detailed color-change technique that creates the fox's signature white chest and face markings. The clear round-by-round instructions ensure you'll confidently craft each piece before assembling them into your adorable forest friend.

Why You'll Love This Little Fox Amigurumi Pattern

I absolutely love this Little Fox pattern because it's the perfect introduction to working with color changes in amigurumi! The way the white markings naturally flow into the orange body creates such a realistic and charming effect. I find the size idealβ€”not too small to be fiddly, not too large to take forever. The best part is watching the personality emerge as you add those expressive eyes and assemble the pieces. This fox has such a sweet, innocent expression that makes everyone smile. It's one of those patterns where you can't help but want to make multiples in different color combinations!

Little Fox Amigurumi Pattern step 1 - construction progress Little Fox Amigurumi Pattern step 2 - assembly progress Little Fox Amigurumi Pattern step 3 - details and accessories Little Fox Amigurumi Pattern step 4 - final assembly and finishing

Switch Things Up

I love experimenting with this Little Fox pattern to create unique variations! One of my favorite modifications is changing the color schemeβ€”try making a silver fox with gray and white yarn, or go whimsical with pastel colors for a dreamy fantasy fox. You can also adjust the ear size by adding or removing rounds to create different fox species looks.

For a winter theme, I sometimes add a tiny crocheted scarf or hat to my foxes, which makes them perfect holiday decorations or gifts. Another fun variation is creating different facial expressions by changing the eye placementβ€”positioning them slightly wider apart gives a more innocent look, while closer placement creates a clever, mischievous expression.

If you want to make your fox poseable, try inserting wire into the arms and legs before stuffing them. This allows the fox to sit in different positions or wave its paws! You could also add embroidered details like whiskers using black embroidery thread, or create closed sleeping eyes for a sleepy fox version. The possibilities are endless, and each small change creates a fox with its own unique personality!

Common Mistakes & How to Fix Them

βœ— Not using a stitch marker when working in continuous spirals leads to losing track of round beginnings and misaligned color changes βœ— Stuffing the head too loosely results in a floppy appearance; make sure to stuff firmly for the fox to hold its adorable shape βœ— Forgetting to check eye placement before inserting safety eyes permanently can throw off the entire facial expression and symmetry βœ— Rushing through color changes without properly securing yarn ends causes unsightly gaps and loose stitches in the white facial markings βœ— Over-stuffing the ears and tail makes them stiff and unnatural; these parts should remain soft and slightly flat for realistic appearance

Little Fox Amigurumi Pattern

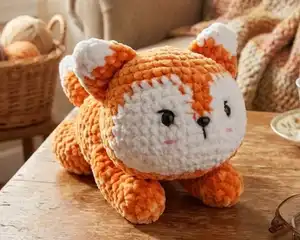
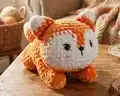
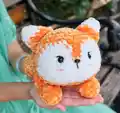
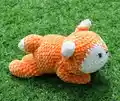
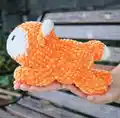
Create your very own adorable Little Fox with this charming amigurumi pattern! This delightful plush fox features a beautiful orange and white color combination, expressive safety eyes, and a fluffy tail that brings this woodland creature to life. Perfect for beginners looking to expand their skills, this pattern guides you through creating a cuddly companion measuring approximately 11 cm in height and 19 cm in length. With detailed round-by-round instructions and helpful tips on color changes and assembly, you'll craft a sweet fox friend that's perfect for gifting or keeping as your own treasured handmade creation.

Beginner Friendly 3-4 Hours

Materials Needed for Little Fox Amigurumi Pattern

β€” Main Fabric

  • 01
    Plush/Velvet/Chenille yarn in Orange color (120m or approximately 1.2 skeins)
  • 02
    Plush/Velvet/Chenille yarn in White color (40m or approximately 0.5 skein)
  • 03
    Recommended yarn brands: Himalaya Velvet, Himalaya Dolphin Baby, YarnArt Dolce, or Premier Parfait Chunky

β€” Tools Required

  • 01
    Crochet hook 4mm
  • 02
    Safety eyes 14mm
  • 03
    Safety nose 8mm
  • 04
    Polyester fiberfill stuffing
  • 05
    Tapestry needle in white color
  • 06
    Tapestry needle in black color
  • 07
    Scissors
  • 08
    Pins for assembly
  • 09
    Stitch marker

Progress Tracker

0% Complete

β€” HEAD :

Info :

Start with Orange yarn

Round 1 :

MR 8sc (8)

Round 2 :

8 inc (16)

Round 3 :

(1 sc, inc) x 8 times (24)

Round 4 :

1 sc, inc, (2 sc, inc) x 7 times, 1 sc (32)

Round 5 :

(3 sc, inc) x 8 times (40)

Round 6 :

40 sc (40)

Info :

Use both Orange and White yarn for the following rounds

Round 7 :

Orange 9 sc, inc, 3 sc, White 5 sc, Orange 1 sc, inc, 1 sc, White 5 sc, Orange 3 sc, inc, 9 sc, inc (44)

Round 8 :

Orange 13 sc, White 7 sc, Orange 2 sc, White 7 sc, Orange 15 sc (44)

Round 9 :

Orange 12 sc, White 8 sc, Orange 2 sc, White 8 sc, Orange 14 sc (44)

Round 10 :

Orange 5 sc, inc, 5 sc, White 5 sc, inc, 3 sc, Orange 2 sc, White 3 sc, inc, 5 sc, Orange 5 sc, inc, 7 sc (48)

Infos :

Insert the safety eyes between rounds 10 and 11, the distance between 2 eyes is 7 sts. Insert the safety nose between 2 eyes. You can embroider the nose with yarn cotton.

Round 11 :

Orange 12 sc, White 22 sc, Orange 14 sc (48)

Round 12 :

Orange 11 sc, White 24 sc, Orange 13 sc (48)

Round 13 :

Orange 12 sc, White 22 sc, Orange 14 sc (48)

Round 14 :

Orange 13 sc, White 20 sc, Orange 15 sc (48)

Info :

Use Orange yarn, and cut White yarn

Round 15 :

Orange (4 sc, dec) x 2 times, 2 sc, White 2 sc, dec, (4 sc, dec) x 2 times, 2 sc, Orange 2 sc, dec, (4 sc, dec) x 2 times (40)

Info :

Start stuffing the head

Round 16 :

Orange (3 sc, dec) x 3 times, White (3 sc, dec) x 2 times, Orange (3 sc, dec) x 3 times (32)

Round 17 :

16 dec (16)

Info :

Stuff the head firmly with fiberfill

Round 18 :

8 dec, slst (8)

Info :

Fasten off, leaving a long tail for sewing. Weave the yarn tail through the front loops of the last round and pull it tight to close the hole. Hide the yarn tail inside the head.

β€” BODY :

Info :

Use Orange yarn

Round 1 :

MR 8 sc (8)

Round 2 :

8 inc (16)

Round 3 :

(1 sc, inc) x 8 times (24)

Round 4 :

(1 sc, inc, 1 sc) x 8 times (32)

Round 5 :

(3 sc, inc) x 8 times (40)

Round 6-10 :

40 sc (40)

Round 11 :

(3 sc, dec) x 8 times (32)

Round 12-14 :

32 sc (32)

Round 15 :

(14 sc, dec) x 2 times (30)

Round 16 :

30 sc, slst (30)

Info :

Fasten off, leaving a long tail for sewing. Stuff the body firmly with fiberfill.

β€” ARMS/LEGS (Make 4) :

Info :

Use Orange yarn

Round 1 :

MR 6 sc (6)

Round 2 :

6 inc (12)

Round 3-12 :

4 sc, inc, 5 sc, dec (12)

Round 13 :

6 sc, slst (6)

Info :

Stuff the arms/legs firmly with fiberfill. Flatten the opening of the arm/leg and work the next round through both layers to close. Fasten off, leaving a long tail for sewing.

β€” EARS (Make 2) :

Info :

Start with White yarn

Round 1 :

MR 6 sc (6)

Round 2 :

(1 sc, inc) x 3 times (9)

Round 3 :

9 sc (9)

Round 4 :

1 sc, inc, (2 sc, inc) x 2 times, 1 sc (12)

Info :

Change to Orange yarn, and cut White yarn

Round 5 :

(3 sc, inc) x 3 times (15)

Round 6 :

7 sc, slst (7)

Info :

Do not stuff the ears. Flatten the opening of the ear and work the next round through both layers to close. Fasten off, leaving a long tail for sewing.

β€” TAIL :

Info :

Start with White yarn

Round 1 :

MR 6 sc (6)

Round 2 :

(1 sc, inc) x 3 times (9)

Round 3 :

(2 sc, inc) x 3 times (12)

Round 4 :

(3 sc, inc) x 3 times (15)

Round 5 :

(4 sc, inc) x 3 times (18)

Info :

Change to Orange yarn, and cut White yarn

Round 6 :

(4 sc, dec) x 3 times (15)

Round 7 :

(3 sc, dec) x 3 times (12)

Round 8 :

6 dec, slst (6)

Info :

Fasten off, leaving a long tail for sewing. Stuff the tail lightly with fiberfill.

Assembly Instructions

  • Sew the ears to the head between rounds 4 and 8, with a distance of 8 stitches between the two ears.
  • Create eye sockets for depth by pulling thread through from behind the safety eyes to create indentation.
  • Create eyelashes using White and Black yarn by embroidering small stitches above the eyes.
  • Place the body and head on a flat surface, use pins to mark placement, then sew the body to the head alternating one stitch on body, one stitch on head.
  • Sew the legs at round 6 of the body with a distance of 10 stitches between the two legs.
  • Sew the arms at rounds 12-15 of the body on the sides.
  • Sew the tail onto the back of the body, positioning it centered and at an appropriate height.

Important Notes

  • πŸ’‘Always use a stitch marker to mark the beginning of each round when working in continuous spirals
  • πŸ’‘Read through the entire pattern before starting to familiarize yourself with color changes and construction
  • πŸ’‘The finished size will vary depending on yarn weight and hook size; adjust materials for different sizes
  • πŸ’‘Stuff the head and body firmly for best shape, but keep ears unstuffed and tail lightly stuffed
  • πŸ’‘Pin all parts in place before final sewing to ensure proper positioning and symmetry
  • πŸ’‘When changing colors, complete the last stitch with the new color for seamless transitions
  • πŸ’‘Keep yarn ends long enough for sewing (at least 20cm) to make assembly easier

This charming Little Fox pattern is designed to bring woodland magic into your crochet collection! With its sweet expression, distinctive color markings, and cuddly size, this fox makes a perfect companion for children or a delightful handmade gift. The pattern combines simple increases and decreases with easy color changes, making it an excellent project for building your amigurumi skills. Create your own adorable forest friend today! 🦊🧢✨

You ask,

we answer.

FAQs

Can I use different yarn types for this pattern?

Yes! While the pattern recommends plush or velvet yarn, you can use any yarn type. Just remember that different yarn weights will create different sized foxes. Match your hook size to your yarn weight for best results.

How do I prevent gaps when changing between orange and white yarn?

Make sure to change colors in the last stitch of the previous color by pulling the new color through the final two loops. Keep your tension consistent and weave in ends securely on the inside to prevent any visible gaps.

Can I make the fox larger or smaller?

Absolutely! Use a thicker yarn with a larger hook to make a bigger fox, or thinner yarn with a smaller hook for a miniature version. The pattern instructions remain the same regardless of size.

What if I don't have safety eyes and nose?

You can embroider the eyes and nose using black yarn or felt instead. The pattern mentions that the nose can be embroidered with yarn cotton as an alternative to the safety nose.

Do I need to stuff all the parts?

No. The head, body, arms, and legs should be stuffed firmly. The tail should be stuffed lightly. The ears should not be stuffed at all to maintain their flat, pointed shape.