🧶 Beautiful ✨ Detailed 💝 Adorable

Lion Granny Square Crochet Pattern

Lion Granny Square Crochet Pattern
4.3★ Rating
2-3 Hours Time Needed
3.2K Made This
✂️

Intermediate Level

Ideal for those with basic knitting experience, featuring slightly more advanced stitches and techniques to expand your skills.

⏱️

Bite-Sized Project

Complete in under 2 hours—quick, fun, and perfect for a little creative escape.

🏡

Cozy Accent

A warm touch for your space that transforms ordinary corners into inviting nooks filled with handmade charm.

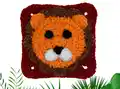
About This Lion Granny Square Crochet Pattern

Lion Granny Square Crochet Pattern crochet pattern - detailed view of completed project

The pattern includes complete instructions for all facial components—from the textured mane to the adorable nose and mouth pieces. You'll learn how to create dimension and personality while perfecting your color-changing skills throughout this rewarding project.

Why You'll Love This Lion Granny Square Crochet Pattern

I absolutely love this pattern because it transforms a simple granny square into a work of art! The textured fur detail adds such beautiful dimension, and watching the lion's face come together is incredibly satisfying. I appreciate how the pattern teaches you to work in different loops to create texture, which is a technique you'll use in so many other projects. The assembly process is like putting together a puzzle, and seeing those little facial features bring the lion to life is pure magic. Plus, once you master this square, you can create an entire safari-themed collection!

Lion Granny Square Crochet Pattern step 1 - construction progress Lion Granny Square Crochet Pattern step 2 - assembly progress Lion Granny Square Crochet Pattern step 3 - details and accessories Lion Granny Square Crochet Pattern step 4 - final assembly and finishing

Switch Things Up

I love experimenting with this lion pattern because it's so versatile! Sometimes I'll swap the orange for a golden yellow yarn to create a sun-kissed lion look, or use cream and tan tones for a softer, vintage aesthetic. The red border can easily become blue for a boy's blanket or purple for something more whimsical.

One of my favorite variations is making the mane in multiple shades of brown—mixing light, medium, and dark throughout creates incredible depth and makes the lion look even more majestic. You could also try adding small white highlights to the mane for a realistic touch.

For a playful twist, I've made lioness squares without the big mane—just a simple orange face with smaller ears and the same sweet expression. These pair beautifully with the full maned lions in a pride-themed blanket!

I've also experimented with sizing by using sport weight yarn with a 3mm hook for tiny lion squares perfect for coasters or bunting, and chunky yarn with a 6mm hook for oversized cushion covers. The pattern scales beautifully at any size while maintaining those adorable proportions.

Common Mistakes & How to Fix Them

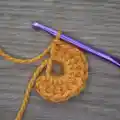
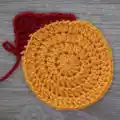
✗ Not tightening the magic ring properly before starting Round 2, which can leave a visible hole in the center of your square ✗ Forgetting to work in back loops only during Round 5, which will prevent the fur from attaching correctly to the front loops ✗ Placing the ears incorrectly and not aligning them with the corners, causing the lion's proportions to look unbalanced ✗ Skipping the invisible finish technique and using regular slip stitches, which creates noticeable bumps and disrupts the smooth circular shape ✗ Attaching the brown fur to the wrong loops in Round 4, causing the mane and ears to overlap awkwardly ✗ Pulling the color change too tightly or too loosely, creating puckering or gaps between the orange center and red border

Lion Granny Square Crochet Pattern

Bring the king of the jungle to life with this adorable Lion Granny Square crochet pattern! Perfect for blankets, pillows, or decorative pieces, this charming design features a vibrant orange lion face with a textured mane, expressive eyes, and cute details. The pattern combines classic granny square techniques with creative color work to create a standout piece that's both fun to make and beautiful to display. Whether you're crafting a themed baby blanket or adding personality to your home décor, this lion square will steal hearts!

Intermediate 2-3 Hours

Materials Needed for Lion Granny Square Crochet Pattern

— Main Fabric

  • 01
    Lightweight acrylic yarn in orange color for the lion's face
  • 02
    Lightweight acrylic yarn in brown color for the textured mane
  • 03
    Lightweight acrylic yarn in red color for the granny square border
  • 04
    Lightweight acrylic yarn in black color for the nose and eyes
  • 05
    Lightweight acrylic yarn in white color for the mouth pieces

— Tools Required

  • 01
    4mm crochet hook
  • 02
    Yarn needle for sewing components
  • 03
    Scissors
  • 04
    Stitch markers (optional but helpful)

Progress Tracker

0% Complete

— Square :

Using the orange yarn

Round 1 :

MR, ch2, 12dc inside MR (12)

Info :

Tighten the MR by pulling on the tail of your yarn and then sl st in the 1st dc (skip the ch2)

Round 2 :

ch2, *dc inc* all around (24)

Round 3 :

ch2, *dc, dc inc* all around (36)

Round 4 :

ch2, *2dc, dc inc* all around (48)

Info :

Color Change: at the end of Round 4, you will need to do a color change to red. Method 1: change color at the last dc of Round 4 and then sl st to the 1st dc. Method 2: after Round 4, finish off with an invisible stitch and then attach the color red

Round 5 :

ch1, *3sc, 2hdc, 2dc, [2tc + ch2 + 2tc] in the same stitch, 2dc, 2hdc* all around BLO (68)

Info :

Sl st in the first sc that you did at the beginning of Round 5

Round 6 :

ch2, *dc* all around and [2dc + ch2 + 2dc] in the ch2 space (84)

Info :

At the end of the round, finish off and weave in any excess yarn. You can finish off using the invisible stitch method or sl st in the 1st dc and then yarn over and pull it all the way through

— Fur :

Using the brown yarn

Info :

Attach the brown yarn to Round 4 in the Front Loop. Make sure to attach the brown yarn to the front loop of [2tc, ch2, 2tc] stitch. This way when you add the ears later on, the hair and the ears would not block each other

Round 1 :

ch1, *skip a st, 5dc in the same st, skip a st, sl st* all around (72)

Info :

At the end of the round, finish off and weave in any excess yarn

— Mouth x2 :

Using the white yarn

Round 1 :

MR, ch1, 6sc in MR (6)

Round 2 :

*inc* all around (12)

Round 3 :

*sc* all around (12)

Info :

The mouth is done in the continuous rounds method (no slip stitching when finish the round). Cut the yarn and finish off. Leave a long tail for stitching

— Nose :

Using the black yarn

Round 1 :

MR, ch1, [2sc, dc, 2sc] in MR (5)

Info :

Tighten the MR but do not close it completely. Finish off and leave a long tail for sewing

— Eyes x2 :

Using the black yarn

Round 1 :

MR, ch1, 5sc in MR (5)

Info :

Close the MR, finish off, and leave a long tail for stitching. You can replace the eyes with two pieces of felt

— Ears x2 :

Using the orange yarn

Row 1 :

MR, ch3 (which count as a dc), 7dc in MR (8)

Info :

Finish off without closing the MR and leave a long tail for stitching

— Assembly :

Info :

Place the face components on the square. Use the tails for sewing. The ears are aligned to the corners of the square. The mouth pieces are a bit tilted and are between Round 2 and 3. The nose is in the center and the pointed part (dc) is directed downwards. The eyes are located on Round 2

Assembly Instructions

  • Position the two ears at the top corners of the square, aligning them with the corners of the granny square for symmetry
  • Place the two white mouth pieces between Round 2 and Round 3, tilting them slightly for a natural expression
  • Position the black nose in the center of the face with the pointed part (double crochet) directed downwards
  • Place the black eyes on Round 2 of the orange face, spacing them appropriately for a balanced look
  • Use the long tails left on each component to sew them securely to the square using a yarn needle
  • Weave in all remaining yarn ends on the back of the square for a clean finish

Important Notes

  • 💡Pay close attention to which loops you're working into—FLO versus BLO makes a significant difference in this pattern
  • 💡The invisible stitch method provides the cleanest finish between rounds, though slip stitches work if you prefer
  • 💡Make sure to attach the brown fur to the front loops of the corner stitches to prevent blocking the ears
  • 💡Leave long tails on all facial components for easier assembly and more secure attachment
  • 💡You can customize the size by using different yarn weights and corresponding hook sizes
  • 💡Consider making multiple squares in different animal faces for a complete safari-themed project

This charming Lion Granny Square pattern combines classic crochet techniques with creative dimensional details to bring a majestic lion to life! Perfect for crafters who want to elevate their granny square game, this pattern teaches valuable skills like working in specific loops and creating textured elements. Whether you're making a statement blanket or a decorative pillow cover, this regal lion will add personality and warmth to any project. The 11cm x 11cm size makes it perfect for mixing and matching with other designs! 🦁🧶✨

You ask,

we answer.

FAQs

Can I use different yarn weights for this pattern?

Absolutely! The pattern notes that you can use any yarn weight—just adjust your hook size accordingly. Using a larger hook and heavier yarn will create a bigger square, while finer yarn with a smaller hook will make a smaller, more delicate version.

What's the difference between Method 1 and Method 2 for color changes?

Method 1 changes color during the last stitch of the round, while Method 2 uses an invisible finish before attaching the new color. Method 2 (invisible stitch) provides a cleaner, more seamless look, but Method 1 is faster and easier for beginners.

Why do I need to attach the brown fur to the front loops specifically?

Attaching the fur to the front loops (FLO) of Round 4 ensures that when you later add the ears, they won't overlap or block the mane. This creates proper layering and allows all elements to be visible and well-positioned.

Can I use safety eyes instead of crocheted eyes?

Yes! The pattern mentions you can replace the crocheted eyes with felt pieces, and safety eyes would work beautifully too. Just make sure to attach them before completing the assembly for the most secure placement.

How many squares do I need for a baby blanket?

Since each square is 11cm x 11cm, you'll need approximately 48-56 squares for a standard baby blanket (around 60cm x 80cm). You could create an entire lion pride or mix with other animal or solid granny squares!