🧶 Beautiful ✨ Detailed 💝 Adorable

Fern Plant Car Hanging Crochet Pattern

Fern Plant Car Hanging Crochet Pattern
3.9★ Rating
2-3 Hours Time Needed
1.6K Made This
✂️

Beginner Friendly Level

Perfect for those just starting their sewing journey, with clear instructions and simple techniques

⏱️

Bite-Sized Project

Complete in under 2 hours—quick, fun, and perfect for a little creative escape.

🏡

Cozy Accent

A warm touch for your space that transforms ordinary corners into inviting nooks filled with handmade charm.

About This Fern Plant Car Hanging Crochet Pattern

Fern Plant Car Hanging Crochet Pattern crochet pattern - detailed view of completed project

The finished hanging measures perfectly for car mirrors while staying compact enough not to obstruct your view. Using super fine yarn in tan beige and fern green creates a realistic plant aesthetic that brings joy to every glance.

Why You'll Love This Fern Plant Car Hanging Crochet Pattern

I absolutely love this pattern because it combines the joy of crochet with the beauty of nature in such a practical way. There's something incredibly satisfying about creating a plant that never needs watering yet brings endless smiles. The simplicity of the stitches makes it accessible, while the final result looks impressively detailed and professional. I find it perfect for using up yarn scraps, and the quick completion time means I can make several in different colors for friends and family. Plus, seeing that little fern hanging in my car every day reminds me of the meditative hours I spent crafting it with my own hands.

Fern Plant Car Hanging Crochet Pattern step 1 - construction progress Fern Plant Car Hanging Crochet Pattern step 2 - assembly progress Fern Plant Car Hanging Crochet Pattern step 3 - details and accessories Fern Plant Car Hanging Crochet Pattern step 4 - final assembly and finishing

Switch Things Up

I love experimenting with this versatile fern pattern because it opens up so many creative possibilities beyond the basic design. Sometimes I create multiple ferns in varying shades of green, from pale mint to deep forest, mixing them in one pot for a more dynamic, natural look that mimics real plant variation.

I've also tried adding tiny crocheted flowers between the fern leaves using bright yellows or soft pinks, transforming the simple fern into a whimsical woodland scene. For a touch of elegance, I occasionally work metallic thread alongside the green yarn in the leaves, creating subtle shimmer that catches light beautifully when hanging in a sunny car window.

During different seasons, I switch up the pot colors too—terra cotta orange for autumn, pastel pink for spring, or even a classic white for minimalist aesthetics. I've discovered that making the pot slightly larger and adding a second layer of different colored leaves creates gorgeous dimension and fullness.

For gift-giving, I personalize each hanging by adding tiny crocheted butterflies or ladybugs perched on the fern fronds, making each piece truly one-of-a-kind. Sometimes I even create entire plant collections, making succulents and other varieties to match, giving friends a set of three different plants in coordinating pots that they can hang together for a stunning botanical display that never needs watering.

Common Mistakes & How to Fix Them

✗ Not stuffing the pot firmly enough can cause it to lose shape over time, so pack the cotton filling evenly and generously for best results ✗ Forgetting to use stitch markers at the beginning of rounds leads to confusion and miscounting, especially when working continuous rounds on the pot ✗ Cutting yarn tails too short before sewing components together makes assembly frustrating, so always leave at least six inches for easier stitching and weaving ✗ Rushing through the fiddlehead spiral without checking tension creates uneven curls that don't sit properly, take time to maintain consistent slip stitch tightness throughout

Fern Plant Car Hanging Crochet Pattern

Transform your car or living space with this adorable fern plant car hanging crochet pattern that brings nature's charm wherever you go. This delightful pattern features a realistic fern design complete with intricate leaves and fiddleheads nestled in a charming beige pot, perfect for adding a touch of greenery without the maintenance. Create your own handmade car accessory that makes every drive special, or gift it to plant-loving friends who appreciate handcrafted treasures that never wilt or require watering.

Beginner Friendly 2-3 Hours

Materials Needed for Fern Plant Car Hanging Crochet Pattern

— Main Fabric

  • 01
    Super fine weight yarn (1.8 oz/50g) in tan beige color for the pot
  • 02
    Super fine weight yarn (1.8 oz/50g) in fern green color for leaves and circle

— Tools Required

  • 01
    Crochet hook size 2.0mm
  • 02
    Crochet hook size 2.5-3.0mm
  • 03
    Stitch markers
  • 04
    Sewing needle
  • 05
    Scissors
  • 06
    Cotton filling for stuffing

Progress Tracker

0% Complete

— Pots (beige):

Row 1:

Magic ring, chain 1, 10SC

Row 2:

chain 1, (1 single crochet, 1 increase) 5 times (15sts)

Row 3:

chain 1, (2 single crochet, 1 increase) 5 times (20sts)

Row 4:

chain 1, (3 single crochet, 1 increase) 5 times (25sts)

Row 5:

chain 1, (4 single crochet, 1 increase) 5 times (30sts)

Row 6:

chain 1, (5 single crochet, 1 increase) 5 times (35sts)

Row 7-10:

chain 1, 35 single crochet (35sts)

— Circle (in green):

Row 1:

Magic Ring, chain 2, 10 double crochet (10sts)

Row 2:

chain 2, 10 double crochet inc (20sts)

Row 3:

chain 2, (1 double crochet, 1 increase) 10 times (30sts)

Row 4:

chain 1, (5 single crochet, 1 increase) 5 times

— Leaf (in green) (make 5):

Info:

use 2.0mm hook size

Instructions:

slip knot, 21ch. hook in 2rd sts, 12SC, 8HDC, (do not cut off this tail just yet)

— Fiddlehead (in green):

Info:

use 2.0mm hook size

Instructions:

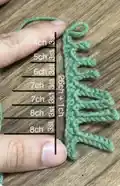
make a slip knot, 27ch, hook in 2rd sts, 4 sl st, 1SC, 8ch. hook in 2rd, 7sl st, 1SC, 1sl st, 1SC, 8ch. hook in 2rd, 7sl st, 1SC, 1sl st, 1SC, 8ch. hook in 2rd, 7sl st, 1SC, 1sl st, 1SC, 7ch. hook in 2rd, 6sl st, 1SC, 1sl st, 1SC, 7ch. hook in 2rd, 6sl st, 1SC, 1sl st, 1SC, 6ch. hook in 2rd, 5sl st, 1SC, 1sl st, 1SC, 5ch. hook in 2rd, 4sl st, 1SC, 1sl st, 1SC, 4ch. hook in 2rd, 3sl st, 1SC, 2sl st 1ch 2 sl st, 1SC 4ch. hook in 2rd, 3sl st, 1SC, 1sl st, 1SC, 5ch. hook in 2rd, 4sl st, 1SC, 1sl st, 1SC, 6ch. hook in 2rd, 5sl st, 1SC, 1sl st, 1SC, 7ch. hook in 2rd, 6sl st, 1SC, 1sl st, 1SC, 7ch. hook in 2rd, 6sl st, 1SC, 1sl st, 1SC, 8ch. hook in 2rd, 7sl st, 1SC, 1sl st, 1SC, 8ch. hook in 2rd, 7sl st, 1SC, 4sl st, (do not cut off this tail just yet)

— Hanging (make 2):

Info:

use 3.0mm hook size

Instructions:

60-70CH

Assembly Instructions

  • Sew the green circle inside the beige pot opening, ensuring it sits flat and secure to create the soil layer
  • Stuff the pot firmly with cotton filling before sewing the circle completely, maintaining a rounded shape that looks full and realistic
  • Position and sew the fiddlehead in the center of the pot, allowing the spiral to curl naturally over the edge for authentic fern appearance
  • Arrange the five leaves evenly around the fiddlehead in the middle of the pot, spacing them to create a balanced and full look
  • Attach the two hanging chains to opposite sides of the pot rim, making sure they're securely fastened to support the weight
  • Weave in all remaining yarn tails carefully into the back of your work to keep the finished piece neat and professional-looking

Important Notes

  • 💡Use stitch markers consistently to track the beginning of each round and avoid losing your place in the pattern
  • 💡Don't cut yarn tails until assembly is complete, as you'll need them for sewing components together securely
  • 💡The fiddlehead requires patience and consistent tension in slip stitches to achieve the characteristic spiral curl of real ferns
  • 💡Super fine yarn creates a delicate, realistic appearance but requires good lighting and careful attention to stitch counts
  • 💡Check local laws before hanging anything from your car's rearview mirror, as some areas have restrictions on such decorations
  • 💡Make multiple leaves in slightly different green shades for a more natural, varied appearance that mimics real plant foliage

This delightful Fern Plant Car Hanging pattern was designed to bring a touch of nature into every journey without the worry of wilting or watering. The combination of simple crochet techniques with realistic details creates a charming accessory that brightens any space, from car mirrors to cozy window corners. Whether you're crafting for yourself or creating heartfelt gifts for plant-loving friends, this quick and satisfying project delivers professional-looking results with minimal effort. The portable size and timeless design make it perfect for beginners looking to expand their skills while creating something truly useful and beautiful. 🧶 Happy crocheting! 🌿✨

You ask,

we answer.

FAQs

What yarn weight works best for this car hanging plant pattern?

The pattern specifically calls for super fine weight yarn (also known as fingering weight or size 1) in tan beige and fern green colors. This creates a delicate, realistic appearance perfect for a car hanging. Using heavier yarn will create a larger, bulkier finished product that may be too heavy for hanging.

Can I make this pattern larger for home decoration instead of car hanging?

Absolutely! Simply use a heavier weight yarn (such as worsted weight) with a corresponding larger hook size (4.0-5.0mm). This will scale up the entire project while maintaining the same proportions. Just remember to adjust your stuffing amount accordingly for the larger pot.

How long should I make the hanging chains?

The pattern suggests 60-70 chains for each of the two hanging strands. This length works well for most car mirrors, but you can adjust based on where you plan to hang it. Measure your desired hanging length before starting and add chains as needed.

Do I need to use different hook sizes for this pattern?

Yes, the pattern requires three hook sizes: 2.0mm for the leaves and fiddlehead, 2.5-3.0mm for the pot, and 3.0mm for the hanging chains. Using the correct hook size for each component ensures proper sizing and proportion in the finished piece.

How do I prevent the fiddlehead spiral from unraveling?

Don't cut the yarn tail when you finish the fiddlehead—leave it long for sewing. The pattern specifically notes not to cut this tail. When sewing it to the pot, work the tail through the spiral base to secure it, and the natural curl will hold its shape with proper tension throughout the crocheting process.

Can I use acrylic yarn instead of cotton for this project?

Yes, acrylic yarn works perfectly for this project and is actually more affordable than cotton. Choose a super fine weight acrylic in your desired colors. Acrylic also tends to be softer and more forgiving for beginners, though cotton provides slightly better stitch definition for the detailed fiddlehead.