🧶 Beautiful ✨ Detailed 💝 Adorable

Mini Deer Amigurumi Pattern

Mini Deer Amigurumi Pattern
4.9★ Rating
3-4 Hours Time Needed
2.4K Made This
✂️

Intermediate Level

Ideal for those with basic knitting experience, featuring slightly more advanced stitches and techniques to expand your skills.

⏱️

Weekend Treat

Takes 5-7 hours, making it an enjoyable project to finish over a couple of days.

🦌

Charming Critter

Delightful animal design with sweet antler details that capture the essence of your favorite woodland friends perfectly.

About This Mini Deer Amigurumi Pattern

This mini deer amigurumi is worked almost entirely in continuous rounds, starting from the magic ring and building upward through the head, body, and legs all in one connected piece. The color changes are guided by a visual symbol chart included in the pattern, making it easy to follow even without written color-change instructions. The deer features separately crocheted arms, long and short horns, ears, and an oval snout — each assembled after the main body is complete. The finished doll stands approximately 15cm (5.9 inches) tall when made with worsted weight yarn on a 3mm hook.

Mini Deer Amigurumi Pattern crochet pattern - detailed view of completed project

Every detail — from the layered ears made by joining light beige and brown pieces together, to the sweet red nose stitched onto the snout — is designed to give this little deer a ton of personality. It's the kind of project that looks impressive on a shelf but is genuinely satisfying to make.

Why You'll Love This Mini Deer Amigurumi Pattern

I absolutely love this pattern because it feels like a complete little adventure from start to finish. I get to work the head, body, and legs all in one piece, which means less sewing and more crocheting — my favorite! The color-change chart is such a clever touch; I love how it guides me visually without overwhelming me with written instructions. Every time I attach those little antlers and see the deer's face come together, I get that rush of creative joy that's hard to put into words. It's the kind of pattern I come back to again and again because it never gets old.

Mini Deer Amigurumi Pattern step 1 - construction progress Mini Deer Amigurumi Pattern step 2 - assembly progress Mini Deer Amigurumi Pattern step 3 - details and accessories Mini Deer Amigurumi Pattern step 4 - final assembly and finishing

Switch Things Up

I've made a lot of amigurumi over the years, but there's something about this little deer that keeps pulling me back to it. I think it's the antlers — they seem so tricky at first glance, but once I realized the short horn just sews onto the long horn, the whole thing clicked. I remember the first time I made it, I was sitting on my couch on a rainy afternoon, and by the time I looked up from my hook, the deer was basically done. That feeling of looking at a finished doll you made with your own hands? Nothing really compares. I love how the layered ears give it this sweet, soft look — a little beige peeking out from behind the brown. It feels intentional and considered, like good design always does. The color chart intimidated me at first — I'm used to written color change instructions — but once I printed it out and kept it beside me, it became second nature. I started using it as a guide for my own designs after that. What I also appreciate is how the head, body, and legs flow as one continuous piece. It means less sewing at the end, which is always a win in my book. And the snout! Making it from a chain foundation and building it up into that little oval shape is such a clever technique. I stuffed mine just slightly so it has a gentle rounded look without being too puffy. I've gifted this deer to three different people now — a toddler who carries it everywhere, a friend who collects amigurumi, and my own mother who put it on her windowsill and hasn't moved it since. That tells me everything I need to know about this pattern. 🦌

Common Mistakes & How to Fix Them

✗ Forgetting to change yarn color at the correct round — always check the symbol chart before starting each new round to avoid having to frog your work. ✗ Overstuffing the snout and head can distort the shape — stuff gradually and check the silhouette as you go for the best result. ✗ Skipping stitch markers when dividing the legs often leads to uneven leg placement — always mark your 6 center stitches and 18-stitch leg sections clearly. ✗ Not leaving a long enough tail when fastening off small pieces like the horns and ears makes sewing them on very difficult — always leave at least 15cm of yarn tail. ✗ Sewing the ears before the face details are complete can make it hard to position everything correctly — finish the snout and eyes first, then attach the ears.

Mini Deer Amigurumi Pattern

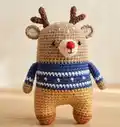
Meet your next favorite little crocheted companion — a sweet mini deer with the most charming details you'll ever stitch to life! This pattern walks you through every step of creating an adorable 15cm (5.9 inch) deer doll, complete with its signature branched antlers, a light beige snout, rosy red nose, and a cozy striped outfit. Whether you're making it as a gift or keeping it on your own shelf, this little guy is guaranteed to steal hearts. The instructions are clearly laid out with symbol patterns and step-by-step rounds, making it enjoyable to follow even if you're still building your amigurumi skills. Grab your hook, pick your yarn colors, and get ready to bring the cutest deer in the forest to life — one stitch at a time!

Intermediate 3-4 Hours

Materials Needed for Mini Deer Amigurumi Pattern

— Main Fabric

  • 01
    Worsted weight yarn in Brown
  • 02
    Worsted weight yarn in Dark Brown
  • 03
    Worsted weight yarn in Light Beige
  • 04
    Worsted weight yarn in Blue
  • 05
    Worsted weight yarn in Red
  • 06
    Worsted weight yarn in White
  • 07
    Worsted weight yarn in Dark Orange
  • 08
    Worsted weight yarn in Yellow

— Tools Required

  • 01
    Crochet hook size 5/0 (3mm)
  • 02
    5mm black plastic safety eyes x2
  • 03
    Yarn needle
  • 04
    Scissors
  • 05
    Stitch markers
  • 06
    Fiberfill stuffing
  • 07
    Glue (for securing eyes)
  • 08
    Wooden pin (optional, for straightening the doll)

Progress Tracker

0% Complete

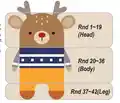
— Head / Body / Legs :

Infos :

Use Brown yarn to make a Magic Ring. Change yarn color according to the Symbol Pattern chart — color changes are not mentioned in the written instructions. Refer to page 1 for the full color guide. Rounds 1–19 form the Head (Brown yarn), Rounds 20–36 form the Body (Navy / White / Yellow yarn), Rounds 37–42 form the Legs (Yellow / Dark Orange yarn).

Round 1 :

6 sc in magic ring, tighten the loop (6)

Round 2 :

(2-sc inc) x 6 (12)

Round 3 :

(1 sc, 2-sc inc) x 6 (18)

Round 4 :

(2 sc, 2-sc inc) x 6 (24)

Round 5 :

(3 sc, 2-sc inc) x 6 (30)

Round 6 :

(4 sc, 2-sc inc) x 6 (36)

Round 7 :

(5 sc, 2-sc inc) x 6 (42)

Round 8 :

(6 sc, 2-sc inc) x 6 (48)

Round 9–36 :

1 sc in each st (48)

Info :

Divide the legs: Identify the center 6 stitches between the legs and mark each leg section of 18 stitches with stitch markers. Start the first leg (left leg) at the 31st stitch of Round 36.

— First Leg (Left Leg) :

Round 37–40 :

1 sc in each st (18)

Round 41 :

(1 sc, sc2tog) x 6 (12)

Round 42 :

(sc2tog) x 6 (6)

Info :

Fasten off, leaving a long tail. Stuff the leg. Using a yarn needle, weave the yarn tail through the front loop of each remaining stitch and pull tight to close.

— Second Leg (Right Leg) :

Info :

Rejoin Yellow yarn to the 7th back unworked stitch of Round 36. This is the first stitch of the right leg. Work Rounds 37–42 the same as the left leg. Using a yarn needle, sew the 6 stitches between the legs closed.

Round 37–40 :

1 sc in each st (18)

Round 41 :

(1 sc, sc2tog) x 6 (12)

Round 42 :

(sc2tog) x 6 (6)

Info :

Fasten off, leaving a long tail. Stuff the leg. Weave yarn tail through front loops of remaining stitches and pull tight to close. Sew the 6 stitches between both legs.

— Arm x2 :

Info :

Use Brown yarn to make a Magic Ring. Make 2 pieces. Color changes: Brown / Blue / White yarn — refer to the arms symbol pattern chart.

Round 1 :

5 sc in magic ring, tighten the loop (5)

Round 2 :

(2-sc inc) x 5 (10)

Round 3–11 :

1 sc in each st (10)

Info :

Fasten off, leaving a long tail for sewing. Flatten the arm — do not stuff.

— Long Horn x2 :

Info :

Use Dark Brown yarn to make a Magic Ring. Make 2 pieces. Do not stuff.

Round 1 :

4 sc in magic ring, tighten the loop (4)

Round 2–5 :

1 sc in each st (4)

Round 6 :

2-sc inc, 3 sc (5)

Round 7 :

2-sc inc, 4 sc (6)

Info :

Fasten off, leaving a long tail for sewing. Do not stuff.

— Short Horn x2 :

Info :

Use Dark Brown yarn to make a Magic Ring. Make 2 pieces. Do not stuff. Sew the short horn onto the long horn after completion.

Round 1 :

4 sc in magic ring, tighten the loop (4)

Round 2–4 :

1 sc in each st (4)

Info :

Fasten off, leaving a long tail for sewing. Sew the short horn onto the long horn (attach at the 2-round mark up from the base).

— Snout :

Info :

Use Light Beige yarn to make 3 chains (foundation chain, not a magic ring).

Round 1 :

1 sc in second ch from hook, 3 sc in bottom chain, working up the other side — 1 sc, 1 sc in next chain, slst (6)

Round 2 :

ch 1, (2-sc inc) x 6, slst (12)

Round 3 :

ch 1, 1 sc in each st, slst (12)

Round 4 :

ch 1, 4 sc, 2-sc inc, 6 sc, 2-sc inc, slst (14)

Round 5 :

ch 1, 1 sc in each st, slst (14)

Info :

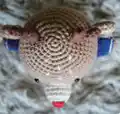
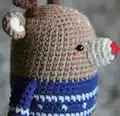
Fasten off, leaving a long tail for sewing. Fill with a small amount of stuffing. Embroider a nose and mouth onto the snout before attaching. Place eyes between Rounds 13 and 14 of the head. Attach snout over the 8-stitch wide, 19-stitch tall section of the face as shown in the diagram.

— Ear x2 :

Info :

Make 2 Light Beige ears and 2 Brown ears using the same pattern below. Then layer and join them together using Brown yarn edging.

Round 1 :

6 sc in magic ring, tighten the loop (6)

Round 2 :

(2-sc inc) x 6 (12)

Edging (Step 3) :

Place the Light Beige ear on top of the Brown ear and SC them together using Brown yarn around the edge (12)

Info :

Fasten off, leaving a long tail for sewing. Attach ears to the head. Cheek location: between Rounds 14 and 15. Arms location: between Rounds 20 and 21. Tip: plug a wooden pin into the back of the doll's feet to help it stand upright.

Assembly Instructions

  • Sew the short horn onto each long horn at approximately the 2-round mark from the base, then attach the completed antler pairs to the top of the head.
  • Attach the layered ears (light beige over brown, edged together) to either side of the head between rounds 14 and 15.
  • Glue or secure the 5mm black plastic safety eyes to the face between rounds 13 and 14, on either side of the snout placement area.
  • Stuff the snout lightly, embroider the nose and mouth details onto it, then sew it onto the face over the marked 8-stitch wide section.
  • Sew the arms flat (do not stuff) to the sides of the body between rounds 20 and 21, one on each side.
  • After the legs are complete and the 6 center stitches between them are sewn shut, use a wooden pin inserted into the base of the feet to help the doll stand straight.
  • Complete all face embroidery details and use the reference illustrations in the pattern to confirm correct placement of every part before finalizing.

Important Notes

  • 💡Color changes throughout the head, body, and leg sections are only shown on the symbol chart — always refer to the chart before starting each new section.
  • 💡Use stitch markers when dividing the legs to correctly identify the 6 center stitches and the 18-stitch leg sections on each side.
  • 💡Do not stuff the arms — flatten them before sewing for the correct flat, natural look on the finished doll.
  • 💡When making the ears, create both the light beige and brown versions before joining them — do not try to stuff or shape them before the edging round.
  • 💡Leave a generous yarn tail (at least 15cm) on every small piece like horns, ears, and the snout to make sewing them onto the body much easier.

This sweet little deer from the Bigbebez Minimals collection is one of those patterns that just fills your heart with warmth while you're making it. From the chunky magic-ring head down to those tiny color-blocked legs, every round feels satisfying and intentional. Whether you're making it for a baby shower gift, a festive decoration, or simply because you needed a woodland friend on your desk — this little deer delivers. 🦌 The layered ears, branched antlers, and embroidered snout give it a level of detail that looks far more complex than it really is. 🧶 Happy crocheting — may your yarn never tangle and your tension always hold! ✨

You ask,

we answer.

FAQs

What yarn weight should I use for this deer pattern?

The pattern calls for worsted weight yarn, which gives the finished deer a size of approximately 15cm (5.9 inches). If you prefer a smaller doll, you can use fingering weight yarn on a 3mm crochet hook for a more miniature result.

How do I know when to change colors during the body section?

Color changes are not written into the round-by-round instructions — they are shown exclusively on the symbol pattern chart included in the PDF. Always check the chart before starting each new section: Brown for Rounds 1–19, Navy/White/Yellow for Rounds 20–36, and Yellow/Dark Orange for Rounds 37–42.

Do I need to stuff all the parts?

No — the arms and horns are not stuffed. The snout is stuffed lightly, and the main body/head section along with the legs should be firmly stuffed before closing. Leave the arms flat and the horns unstuffed to keep them neat and easy to sew on.

How do I make the deer stand up on its own?

The pattern includes a helpful tip: insert a small wooden pin into the back of the doll's feet to help it stand upright. This is especially useful if your tension is slightly looser and the legs don't hold their shape perfectly.

How do I assemble the layered ears correctly?

Make two light beige ears and two brown ears using the same 2-round pattern. Then place the light beige piece on top of the brown one and single crochet them together using brown yarn around the edge for 12 stitches. This creates a two-tone ear with a nice natural finish.

Where exactly do the eyes go on the face?

The 5mm black plastic safety eyes are placed between Rounds 13 and 14 of the head, on either side of where the snout will be attached. The snout is positioned over an 8-stitch wide section of the face, so place your eyes before attaching the snout for the best result.