🧢 Beautiful ✨ Detailed πŸ’ Adorable

Spaghetti-Eating Dinosaur Amigurumi Pattern

Spaghetti-Eating Dinosaur Amigurumi Pattern
4.8β˜…Rating
5-7 HoursTime Needed
2.5KMade This
βœ‚οΈ

Intermediate Level

Ideal for those with basic crocheting experience, featuring slightly more advanced stitches and techniques to expand your skills.

⏱️

Weekend Treat

Takes 5-7 hours, making it an enjoyable project to finish over a couple of days.

🧸

Cute Companion

An adorable friend to cherish, handcrafted with love to bring comfort and joy for years to come.

About This Spaghetti-Eating Dinosaur Amigurumi Pattern

Spaghetti-Eating Dinosaur Amigurumi Pattern crochet pattern - detailed view

A fantastic conversation starter for your home or a wonderfully unique gift for the pasta lover in your life, guaranteed to bring a smile to anyone who sees it sitting on a shelf.

Why You'll Love This Spaghetti-Eating Dinosaur Amigurumi Pattern

I absolutely fell in love with how much character is packed into this little guy. Crocheting the tiny bowl and stuffing it full of yarn spaghetti was such a playful break from standard toy patterns, and shaping those chubby cheeks using simple increases was incredibly satisfying to watch come together.

Spaghetti-Eating Dinosaur Amigurumi Pattern step 1 Spaghetti-Eating Dinosaur Amigurumi Pattern step 2 Spaghetti-Eating Dinosaur Amigurumi Pattern step 3 Spaghetti-Eating Dinosaur Amigurumi Pattern step 4

Switch Things Up

I have always believed that the best amigurumi patterns are the ones that make you giggle while you make them, and this little spaghetti-eating dinosaur does exactly that! When I first sat down to design this buddy, I wanted to capture that absolute, single-minded joy of a toddler face-first in a bowl of noodles.

If you want to customize your little guy, there are so many fun directions you can go. You could easily swap the yellow yarn for green to make pesto, or add some tiny red pom-poms to the bowl as meatballs! For the dinosaur himself, try using a soft variegated yarn to give him a fun, textured look, or make his spikes in rainbow colors.

My biggest tip for this build is to take your time with the face embroidery. The placement of those tiny eyebrows and sleepy eyes is what really brings his expression to life. I like to use a few sewing pins to map out the facial features before I commit with the embroidery needle. It makes a world of difference!

Common Mistakes & How to Fix Them

βœ— When working the cheek increases in Round 16, miscounting by even one stitch will shift the entire snout off-center, so use a marker to find the exact middle beforehand.βœ— If you stuff the head too lightly, the heavy spaghetti bowl will cause the dinosaur to tip forward; make sure to pack the fiberfill firmly to keep him upright.βœ— Forgetting to work in the front loops only during Round 44 of the body will ruin the clean ridge that separates his torso, making the transition look messy.βœ— Leaving too short of a yarn tail on the back spikes will make it difficult to sew them securely in a straight line down the spine, causing them to wobble.

Spaghetti-Eating Dinosaur Amigurumi Pattern

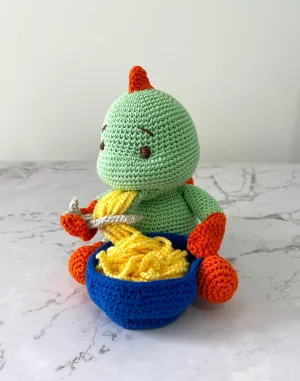
Meet your new favorite crafting adventure! This adorable little dinosaur is absolutely obsessed with spaghetti, and now you can bring him to life with your crochet hook. Complete with his own cozy blue bowl, a fork, and lots of yummy yellow noodles, this project is packed with personality and fun details that will keep you smiling with every stitch. It's the perfect quirky addition to any desk or toy collection.

Intermediate 5-7 Hours

Materials Needed for Spaghetti-Eating Dinosaur Amigurumi Pattern

β€” Main Fabric

  • 01
    Medium weight yarn in Mint Green for the main body and head
  • 02
    Medium weight yarn in Vibrant Orange for the feet, hands, and back spikes
  • 03
    Medium weight yarn in Royal Blue for the spaghetti bowl
  • 04
    Medium weight yarn in Pastel Yellow for the spaghetti noodles
  • 05
    Small amount of Light Brown yarn for the eating stick/fork
  • 06
    A few inches of Dark Brown embroidery thread for the facial details

β€” Tools Required

  • 01
    2.5 mm crochet hook
  • 02
    High-quality polyester fiberfill stuffing
  • 03
    Tapestry needle for sewing pieces together
  • 04
    Stitch markers to keep track of rounds
  • 05
    Straight pins for positioning limbs before sewing
  • 06
    Scissors

Progress Tracker

0% Complete

β€” 1. Head & Body :

Round 1 :

6 sc in mr (6)

Round 2 :

6 inc (12)

Round 3 :

repeat (1 sc, inc) 6 times (18)

Round 4 :

repeat (2 sc, inc) 6 times (24)

Round 5 :

repeat (3 sc, inc) 6 times (30)

Round 6 :

repeat (4 sc, inc) 6 times (36)

Round 7 :

repeat (5 sc, inc) 6 times (42)

Round 8 :

repeat (6 sc, inc) 6 times (48)

Round 9 :

repeat (7 sc, inc) 6 times (54)

Round 10-15 :

sc in each st around (54)

Round 16 :

20 sc, 14 inc, 20 sc (68)

Round 17-23 :

sc in each st around (68)

Round 24 :

20 sc, 14 dec, 20 sc (54)

Round 25 :

repeat (7 sc, dec) 6 times (48)

Round 26 :

repeat (6 sc, dec) 6 times (42)

Round 27 :

repeat (5 sc, dec) 6 times (36)

Round 28 :

repeat (4 sc, dec) 6 times (30)

Info :

Tightly fill the head with stuffing.

Round 29-31 :

sc in each st around (30)

Round 32 :

repeat (4 sc, inc) 6 times (36)

Round 33 :

repeat (5 sc, inc) 6 times (42)

Round 34 :

repeat (6 sc, inc) 6 times (48)

Round 35 :

repeat (7 sc, inc) 6 times (54)

Round 36-43 :

sc in each st around (54)

Info :

Switch to body color (or continue with main color).

Round 44 :

flo sc in each st around (54)

Round 45-58 :

sc in each st around (54)

Round 59 :

flo sc in each st around (54)

Round 60 :

repeat (7 sc, dec) 6 times (48)

Round 61 :

repeat (6 sc, dec) 6 times (42)

Round 62 :

repeat (5 sc, dec) 6 times (36)

Round 63 :

repeat (4 sc, dec) 6 times (30)

Round 64 :

repeat (3 sc, dec) 6 times (24)

Round 65 :

repeat (2 sc, dec) 6 times (18)

Round 66 :

repeat (1 sc, dec) 6 times (12)

Round 67 :

6 dec (6). fo.

β€” 2. Lower Lip :

Round 1 :

6 sc in mr (6)

Round 2 :

6 inc (12)

Round 3 :

sc in each st around (12)

Round 4 :

repeat (1 sc, inc) 6 times (18)

Round 5 :

sc in each st around (18)

Round 6 :

repeat (2 sc, inc) 6 times (24)

Round 7 :

sc in each st around (24)

Round 8 :

Straighten the piece and crochet through both layers with 12 sc. fo, leaving a long tail for sewing.

β€” 3. Tail :

Round 1 :

6 sc in mr (6)

Round 2 :

sc in each st around (6)

Round 3 :

repeat (2 sc, inc) 2 times (8)

Round 4 :

sc in each st around (8)

Round 5 :

repeat (3 sc, inc) 2 times (10)

Round 6 :

sc in each st around (10)

Round 7 :

repeat (4 sc, inc) 2 times (12)

Round 8 :

sc in each st around (12)

Round 9 :

repeat (1 sc, inc) 6 times (18)

Round 10-16 :

sc in each st around (18)

Round 17 :

repeat (8 sc, inc) 2 times (20)

Round 18 :

repeat (9 sc, inc) 2 times (22)

Round 19 :

sc in each st around (22)

Round 20 :

repeat (10 sc, inc) 2 times (24)

Round 21 :

sc in each st around (24). Tightly fill the tail with stuffing.

Round 22 :

repeat (4 sc, inc) 6 times (30)

Round 23-24 :

sc in each st around (30). fo, leaving a long tail for sewing.

β€” 4. Arms (Make 2) :

Round 1 :

Using Orange yarn, 6 sc in mr (6)

Round 2 :

6 inc (12)

Round 3 :

sc in each st around (12)

Round 4 :

repeat (5 sc, inc) 2 times (14)

Round 5-8 :

sc in each st around (14)

Round 9 :

repeat (2 sc, dec) 4 times (10)

Round 10 :

sc in each st around (10)

Round 11 :

repeat (1 sc, inc) 5 times (15)

Info :

Switch to Mint Green yarn.

Round 12-23 :

sc in each st around (15)

Round 24 :

Straighten the piece and crochet through both layers with 7 sc. fo, leaving a long tail.

β€” 5. Legs (Make 2) :

Round 1 :

Using Orange yarn, 6 sc in mr (6)

Round 2 :

6 inc (12)

Round 3 :

repeat (1 sc, inc) 6 times (18)

Round 4 :

6 sc, 4 inc, 8 sc (22)

Round 5-7 :

sc in each st around (22). Tightly fill the legs with stuffing.

Round 8 :

6 sc, 4 dec, 8 sc (18)

Round 9 :

7 sc, 2 dec, 7 sc (16)

Round 10-11 :

sc in each st around (16)

Round 12 :

Switch to Mint Green yarn and work flo sc in each st around (16)

Round 13-20 :

sc in each st around (16)

Round 21 :

Straighten the piece and crochet through both layers with 8 sc. fo, leaving a long tail.

Leg Details :

Join Orange yarn to the flo loops of Round 12 and work sc in each of the 16 st. fo and weave in ends.

β€” 6. Spaghetti Bowl :

Round 1 :

Using Royal Blue yarn, 6 sc in mr (6)

Round 2 :

6 inc (12)

Round 3 :

repeat (1 sc, inc) 6 times (18)

Round 4 :

repeat (2 sc, inc) 6 times (24)

Round 5 :

repeat (3 sc, inc) 6 times (30)

Round 6 :

repeat (4 sc, inc) 6 times (36)

Round 7 :

repeat (5 sc, inc) 6 times (42)

Round 8 :

flo sc in each st around (42)

Round 9-10 :

sc in each st around (42)

Round 11 :

blo repeat (6 sc, inc) 6 times (48)

Round 12 :

repeat (7 sc, inc) 6 times (54)

Round 13 :

repeat (8 sc, inc) 6 times (60)

Round 14-16 :

sc in each st around (60)

Round 17 :

repeat (7 sc, dec) 6 times (54). fo.

β€” 7. Dinosaur Back Spikes (Make 5) :

Round 1 :

Using Orange yarn, 6 sc in mr (6)

Round 2 :

repeat (2 sc, inc) 2 times (8)

Round 3 :

repeat (3 sc, inc) 2 times (10)

Round 4 :

repeat (4 sc, inc) 2 times (12)

Round 5-6 :

sc in each st around (12). fo, leaving a long tail.

β€” 8. Spaghetti & Eating Stick :

Spaghetti :

Using Yellow yarn, ch 100. fo. Make 7 strands total.

Stick :

Using Light Brown yarn, ch 20, turn.

Row 2 :

Work 20 sc. Fold the piece up and fo, leaving a tail to attach.

Assembly Instructions

  • Position the lower lip on the face between rounds 14 and 15, ensuring there are exactly 8 single crochet stitches between the eyes, then sew it securely.
  • Attach the stuffed tail to the lower back of the body, centering it so it acts as a tripod support to help the dinosaur sit upright.
  • Sew the arms to the sides of the body between rounds 30 and 33, angling them slightly forward so they can hold the stick and bowl.
  • Position the legs on the lower sides of the body between rounds 55 and 59, pinning them first to make sure the dinosaur sits flat.
  • Stitch the five orange spikes along the center of the head, back, and tail, keeping them perfectly aligned in a straight line.
  • Fill the blue bowl with the yellow spaghetti strands, secure them with a few hidden stitches, and attach the fork to one of the hands.

Important Notes

  • πŸ’‘To get a clean color change on the limbs, complete the final pull-through of the last stitch in the old color with your new color.
  • πŸ’‘When crocheting the spaghetti strands, keep your tension loose so the chains drape naturally like real noodles.
  • πŸ’‘Use the invisible decrease method for all decreases on the head and body to prevent any stuffing from peeking through the gaps.
  • πŸ’‘Make sure to firmly stuff the legs and tail before closing them to give the finished toy maximum stability when sitting.

I hope you have as much fun making this little pasta-loving dino as I did! There is something so magical about watching a pile of colorful yarn transform into a quirky, character-rich friend. Don't worry if your stitches aren't absolutely perfectβ€”that's what gives handmade toys their unique charm and personality. Happy crocheting, and may your hook fly fast! 🧢✨

You ask,

we answer.

FAQs

Can I use safety eyes instead of embroidering them?

Absolutely! If you prefer safety eyes, 8mm eyes placed around rounds 14-15 with about 8 stitches between them will look wonderfully cute.

My dinosaur keeps tipping over backward. How do I fix this?

This usually happens if the tail isn't stuffed firmly enough or is sewn too high. Try repositioning the tail lower so it acts as a kickstand.

What kind of yarn is best for this project?

A sturdy cotton or cotton-blend yarn in sports/DK weight works beautifully because it gives great stitch definition and helps the bowl hold its shape.

How do I make the spaghetti look more realistic?

Varying the lengths of your chains slightly (some 90 chains, some 110) and letting them twist naturally will give the bowl a much more realistic, tangled look.