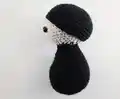
Bring adorable Rizzo the Ladybug to life with this charming amigurumi pattern! Standing 11 inches tall, this delightful spotted friend features a classic black cap with decorative spots, sweet pink accents, and the cutest little scarf. Perfect for bug lovers of all ages, Rizzo combines cream and black colors with pops of pink for an irresistibly sweet appearance. This comprehensive pattern includes detailed instructions for creating every element, from the dotted wings to those endearing embroidered eyebrows that give Rizzo so much personality and charm.
Progress Tracker
0% Complete
— Head :
Round 1 :
Make 6 sc into a magic ring (6)
Round 2 :
Increase in each st around (12)
Round 3 :
(sc, inc) x 6 (18)
Round 4 :
sc, inc, (2 sc, inc) x 5, sc (24)
Round 5 :
(3 sc, inc) x 6 (30)
Round 6 :
2 sc, inc, (4 sc, inc) x 5, 2 sc (36)
Round 7 :
(5 sc, inc) x 6 (42)
Round 8 :
3 sc, inc, (6 sc, inc) x 5, 3 sc (48)
Round 9-14 :
sc in each st around (48)
Infos :
Place eyes between rounds 12 and 13, leaving 10 holes between them. Place nose in between eyes between rounds 13 and 14. You may have to adjust the eye placement depending on yarn and hook size you use.
Round 15 :
3 sc, dec, (6 sc, dec) x 5, 3 sc (42)
Round 16 :
(5 sc, dec) x 6 (36)
Info :
Start stuffing the head
Round 17 :
2 sc, dec, (4 sc, dec) x 5, 2 sc (30)
Round 18 :
(3 sc, dec) x 6 (24)
Round 19 :
(2 sc, dec) x 6 (18)
Info :
F/O and leave a tail (the tail does not need to be long)
— Cap :
Round 1 :
Make 6 sc into a magic ring (6)
Round 2 :
Increase in each st around (12)
Round 3 :
(sc, inc) x 6 (18)
Round 4 :
sc, inc, (2 sc, inc) x 5, sc (24)
Round 5 :
(3 sc, inc) x 6 (30)
Round 6 :
2 sc, inc, (4 sc, inc) x 5, 2 sc (36)
Round 7 :
(5 sc, inc) x 6 (42)
Round 8 :
3 sc, inc, (6 sc, inc) x 5, 3 sc (48)
Round 9-13 :
sc in each st around (48)
Round 14 :
(6 sc, dec) x 6 (42)
Info :
F/O and leave a long tail for sewing
— Body :
Round 1 :
Make 6 sc into a magic ring (6)
Round 2 :
Increase in each st around (12)
Round 3 :
(sc, inc) x 6 (18)
Round 4 :
(inc, 2 sc) x 6 (24)
Round 5 :
(3 sc, inc) x 6 (30)
Round 6 :
2 sc, inc, (4 sc, inc) x 5, 2 sc (36)
Round 7-13 :
sc in each st around (36)
Round 14 :
(5 sc, dec) x 4, 8 sc (32)
Round 15 :
(4 sc, dec) x 3, 14 sc (29)
Round 16 :
(dec, 7 sc) x 2, dec, 9 sc (26)
Round 17 :
3 sc, dec, 16 sc, dec, 3 sc (24)
Info :
Start stuffing the body
Round 18 :
sc in each st around (24)
Round 19 :
8 sc, dec, 4 sc, dec, 8 sc (22)
Round 20 :
sc in each st around (22)
Round 21 :
dec, 8 sc, dec, 10 sc (20)
Round 22 :
sc in each st around (20)
Round 23 :
(dec, 8 sc) x 2 (18)
Info :
F/O and leave a long tail for sewing
— Arms (Make 2) :
Round 1 :
Make 6 sc into a magic ring (6)
Round 2 :
Increase in each st around (12)
Round 3-6 :
Sc in each st around (12)
Info :
Stop stuffing the arms
Round 7 :
5 sc, dec, 5 sc (11)
Round 8 :
Sc in each st around (11)
Round 9 :
4 sc, dec, 3 sc, dec (9)
Round 10 :
Sc in each st around (9)
Round 12-16 :
Sc in each st around (8)
Infos :
F/O and leave a long tail for sewing. Tip: If you fold the arms in half and sc closed, you will have an easier time when sewing them.
— Scarf :
Round 1 :
sl st in 2nd chain from hook, sc, hdc, 2 dc, hdc, 26 sc, hdc, 2 dc, hdc, sc, 2 sl st across the chain
Info :
F/O and leave a long tail for sewing
— Legs (Make 2) :
Info :
Starting with Color C: Ch 6
Round 1 :
inc in 2nd chain from hook, 3 sc, 4 sc in the last chain, working on the opposite side of the chain: 3 sc, inc (14)
Round 2 :
Inc3, 4 sc, inc3, 2 sc, inc3, 5 sc (20)
Round 3 :
inc x 3, 5 sc, inc3, 4 sc, inc3, 6 sc (27)
Round 4 :
sc, inc x 3, 8 sc, inc3, 6 sc, inc3, 7 sc (34)
Round 5-7 :
sc in each st around (34)
Round 8 :
17 sc, dec x 6, 5 sc (28)
Info :
Stuff the legs as you work
Round 9 :
16 sc, dec x 4, 4 sc (24)
Round 10 :
15 sc, dec x 4, sc (20)
Round 11 :
12 sc, dec x 4 (16)
Info :
Stop stuffing the legs
Round 12 :
(dec, 6 sc) x 2 (14)
Round 13 :
sc in each st around (14)
Round 14 :
(dec, 5 sc) x 2 (12)
Round 15 :
sc in each st around (12)
Round 16 :
(dec, 4 sc) x 2 (10)
Round 17 :
sc in each st around (10)
Info :
F/O and leave a long tail for sewing
— Antennae (Make 2) :
Round 1 :
Make 6 sc into a magic ring (6)
Round 2 :
Increase in each st around (12)
Round 3-4 :
sc in each st around (12)
Info :
Change to Color B. Do not stuff the antennae from here on
Round 6-12 :
sc in each st around (6)
Info :
F/O and leave a long tail for sewing
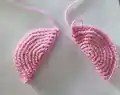
— Wings (Make 2) :
Round 1 :
Make 6 sc into a magic ring (6)
Round 2 :
Increase in each st around (12)
Round 3 :
(sc, inc) x 6 (18)
Round 4 :
(2 sc, inc) x 6 (24)
Round 5 :
(3 sc, inc) x 6 (30)
Round 6 :
(4 sc, inc) x 6 (36)
Round 7 :
(5 sc, inc) x 6 (42)
Round 8 :
(6 sc, inc) x 6 (48)
Infos :
Do not F/O! Fold the wing in half and sc closed. F/O and leave a long tail for sewing
This adorable Rizzo the Ladybug pattern was designed to capture the charm of everyone's favorite spotted garden friend in the sweetest amigurumi form! The combination of the classic black cap with pink wings creates a delightful twist on the traditional ladybug look. With customizable felt spots and endearing embroidered features, each Rizzo you create will have its own unique personality. The cozy scarf and rosy cheeks add that extra touch of warmth that makes this ladybug truly special. 🐞✨ Happy crocheting! 🧶💕