🧶 Beautiful ✨ Detailed 💝 Adorable

Reversible Princess and Muffin Amigurumi Pattern

Reversible Princess and Muffin Amigurumi Pattern
4.4★ Rating
8-10 Hours Time Needed
3.6K Made This
✂️

Intermediate Level

Ideal for those with basic knitting experience, featuring slightly more advanced stitches and techniques to expand your skills.

⏱️

All-Day Adventure

Requires 8-10 hours, ideal for a full day of immersive knitting.

🧸

Whimsical Buddy

Playful characters full of personality, designed to spark imagination and become cherished playtime favorites.

About This Reversible Princess and Muffin Amigurumi Pattern

Reversible Princess and Muffin Amigurumi Pattern crochet pattern - detailed view of completed project

This unique design is perfect for those who want to challenge themselves with something different while creating a toy that offers twice the play value. The pattern includes detailed instructions for creating curly hair, embroidering facial features, and constructing the reversible hat that makes this design truly special.

Why You'll Love This Reversible Princess and Muffin Amigurumi Pattern

I absolutely love this pattern because it's not just another amigurumi—it's a magical transformation toy that sparks joy and creativity! The reversible design means you're essentially getting two patterns in one, which makes it an incredible value. I'm fascinated by the clever construction techniques, especially how the muffin hat flips to become part of the princess's outfit. The attention to detail in the curly hair, the embroidered features, and the layered dress construction makes this pattern both challenging and rewarding. Plus, watching someone's face light up when they discover the toy reverses is absolutely priceless! It's the perfect project for gifting because it shows you've put extra thought and effort into creating something truly unique.

Reversible Princess and Muffin Amigurumi Pattern step 1 - construction progress Reversible Princess and Muffin Amigurumi Pattern step 2 - assembly progress Reversible Princess and Muffin Amigurumi Pattern step 3 - details and accessories Reversible Princess and Muffin Amigurumi Pattern step 4 - final assembly and finishing

Switch Things Up

I love experimenting with this reversible pattern to create different characters! Instead of a princess, you could transform the design into a fairy with pointed ears and butterfly wings that flip into a flower pot. The curly yellow hair could become orange or red spirals for an autumn-themed version that reverses from a pumpkin girl into a pumpkin spice cupcake.

For a more modern twist, I've considered making the dress in denim blue with white accents that could reverse into a blueberry muffin. You could also create a chocolate version by using brown yarn for the muffin portion and having the princess wear a chocolate-themed ball gown in rich browns and golds.

The cherry on top offers endless possibilities too—swap it for a strawberry, a flower, or even a little crown that matches your princess theme. I've thought about adding tiny embroidered details like hearts or stars on the dress to make each version unique. You could even create a whole set of reversible dolls representing different baked goods and their corresponding fairy tale characters—imagine a collection with a cupcake princess, donut queen, and cookie duchess!

Common Mistakes & How to Fix Them

✗ Not working behind the arch correctly for the muffin hat, which can cause the reversible feature to not function properly—follow the picture guides carefully ✗ Forgetting to attach the underskirt to the back loops of row 31 before continuing, which will make assembly extremely difficult later on ✗ Stuffing the head too firmly or too loosely, affecting the doll's shape—stuff gradually and check the firmness as you decrease rounds ✗ Placing safety eyes incorrectly between rounds, creating an unbalanced facial expression—count stitches carefully and pin first before securing permanently

Reversible Princess and Muffin Amigurumi Pattern

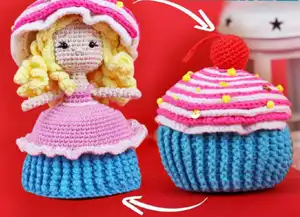
Create an enchanting two-in-one crochet toy with this reversible princess and muffin pattern! This unique design transforms from an adorable princess doll with flowing golden hair and a beautiful dress into a sweet cupcake complete with a cherry on top. Perfect for gifting or adding to your amigurumi collection, this pattern offers double the fun with creative details like a turquoise underskirt, a muffin hat that actually reverses, and charming embroidered features. Whether you're making it for a child or keeping it for yourself, this whimsical reversible design will delight everyone!

Intermediate 8-10 Hours

Materials Needed for Reversible Princess and Muffin Amigurumi Pattern

— Main Fabric

  • 01
    YarnArt Jeans 2-Fine Sport weight cotton blend yarn in colors: #01 white, #18 lilac, #20 pink, #59 pink neon, #88 light yellow, #26 red
  • 02
    Alize Cotton Gold 2-Fine Sport weight cotton blend yarn in colors: #458 stone, #287 turquoise
  • 03
    Embroidery floss in black, white, and brown colors

— Tools Required

  • 01
    Crochet hook 2.0 mm
  • 02
    Black 5 mm safety eyes (2 pairs)
  • 03
    Hollowfiber stuffing
  • 04
    Blunt sewing needle
  • 05
    Pins
  • 06
    Stitch markers
  • 07
    Scissors
  • 08
    Dry pastel or blush for cheeks
  • 09
    Elastic band for hat attachment
  • 10
    Beads and sequins for decoration

Progress Tracker

0% Complete

— HANDS (2 pieces) :

Info :

Hands are crochet in continuous rounds/spirals using stone color yarn and 2 mm hook

Row 1 :

5 sc in mr

Rows 2-9 :

5 sc (8 rows)

Row 10 :

Fold edges in half, work 2 sc

Info :

Cut thread, leave long tail for sewing

— HAIR :

Info :

Hair crochet in continuous rounds/spirals using light-yellow color yarn and 2 mm hook

Row 1 :

6 sc in mr

Row 2 :

6 inc (12)

Row 3 :

*1 sc, 1 inc* 6 times (18)

Row 4 :

*2 sc, 1 inc* 6 times (24)

Row 5 :

*3 sc, 1 inc* 6 times (30)

Row 6 :

10 times "curls #1", 10 times "curls #2"

Curl #1 :

30 ch, from 2nd ch from hook *1 sc, 1 inc* 10 times, 9 sc, 1 sc in next stitch of 5th row

Curl #2 :

30 ch, from 2nd ch from hook *1 sc, 1 inc* 10 times, 9 sc, skip 1 stitch of 5th row, 1 sc in 5th row stitch

Info :

Join first and last curls with 1 ss. Leave long tail for sewing. Attach hair to head with pins, style, and sew to head

— HEAD AND BODY :

Info :

Head and body crochet in continuous rounds/spirals. Start with stone color, then switch to pink

Row 1 (stone) :

6 sc in mr

Row 2 :

6 inc (12)

Row 3 :

*1 sc, 1 inc* 6 times (18)

Row 4 :

1 sc, 1 inc, *2 sc, 1 inc* 5 times, 1 sc (24)

Row 5 :

*3 sc, 1 inc* 6 times (30)

Row 6 :

2 sc, 1 inc, *4 sc, 1 inc* 5 times, 2 sc (36)

Rows 7-15 :

36 sc (9 rows)

Infos :

Here shape the face. Use black floss for eyelashes, brown floss for eyebrows. Embroider nose with stone color yarn. Insert safety eyes between 11th and 12th rows with 6 sc between eyes. Use white floss to make eyes brighter

Row 16 :

*2 sc, 1 dec* 9 times (27)

Row 17 :

*1 sc, 1 dec* 9 times (18)

Info :

Tightly fill head with hollowfiber

Row 18 :

9 dec

Rows 19-20 :

9 sc (2 rows)

Row 21 :

*2 sc, 1 inc* 3 times (12)

Row 22 :

*1 sc, 1 inc* 6 times (18)

Row 23 :

18 sc

Row 24 (pink) :

18 sc

Rows 25-26 :

18 sc (2 rows)

Row 27 :

18 inc-flo (36)

Row 28 :

*5 sc, 1 inc* 6 times (42)

Row 29 :

3 sc, 1 inc, *6 sc, 1 inc* 5 times, 3 sc (48)

Row 30 :

*7 sc, 1 inc* 6 times (54)

Row 31 :

54 sc-flo

Rows 32-34 :

54 sc (3 rows)

Row 35 :

4 sc, 1 inc, *8 sc, 1 inc* 5 times, 4 sc (60)

Rows 36-38 :

60 sc (3 rows)

Row 39 (light pink) :

60 dc inc, 1 ss

Info :

Sew hands between 23rd and 24th rows. Fasten off, cut thread and weave in ends. Fill body with hollowfiber

— UNDERSKIRT :

Info :

Underskirt crochet in continuous rounds/spirals using turquoise color yarn and 2 mm hook

Row 1 :

6 sc in mr

Row 2 :

6 inc (12)

Row 3 :

*1 sc, 1 inc* 6 times (18)

Row 4 :

1 sc, 1 inc, *2 sc, 1 inc* 5 times, 1 sc (24)

Row 5 :

*3 sc, 1 inc* 6 times (30)

Row 6 :

2 sc, 1 inc, *4 sc, 1 inc* 5 times, 2 sc (36)

Row 7 :

*5 sc, 1 inc* 6 times (42)

Row 8 :

3 sc, 1 inc, *6 sc, 1 inc* 5 times, 3 sc (48)

Row 9 :

*7 sc, 1 inc* 6 times (54)

Info :

Take doll, turn pink skirt inside out. Find back loops of 31st row, attach the detail currently working on to it as pictured

Row 10 :

Work back loops only + back loops of 31st row - 54 sc

Row 11 :

*8 dc, 1 inc* 6 times, 1 ss, 2 ch (60)

Rows 12-21 :

*1 fpdc, 1 bpdc* 30 times, 1 ss, 2 ch (60) - 10 rows

Info :

Decorate neckline and straps with pink yarn. Work ss on edge of back of dress (edge of stone and pink colors). When reaching hand work 5 ch, then ss on front side of dress, 5 ch. Fasten off thread, weave in ends. Use light-pink thread to crochet belt: 18 ss. Apply blush or dry pastel on cheeks

— MUFFIN-HAT :

Info :

Muffin-hat crochet in continuous rounds/spirals using white and neon-pink colors yarn and 2 mm hook

Row 1 :

6 sc in mr

Row 2 :

6 inc-blo (12)

Row 3 :

Behind arch on wrong side - *1 hdc, 1 inc* 6 times (18)

Row 4 :

Behind arch on wrong side - *2 hdc, 1 inc* 6 times (24)

Row 5 :

Behind arch on wrong side - *3 hdc, 1 inc* 6 times (30)

Row 6 :

Behind arch on wrong side - *4 hdc, 1 inc* 6 times (36)

Row 7 :

Behind arch on wrong side - *5 hdc, 1 inc* 6 times (42)

Row 8 :

Behind arch on wrong side - *6 hdc, 1 inc* 6 times (48)

Row 9 :

Behind arch on wrong side - *7 hdc, 1 inc* 6 times (54)

Info :

Turn work, 1 ch, from 3rd stitch from hook work *1 inc, 1 dc-blo* repeat up to 1st row. Work *1 hdc, 1 sc, 1 ss* in last 3 stitches of 2nd row

Info :

Attach neon-pink thread as pictured. In front loops work 2 ch, *1 inc, 1 dc*. Repeat action in asterisks up to 1st row. Work 1 hdc, 1 sc, 1 ss in last 3 stitches of 2nd row. Fasten off, cut thread and weave in ends

— CHERRY :

Info :

Cherry crochet in continuous rounds/spirals using red color yarn and 2 mm hook

Row 1 :

6 sc in mr

Row 2 :

6 inc (12)

Row 3 :

*1 sc, 1 inc* 6 times (18)

Row 4 :

*2 sc, 1 inc* 6 times (24)

Rows 5-8 :

24 sc (4 rows)

Row 9 :

*2 sc, 1 dec* 6 times (18)

Row 10 :

*1 sc, 1 dec* 6 times (12)

Row 11 :

6 dec

Info :

Tie the hole. Fasten off and cut thread. Weave in ends

Tail :

12 ch. Cut thread, leave long tail for sewing

Info :

Sew tail to cherry. Sew cherry to hat, decorate hat with beads and sequins

— FINAL ASSEMBLY :

Info :

ATTENTION: Small details are dangerous for small kids. Can replace them with embroidery. Sew elastic band on wrong side of hat to fasten hat on head of doll. If no elastic band available, can sew hat to head

Assembly Instructions

  • Attach the curly hair to the head using pins first to position it correctly, then style the curls as desired before sewing permanently to the head.
  • Sew the hands to the body between rows 23 and 24, making sure they are positioned symmetrically on both sides.
  • Turn the pink skirt inside out and carefully attach the turquoise underskirt to the back loops of row 31 before continuing with the underskirt pattern.
  • Decorate the neckline and create dress straps using pink yarn by working slip stitches along the edges and creating 5-chain straps over the shoulders.
  • Crochet the light-pink belt (18 slip stitches) and attach it around the waist of the dress for added detail.
  • Sew the cherry tail (12 chain) to the cherry, then attach the completed cherry to the top of the muffin hat and add beads and sequins for decoration.
  • Attach an elastic band to the wrong side of the muffin hat so it can be secured to the doll's head, or alternatively sew the hat directly to the head for permanent attachment.

Important Notes

  • 💡This pattern requires knowledge of basic crochet techniques and does not contain crochet lessons for beginners
  • 💡Safety eyes must be positioned between rows 11 and 12 with exactly 6 single crochets between them for proper facial proportion
  • 💡When working the muffin hat, pay special attention to working behind the arch on the wrong side as shown in the pattern pictures
  • 💡Small decorative details like beads and sequins can be dangerous for young children and should be replaced with embroidery if making for kids
  • 💡Apply dry pastel or blush to the cheeks after completing the face for a sweet, rosy appearance
  • 💡The reversible feature depends on correctly attaching the underskirt to row 31 of the body, so follow this step carefully

This magical Reversible Princess and Muffin pattern brings double the delight in one adorable creation! The clever design transforms from an enchanting princess doll with flowing golden curls and a beautiful layered dress into a sweet cupcake complete with frosted top and cherry decoration. Perfect for those who love unique amigurumi projects, this pattern challenges you with reversible construction techniques while rewarding you with a truly special handmade toy that will amaze everyone who sees it. 🧶✨👑🧁

You ask,

we answer.

FAQs

How does the reversible feature work in this pattern?

The reversible feature works by creating a muffin hat that can flip to reveal the princess underneath, and the pink dress skirt can be turned inside out to reveal the turquoise underskirt. The key is properly attaching the underskirt to the back loops of row 31 of the body, which allows the garment to reverse smoothly between princess and muffin modes.

What does 'working behind the arch on the wrong side' mean for the muffin hat?

This technique refers to inserting your hook into a specific part of the stitch that creates the ruffled, frosting-like texture of the muffin top. The pattern includes pictures to show exactly where to place your hook. This creates the dimensional, layered look that makes the muffin hat reversible and realistic.

Can I make this toy safe for young children?

Yes! The pattern notes that small details like beads, sequins, and safety eyes can be dangerous for young children. You can replace the safety eyes with embroidered eyes using black floss, and substitute the decorative beads and sequins on the hat with embroidered details instead. This makes the toy completely safe for babies and toddlers.

What yarn weight and hook size should I use?

The pattern calls for 2-Fine (Sport) weight cotton blend yarn with a 2.0 mm crochet hook. The designer specifically recommends YarnArt Jeans and Alize Cotton Gold yarns. Using the recommended yarn weight and hook size is important for achieving the correct size and ensuring the reversible feature works properly.

How do I create the curly hair for the princess?

The curly hair is created by working 20 curls total (10 of curl #1 and 10 of curl #2) from row 5 of the hair base. Each curl starts with 30 chains, then you work back along the chain with a pattern of single crochets and increases that creates the spiral curl effect. The curls are then joined and styled before being sewn to the head.

Do I need to stuff both the princess body and the muffin parts?

You only need to stuff the head and main body of the doll with hollowfiber. The muffin hat is not stuffed as it needs to remain flexible to flip and reverse. The underskirt and pink dress create the structure around the body and don't require separate stuffing.