🧶 Beautiful ✨ Detailed 💝 Adorable

Halloween Cat in Witch Hat Amigurumi Pattern

Halloween Cat in Witch Hat Amigurumi Pattern
4.4★ Rating
4-5 Hours Time Needed
1.8K Made This
✂️

Intermediate Level

Ideal for those with basic knitting experience, featuring slightly more advanced stitches and techniques to expand your skills.

⏱️

Weekend Treat

Takes 5-7 hours, making it an enjoyable project to finish over a couple of days.

🎃

Holiday Cheer

Festive fun for the season, bringing handmade magic to celebrations and creating new family traditions.

About This Halloween Cat in Witch Hat Amigurumi Pattern

This Halloween cat amigurumi pattern brings together the perfect combination of spooky and adorable. The design features a plump white cat body with delicate pink accents on the ears, nose, and paws, topped off with an impressive purple witch hat complete with a golden buckle. The pattern includes detailed instructions for creating each component separately before assembly, ensuring a professional finish. With 14 pages of step-by-step guidance and 25 helpful photos, you'll be guided through every stage of bringing this magical feline to life.

Halloween Cat in Witch Hat Amigurumi Pattern crochet pattern - detailed view of completed project

The witch hat is particularly special, featuring openings for the ears to peek through naturally, creating an authentic worn-hat appearance. The combination of white and light pink tones with the bold purple hat creates a visually striking contrast that captures the Halloween spirit perfectly.

Why You'll Love This Halloween Cat in Witch Hat Amigurumi Pattern

I absolutely love how this pattern transforms simple yarn into a character bursting with personality and seasonal charm. The way the cat's ears poke through the witch hat adds such a delightful realistic touch that makes me smile every time. I find the color combination both sophisticated and playful, making it suitable for display all season long. The satisfaction of watching each piece come together and seeing that purple hat take shape is truly magical. This pattern strikes the perfect balance between challenging enough to keep me engaged and straightforward enough to complete in a weekend, making it my go-to Halloween project.

Halloween Cat in Witch Hat Amigurumi Pattern step 1 - construction progress Halloween Cat in Witch Hat Amigurumi Pattern step 2 - assembly progress Halloween Cat in Witch Hat Amigurumi Pattern step 3 - details and accessories Halloween Cat in Witch Hat Amigurumi Pattern step 4 - final assembly and finishing

Switch Things Up

I love experimenting with color combinations for this adorable Halloween cat pattern! While the original purple witch hat is absolutely charming, I've tried creating versions with black hats and orange bands for a more traditional Halloween look, and the results were stunning. You could also make the entire cat in black yarn with green or orange eyes for a mysterious witchy vibe.

For a softer, less spooky version, I've swapped the purple for pastel pink or lavender, creating a sweet fairy-tale witch cat that's perfect for year-round display. The buckle is another element I enjoy customizing—try using metallic gold or silver yarn to make it really pop, or even add a small star or moon appliqué for extra magical detail.

I've also experimented with different ear positions and expressions by adjusting where I place the nose and how I stuff the body. A slightly rounder body makes for a plumper, more cartoonish look, while less stuffing creates a sleeker, more elegant cat silhouette. Don't be afraid to add embroidered details like closed eyes for a sleeping cat or little whiskers using black embroidery thread.

Common Mistakes & How to Fix Them

✗ Forgetting to stuff the body firmly enough before closing, resulting in a floppy cat that won't stand properly on its own ✗ Not positioning the ears correctly through the hat openings, which can make the hat sit awkwardly or cover the ears completely ✗ Crocheting the hat brim too tightly in rounds 42-46, preventing it from having the proper flared witch hat appearance ✗ Skipping the color changes at the exact rounds specified, which disrupts the hat's striped band design and overall proportions

Halloween Cat in Witch Hat Amigurumi Pattern

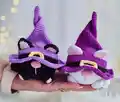
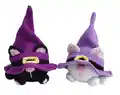
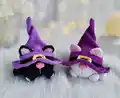
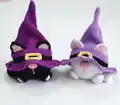
Create an enchanting Halloween cat wearing a charming purple witch hat with this delightful amigurumi pattern. Standing approximately 5.51 inches tall, this adorable feline friend features sweet pink paws, expressive details, and a whimsical pointed hat complete with a decorative buckle. Perfect for Halloween décor or as a magical gift for cat lovers, this pattern combines classic amigurumi techniques with seasonal charm to bring a touch of witchy wonder to your crochet collection.

Intermediate 4-5 Hours

Materials Needed for Halloween Cat in Witch Hat Amigurumi Pattern

— Main Fabric

  • 01
    Sport weight/4ply yarn Yarn Art Jeans in purple (#72), yellow (#88), pink (#36), and light pink (#74)
  • 02
    Sport weight/4ply yarn Alize Cotton Gold in white (#55) and black (#60)
  • 03
    Approximately 72 grams purple, 88 grams yellow, 36 grams pink, 74 grams light pink, 55 grams white, and 60 grams black

— Tools Required

  • 01
    Crochet hook 1.75mm
  • 02
    Fiberfill stuffing
  • 03
    Scissors
  • 04
    Embroidery and sewing needle
  • 05
    Pins for attaching details
  • 06
    Stitch markers

Progress Tracker

0% Complete

— Body :

Round 1 :

8 sc in MR

Round 2 :

8 inc (16)

Round 3 :

(1 sc, inc) * 8 (24)

Round 4 :

1 sc, inc, (2 sc, inc) * 7, 1 sc (32)

Round 5 :

(3 sc, inc) * 8 (40)

Round 6 :

2 sc, inc, (4 sc, inc) * 7, 2 sc (48)

Round 7 :

(5 sc, inc) * 8 (56)

Round 8 :

3 sc, inc, (6 sc, inc) * 7, 3 sc (64)

Round 9-21 :

64 sc (13 rounds)

Round 22 :

3 sc, dec, (6 sc, dec) * 7, 3 sc (56)

Round 23 :

(5 sc, dec) * 8 (48)

Round 24 :

2 sc, dec, (4 sc, dec) * 7, 2 sc (40)

Round 25 :

(3 sc, dec) * 8 (32)

Round 26 :

1 sc, dec, (2 sc, dec) * 7, 1 sc (24)

Round 27 :

(1 sc, dec) * 8 (16)

Round 28 :

8 dec (8)

Info :

Cut the yarn, fasten off, sew the hole and hide the yarn tail inside the detail. Start crocheting with white thread. Stuff with fiberfill in the process.

— Ears (make 2) :

1 PART (make 2) :

Start crocheting with light pink thread. Work in rows.

Round 1 :

4 sc in MR, ch 1, turn

Round 2 :

4 inc (8), ch 1, turn

Round 3 :

1 sc, inc, 1 sc, (hdc, dc, hdc in one stitch), (1 sc, inc) * 2 (13). Change color to white.

Round 4 :

Ch 1, turn, 2 sc, inc, 3 sc, (hdc, dc, hdc in one stitch), 2 sc, inc, 3 sc (17). Cut the yarn, fasten off.

2 PART (make 2) :

Start crocheting with white thread. Work in rows.

Round 1 :

4 sc in MR, ch 1, turn

Round 2 :

4 inc (8), ch 1, turn

Round 3 :

1 sc, inc, 1 sc, (hdc, dc, hdc in one stitch), (1 sc, inc) * 2 (13), ch 1, turn

Round 4 :

2 sc, inc, 3 sc, (hdc, dc, hdc in one stitch), 2 sc, inc, 3 sc (17)

Info :

Don't cut the thread. Now put two parts together and crochet SL ST in the round. Cut the yarn, fasten off, leaving a long thread for sewing.

— Nose :

Info :

Start crocheting with pink thread. Make chain 6, start to crochet on the second chain from the hook.

Round 1 :

4 sc, 3 sc in the last loop on the other side off the chain: 3 sc, inc (12)

Round 2 :

12 sc

Round 3 :

6 dec (6)

Info :

Fill in with fiberfill. Cut the yarn, fasten off, sew the hole and leaving a long thread for sewing.

— Paws (make 2) :

Info :

Start crocheting with light pink thread. Make chain 4, start to crochet on the second chain from the hook.

Round 1 :

2 sc, 3 sc in the last loop on the other side off the chain: 1 sc, inc (8). Change color to white.

Round 2 :

inc, 1 sc, 3 inc, 1 sc, 2 inc (14)

Round 3 :

1 sc, inc, 1 sc, (1 sc, inc) * 3, 1 sc, (1 sc, inc) * 2 (20)

Round 4-5 :

20 sc (2 rounds)

Round 6 :

(3 sc, dec) * 4 (16)

Round 7 :

8 dec (8)

Info :

Fill in the paws lightly with fiberfill. Cut the yarn, fasten off, leaving a long thread for sewing.

— Tail :

Info :

Start crocheting with white thread. Stuff slightly with fiberfill in the process.

Round 1 :

6 sc in MR

Round 2 :

6 inc (12)

Round 3 :

(1 sc, inc) * 6 (18)

Round 4-6 :

18 sc (3 rounds)

Round 7 :

(1 sc, dec) * 6 (12)

Round 8-10 :

12 sc (3 rounds)

Round 11 :

(2 sc, dec) * 3 (9)

Round 12-18 :

9 sc (7 rounds)

Info :

Straighten your tail and align the stitches side by side. Close the open end with a hook 4 sc across. Cut the yarn, fasten off, leaving a long thread for sewing.

— Hat :

Info :

Start crocheting with purple thread.

Round 1 :

6 sc in MR

Round 2 :

6 sc (6)

Round 3 :

6 inc (12)

Round 4-7 :

12 sc (4 rounds)

Round 8 :

(3 sc, inc) * 3 (15)

Round 9-11 :

15 sc (3 rounds)

Round 12 :

(2 sc, inc) * 5 (20)

Round 13-14 :

20 sc (2 rounds)

Round 15 :

(1 sc, inc) * 10 (30)

Round 16 :

30 sc

Round 17 :

inc, 29 sc (31)

Round 18 :

inc, 30 sc (32)

Round 19 :

32 sc

Round 20 :

(3 sc, inc) * 8 (40)

Round 21 :

(3 sc, dec) * 8 (32)

Round 22 :

(inc, 15 sc) * 2 (34)

Round 23 :

(inc, 16 sc) * 2 (36)

Round 24 :

(inc, 17 sc) * 2 (38)

Round 25 :

(inc, 18 sc) * 2 (40)

Round 26 :

(inc, 19 sc) * 2 (42)

Round 27 :

(inc, 6 sc) * 6 (48)

Round 28 :

(inc, 7 sc) * 6 (54)

Round 29-30 :

54 sc (2 rounds)

Round 31 :

(inc, 8 sc) * 6 (60)

Round 32 :

(inc, 9 sc) * 6 (66)

Round 33 :

20 sc, ch 10, skip 10 stitch, 5 sc, ch 10, skip 10 stitch, 21 sc (66)

Round 34 :

66 sc

Round 35 :

(inc, 10 sc) * 6 (72)

Round 36-37 :

72 sc (2 rounds). Change color to black.

Round 38-41 :

72 sc (4 rounds). Change color to purple.

Round 42 :

FLO: (2 sc, inc) * 24 (96)

Round 43 :

(3 sc, inc) * 24 (120)

Round 44-46 :

120 sc (3 rounds)

Info :

Cut the yarn, fasten off, weave in the ends.

— Buckle :

Info :

Start crocheting with yellow thread. Make Ch 22. Making sure that the ch is not twisted, sl st into the first ch to join.

Round 1 :

(7 sl st, 3 sl st in one stitch, 2 sl st, 3 sl st in one stitch) * 2

Info :

Cut the yarn, fasten off, leaving a long thread for sewing.

Assembly Instructions

  • Sew the ears to the body between rounds 3 and 10 with 5 single crochet stitches spacing between them for proper positioning.
  • Attach the pink nose to the center of the face between rounds 10 and 11, ensuring it's centered for a balanced look.
  • Sew the paws symmetrically on the sides of the body between rounds 21 and 22, making sure they're at the same height.
  • Attach the tail on the back side of the body between rounds 19 and 22, positioning it slightly to one side for a natural appearance.
  • Sew the yellow buckle onto the front center of the hat's black band for decorative detail.
  • Place the completed hat onto the cat's head, allowing the ears to poke through the chain openings created in round 33.
  • Make any final adjustments to ensure all pieces are securely attached and the cat can stand independently.

Important Notes

  • 💡Use stitch markers throughout the project to keep track of your rounds, especially when working on the hat's many increase rounds
  • 💡Stuff the body firmly but the paws and tail only lightly to maintain the proper proportions and shape
  • 💡When creating the hat, rounds 33 require careful attention to create the ear openings with chain stitches at the correct positions
  • 💡Work the ear pieces carefully in rows with turning chains, as this creates the distinctive shape with pointed tips
  • 💡Pin all pieces in place before final sewing to ensure symmetrical placement and proper proportions
  • 💡The FLO (front loops only) technique in round 42 of the hat creates the brim's flare, so work this round loosely

This enchanting Halloween Cat in Witch Hat pattern was designed to capture the whimsical spirit of the spooky season while maintaining that irresistibly cute amigurumi charm. The clever construction allows the ears to peek naturally through the hat, creating an authentic and endearing appearance that will delight anyone who sees it. Whether displayed as seasonal décor or gifted to a cat-loving friend, this magical feline companion brings handmade warmth to your Halloween celebrations. 🎃🐱✨ Happy crocheting!

You ask,

we answer.

FAQs

Can I use different yarn weights for this pattern?

Yes, you can use different yarn weights, but keep in mind this will change the final size of your cat. If you use thicker yarn with a larger hook, your cat will be bigger than 5.51 inches, and thinner yarn will make it smaller. Adjust your hook size accordingly to match your yarn weight.

How do I make sure the ears fit properly through the hat openings?

In round 33 of the hat, you'll create two chain-10 openings by skipping stitches. Position these openings carefully based on where you've attached the ears to the body. You can try the hat on the cat as you work to ensure proper placement before completing the remaining rounds.

What's the best way to achieve the hat's flared brim?

The key is round 42 where you work in the front loops only (FLO). This creates a natural fold and allows the brim to flare outward. Make sure not to crochet this round too tightly, as tension here affects how dramatically the brim flares.

Can I make this pattern without the witch hat for a regular cat?

Absolutely! You can skip the hat and buckle sections entirely to create an adorable white and pink cat. You might want to add some embroidered eyes and whiskers to complete the face if you choose to make it without the hat.

How do I prevent the body from being too soft or floppy?

Stuff the body firmly with fiberfill as you go, adding small portions gradually. The pattern specifically notes to stuff the body firmly while the paws and tail should be stuffed only lightly. This contrast helps the cat maintain its shape and stand upright.