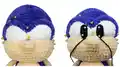
Create your very own speedy blue hedgehog with this adorable Sonic amigurumi pattern! This detailed design captures Sonic's iconic appearance with his signature deep blue color, ivory muzzle, white gloves, and red sneakers with white accents. Perfect for fans of the classic video game character, this plush toy features Sonic's distinctive spiky quills, emerald-green eyes, and charming smile. Whether you're crafting for yourself or as a gift for a Sonic enthusiast, this pattern brings the world's fastest hedgehog to life in huggable form.
Progress Tracker
0% Complete
— Thumb :
Info :
Make 2 details, stuff only the palms, white yarn, don't stuff
Round 2-5 :
4 rounds of 6 SC
Info :
Work a CH, fold in half and crochet the sides together with 3 SC; fix and cut the thread
— Other Fingers (except thumb) :
Info :
White yarn, make 4 details, don't stuff
Round 2-6 :
5 rounds of 6 SC
Info :
Fix and cut the thread in 3 details; when crocheting the last 4th detail, do NOT cut the thread and begin to join all 4 fingers
Round 7 :
3 SC on the 1st finger, 3 SC on the 2nd finger, 3 SC on the 3d finger, 6 SC on the 4th finger, 3 SC on the 3d finger, 3 SC on the 2nd finger, 3 SC on the 1st finger (24)
Round 8-12 :
5 rounds of 24 SC
Info :
In Rd 13 we attach the thumb; fold the detail in half along all the fingers and shift the stitch marker to the next SC from the fold line
Round 13 :
Left arm: SC, 3 SC with the thumb, 20 SC (24); Right arm: 8 SC, 3 SC with the thumb, 13 SC (24)
Round 14 :
(10 SC, DEC)* 2 (22)
Round 15 :
(9 SC, DEC)* 2 (20)
Round 16 :
(3 SC, DEC)*4 (16)
Round 17 :
(2 SC, DEC)*4 (12)
Info :
Change thread color to ivory
Round 18 :
(4 SC, DEC)*2 (10)
Round 19 :
(3 SC, DEC)*2 (8)
Round 20 :
(2 SC, DEC)*2 (6)
Info :
Stuff only the palm so that it stays flat
Round 21-32 :
12 rounds of 6 SC
Info :
If needed, work several additional SCs so that the 1st finger was in one line with the fold line when folded; work a CH, fold in half and crochet the sides together with 3 SC; fasten off
— The Edge of the Glove :
Info :
White yarn, make 2 details, make a turn and work a turning CH at the end of each row
Row 1 :
Start in the 2nd chain from the hook: 21 SC
Info :
Fix the thread and leave a long end to sew; fold the detail in half so that the loose front loops of rows 2 and 3 are on the front side; carefully sew the edges; turn out the detail; put it on the arm and fix it with two stitches on two opposite sides of the arm so that the seam is on the opposite side from the thumb between Rds 15 and 16 of the arm
— Legs :
Info :
Make 2 details, stuff in process, start with grey yarn
Info :
Work in spiral (without a turning CH and SS) as in all amigurumi toys (oval-shape detail)
Round 1 :
Start in the 2nd chain from the hook: 8 SC, 3 into the last chain from the hook, on the other side: 7 SC, INC (20)
Round 2 :
INC, 7 SC, 3 INC, 7 SC, 2 INC (26)
Round 3 :
SC, INC, 7 SC, (SC, INC)*3, 7 SC, (SC, INC)*2 (32)
Round 4 :
(2 SC, INC)*2, 4 SC, (2 SC, INC)*3, 4 SC, (2 SC, INC)*3 (40)
Round 5 :
(3 SC, INC)*2, 4 SC, (3 SC, INC)*3, 4 SC, (3 SC, INC)*3 (48)
Info :
Change thread color to red, don't cut the grey thread and leave it on the outside for further crocheting
Info :
Shift stitch marker to the middle of the heel if needed
Round 7 :
20 SC, 4 DEC, 20 SC (44)
Info :
Return to the grey thread, don't cut the red one; work 48 SS in loose front loops of Rd 5; join the Rd with SS, fasten off, hide the thread inside the foot; continue crocheting the foot with a red thread
Round 8 :
18 SC, 4 DEC, 18 SC (40)
Round 9 :
16 SC, 4 DEC, 16 SC (36)
Round 10 :
14 SC, 4 DEC, 14 SC (32)
Round 11 :
12 SC, 4 DEC, 12 SC (28)
Round 12 :
10 SC, 4 DEC, 10 SC (24)
Round 13 :
8 SC, 4 DEC, 8 SC (20)
Round 14 :
6 SC, 4 DEC, 6 SC (16)
Info :
Stuff the foot tightly keeping a pointed triangle shape; change thread color to deep blue
Round 15 :
(6 SC, DEC)*2 (14)
Round 16 :
(5 SC, DEC)*2 (12)
Round 17 :
(4 SC, DEC)*2 (10)
Round 18 :
(3 SC, DEC)*2 (8)
Info :
Stuff the ankle well, then keep stuffing the leg in the process
Round 19-31 :
13 rounds of 8 SC
Info :
Fasten off on the first leg; it is the left leg of the toy; do NOT fasten off on the second leg (right one), work several additional SC (or loose several SC), so that the end of the round is on the inner side; continue crocheting the body
— Body and Head :
Info :
Stitch marker is on the back, stuff in process, crochet chain 4 from the right leg; attach both legs to each other and continue crocheting on the left leg from the side behind according to the pattern
Round 32 :
On the left leg: 8 SC, on the chain: 4 SC, on the right leg: 8 SC, on the chain: 4 SC (24)
Round 33 :
(3 SC, INC)*6 (30)
Round 35 :
(4 SC, INC)*6 (36)
Round 37 :
(5 SC, INC)*6 (42)
Round 38-43 :
6 rounds of 42 SC
Round 44 :
(5 SC, DEC)*6 (36)
Round 45-46 :
2 rounds of 36 SC
Round 47 :
(4 SC, DEC)*6 (30)
Info :
In Rd 48 we are going to attach arms; for accuracy of attachment mark 3 SC (place of attachment) at a distance of 12 SC in the front and on the back; the pattern of attachment may differ, so double-check the area of attachment by markers; if needed, adjust (shift) the stitch marker; if there is a gap between the legs, sew it with the thread end on the wrong side
Round 48 :
5 SC, 3 SC with the arm, 12 SC, 3 SC with the arm, 7 SC (30)
Round 50 :
(3 SC, DEC)*6 (24)
Round 51 :
(2 SC, DEC)*6 (18)
Round 52 :
(SC, INC)*9 (27) - the first Rd of the head
Round 53 :
(2 SC, INC)*9 (36)
Round 54 :
(3 SC, INC)*9 (45)
Round 55 :
(4 SC, INC)*9 (54)
Round 56 :
(8 SC, INC)*6 (60)
Round 57-68 :
12 rounds of 60 SC
Round 69 :
(8 SC, DEC)*6 (54)
Round 70 :
(7 SC, DEC)*6 (48)
Round 71 :
(6 SC, DEC)*6 (42)
Round 72 :
(5 SC, DEC)*6 (36)
Round 73 :
(4 SC, DEC)*6 (30)
Round 74 :
(3 SC, DEC)*6 (24)
Round 75 :
(2 SC, DEC)*6 (18)
Round 76 :
(SC, DEC)*6 (12)
Info :
Do NOT tighten the hole, we will need it for a neat muzzle tightening; fix the thread and leave the long end for tightening the hole
— Sneaker Fastener :
Info :
White yarn, make 2 details, make a turn and work a turning CH at the end of each row
Row 1 :
Start in the 2nd chain from the hook: 18 SC
Info :
Fix the thread and leave a long end to sew; sew on the sneakers on the sides; tie the ends of the threads into a knot and hide them inside the foot
— Upper Edge of the Sock :
Info :
White yarn, make 2 details, make a turn and work a turning CH at the end of each row
Row 1 :
Start in the 2nd chain from the hook: 26 SC
Info :
Fix the thread and leave a long end to sew; wrap the detail around the leg so that the front loose loops of rows 1 and 3 are on the front side, and the start chain is on top; carefully sew the edges of the detail without removing it from the leg; the seam is performed in an upward direction; turn the detail on the leg to the other side; fix the detail from the bottom (back and front) with several stitches for the loops of the start chain two rows below the thread color change line; tie the ends of the threads into a knot and hide inside the foot
— Tummy :
Round 3 :
(3 INC, 3 SC)*2 (18)
Round 4 :
(SC, INC)*3, 3 SC, (SC, INC)*3, 3 SC (24)
Round 5 :
(2 SC, INC)*3, 3 SC, (2 SC, INC)*3, 3 SC (30)
Round 6 :
(3 SC, INC)*3, 3 SC, (3 SC, INC)*3, 3 SC (36)
Info :
Finish with a straight line; sew on the tummy with a thin cotton thread to match
— Muzzle :
Round 1 :
Start in the 2nd chain from the hook: 14 SC, 3 SC into the last chain from the hook, on the other side: 13 SC, INC (32)
Round 2 :
INC, 13 SC, 3 INC, 6 SC, 3 SC in the same St, 6 SC, 2 INC (40)
Round 3 :
SC, INC, 13 SC, (SC, INC)*3, 7 SC, 3 SC in the same St, 7 SC, (SC, INC)*2 (48)
Round 4 :
2 SC, INC, 13 SC, (2 SC, INC)*3, 8 SC, 3 SC in the same St, 8 SC, (2 SC, INC)*2 (56)
Round 5-6 :
2 rounds of 56 SC
Info :
Finish with a straight line; fold the part in half inside out; sew with a needle or work a seam of 5 SS in the area of the top of the detail; turn it out on the front side
— Eye Whites :
Info :
White yarn, make 2 details
Round 3 :
(3 INC, 3 SC)*2 (18)
Round 4 :
(SC, INC)*3, 3 SC, (SC, INC)*3, 3 SC (24)
Info :
Finish with a straight line on the first eye white; work additional 3 SC on the second eye white; don't fasten off; attach eye whites front sides to each other and crochet both sides together with 3 SS; fix and cut the thread; count 14 SC from the middle of the eye whites attachment to the side for each eye white; attach the deep blue thread to the right extreme front loop and begin to crochet the eyelid according to the pattern
Round 1 :
FLO: 28 SC, a turning CH, turn
Round 2 :
28 SC, a turning CH, turn
Info :
In Rd 3 we form a crease; work SCs in Rd 3 together with back loops of the last Rd of the eye white
Round 3 :
28 SC + back loops of the last Rd of the eye white
Info :
Fix and cut the thread
— Pupils :
Info :
Make 2 details using black semi-cotton yarn
Round 1 :
Start in the 2nd chain from the hook: 4 SC, 3 SC into the last chain from the hook, on the other side: 3 SC, INC (12)
Info :
Fix the thread and leave a long end to sew
— Nose :
Info :
Black semi-cotton yarn, don't stuff
Info :
Fix the thread and leave a long end to sew
— Ears :
Inner Part :
Make 2 details, ivory yarn, make a turn and work a turning CH at the end of each row
Row 1 :
Start in the 2nd chain from the hook: INC (2)
Info :
Fix the thread, leave a long end to sew if you are going to sew it with a plush thread
Outer Part + Assembly :
Make 2 details, deep blue yarn, make a turn and work a turning CH at the end of each row
Row 1 :
Start in the 2nd chain from the hook: INC (2)
Info :
Work a CH, work the detail on the sides, work 3 SC in the top: 6 SC on one side, 3 SC in the top, 6 SC on the other side; do not cut the thread, continue the assembly with the inner part; work a CH, attach the ivory inner part of the ear to the outer part and crochet two details together with SC on the sides; work 3 SC in ONE St on the inner part, but 3 separate SC on the outer part; fix the thread and leave a long end to sew; do not sew the ears yet and proceed to crocheting prickles
— Central Upper Prickle :
Info :
Make 1 detail, deep blue yarn, stuff a bit, but not tightly, otherwise the prickles will stick out to the sides
Round 3 :
(2 SC, INC)*3 (12)
Round 4 :
(3 SC, INC)*3 (15)
Round 5 :
(4 SC, INC)*3 (18)
Round 6 :
(5 SC, INC)*3 (21)
Round 7 :
(6 SC, INC)*3 (24)
Round 8 :
(7 SC, INC)*3 (27)
Round 9 :
(8 SC, INC)*3 (30)
Round 10-20 :
11 rounds of 30 SC
Info :
Work a CH, fold in half and crochet the sides together with 15 SC; fix and cut the thread; hide the thread inside the detail if you crochet with a semi-cotton, then we leave a long thread for sewing
— Central Middle and Lower Prickles :
Info :
Make 2 details, deep blue yarn, stuff a bit, but not tightly, otherwise the prickles will stick out to the sides
Round 3 :
(2 SC, INC)*3 (12)
Round 4 :
(3 SC, INC)*3 (15)
Round 5 :
(4 SC, INC)*3 (18)
Round 6 :
(5 SC, INC)*3 (21)
Round 7 :
(6 SC, INC)*3 (24)
Round 8 :
(7 SC, INC)*3 (27)
Round 9 :
(8 SC, INC)*3 (30)
Round 10-17 :
8 rounds of 30 SC
Info :
Work a CH, fold in half and crochet the sides together with 15 SC; fix and cut the thread; hide the thread inside the detail if you crochet with a semi-cotton yarn, then we leave a long thread for sewing
— Side Prickles (Large) :
Info :
Make 4 details, deep blue yarn, stuff a bit, but not tightly, otherwise the prickles will stick out to the sides
Round 2 :
2 SC, 2 INC, 2 SC (8)
Round 3 :
2 SC, 4 INC, 2 SC (12)
Round 5 :
4 SC, 4 INC, 4 SC (16)
Round 7 :
6 SC, 4 INC, 6 SC (20)
Round 9 :
8 SC, 4 INC, 8 SC (24)
Round 11 :
11 SC, 2 INC, 11 SC (26)
Round 12 :
12 SC, 2 INC, 12 SC (28)
Round 13-20 :
8 rounds of 28 SC
Info :
If needed, work 1-2 additional SC so that when the detail is folded in half, it has a clear beveled acute angle; work a CH, fold in half and crochet the sides together with 14 SC; fix and cut the thread; hide the thread inside the detail if you crochet with a semi-cotton yarn, then we leave a long thread for sewing
— Side Prickles (Medium) :
Info :
Make 2 details, deep blue yarn, stuff a bit, but not tightly, otherwise the prickles will stick out to the sides
Round 2 :
2 SC, 2 INC, 2 SC (8)
Round 3 :
3 SC, 2 INC, 3 SC (10)
Round 4 :
4 SC, 2 INC, 4 SC (12)
Round 5 :
5 SC, 2 INC, 5 SC (14)
Round 6 :
6 SC, 2 INC, 6 SC (16)
Round 7 :
7 SC, 2 INC, 7 SC (18)
Round 8-12 :
5 rounds of 18 SC
Info :
If needed, work 1-2 additional SC so that when the detail is folded in half, it has a clear beveled acute angle; work a CH, fold in half and crochet the sides together with 9 SC; fix and cut the thread; hide the thread inside the detail if you crochet with a semi-cotton yarn, then we leave a long thread for sewing
— Small Lower Prickle :
Info :
Make 1 detail, deep blue yarn, don't stuff
Round 2 :
3 SC, INC, 2 SC (7)
Round 3 :
3 SC, INC, 3 SC (8)
Round 5 :
3 SC, 2 INC, 3 SC (10)
Round 6 :
4 SC, 2 INC, 4 SC (12)
Round 7 :
5 SC, 2 INC, 5 SC (14)
Info :
Work a CH, fold in half and crochet the sides together with 7 SC; fix and cut the thread; hide the thread inside the detail if you crochet with a semi-cotton, then we leave a long thread for sewing
This incredible Sonic the Hedgehog pattern brings the beloved gaming icon to life with amazing attention to detail! From his signature spiky blue quills to his confident smile and classic red sneakers, every element captures the spirit of the world's fastest hedgehog. The pattern challenges you with advanced techniques like individually articulated fingers, detailed facial shaping, and precise muzzle tightening that creates Sonic's iconic expression. Working with soft plush yarn creates a huggable companion that's perfect for display or play. Whether you're a longtime Sonic fan or discovering the character through a new generation, this pattern delivers a truly special finished piece. 🦔💙 Happy crocheting and gotta go fast! 🧶✨