๐Ÿงถ Beautiful โœจ Detailed ๐Ÿ’ Adorable

Rustic Chandelier Lamp Crochet Pattern

Rustic Chandelier Lamp Crochet Pattern
4.1โ˜… Rating
8-10 Hours Time Needed
2.3K Made This
โœ‚๏ธ

Intermediate Level

Ideal for those with basic knitting experience, featuring slightly more advanced stitches and techniques to expand your skills.

โฑ๏ธ

All-Day Adventure

Requires 8-10 hours, ideal for a full day of immersive knitting.

๐Ÿก

Cozy Accent

A warm touch for your space that transforms ordinary corners into inviting nooks filled with handmade charm.

About This Rustic Chandelier Lamp Crochet Pattern

This rustic lamp pattern creates a stunning chandelier-style shade using the rope stitch technique worked in rounds. The design features a tapered shape that narrows at both ends, with two metal rings providing structure at strategic points. The pattern includes detailed instructions for increasing and decreasing to achieve the perfect lamp shade silhouette, and finishes with complete electrical assembly guidance.

Rustic Chandelier Lamp Crochet Pattern crochet pattern - detailed view of completed project

The lamp uses Katia Capri yarn in soft sand tones, creating a natural aesthetic that complements various interior styles. The finished piece can be reinforced with fabric stiffener spray for added durability and shape retention.

Why You'll Love This Rustic Chandelier Lamp Crochet Pattern

I absolutely love this pattern because it combines functionality with beautiful design in such a unique way. The rope stitch creates gorgeous texture that looks stunning when backlit, and watching the lamp shade take shape as you crochet is incredibly satisfying. I appreciate how the pattern includes both the crochet instructions and the electrical assembly steps, making it a complete project from start to finish. The natural, rustic aesthetic fits so many home styles, and the ability to customize colors means you can create multiple lamps to suit different rooms.

Rustic Chandelier Lamp Crochet Pattern step 1 - construction progress Rustic Chandelier Lamp Crochet Pattern step 2 - assembly progress Rustic Chandelier Lamp Crochet Pattern step 3 - details and accessories Rustic Chandelier Lamp Crochet Pattern step 4 - final assembly and finishing

Switch Things Up

I love experimenting with different colorways for this lamp pattern to match various room aesthetics. Instead of the natural sand tone, try using crisp white yarn for a modern minimalist look, or deep charcoal gray for an industrial vibe. You could even work with ombre or gradient yarns to create stunning color transitions as light filters through.

For a bohemian feel, consider adding decorative elements like wooden beads threaded onto the yarn at strategic points, or weaving in metallic thread for subtle shimmer. I've also experimented with creating multiple smaller lamps using 20cm and 10cm rings instead, which look adorable clustered together at different heights above a dining table.

Another fun variation is working the lamp in two contrasting colors and switching between them to create stripes or geometric patterns. The rope stitch looks fantastic in variegated yarn too, creating organic color pools that glow beautifully when backlit. Don't be afraid to adjust the length by adding or removing rounds in the middle section to create taller or shorter lamp shades depending on your space needs.

Common Mistakes & How to Fix Them

โœ— Skipping the fabric stiffener reinforcement step can result in a lamp shade that loses its shape and sags too much when hanging โœ— Not carefully tracking rounds during the increase and decrease sections can throw off the entire shape and symmetry of the lamp โœ— Forgetting to weave in ends immediately as instructed makes finishing nearly impossible since ends become unreachable inside the lamp structure โœ— Pulling the cord too tight when securing the narrow part can damage the electrical components or prevent proper bulb installation

Rustic Chandelier Lamp Crochet Pattern

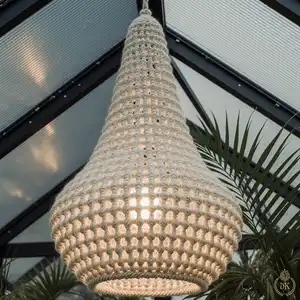
Transform your living space with this beautifully rustic crocheted lamp shade that brings natural warmth to any room. This pattern guides you through creating an elegant chandelier-style lamp cover using the rope stitch technique, featuring two metal rings for structure and soft tones that create a relaxing atmosphere. Perfect for adding a handmade touch to your home decor, this lamp works wonderfully in living rooms or outdoor spaces and can be customized in different colors to match your style.

Intermediate 8-10 Hours

Materials Needed for Rustic Chandelier Lamp Crochet Pattern

โ€” Main Fabric

  • 01
    Katia Capri yarn in Sand color 82134 (3 balls required)

โ€” Tools Required

  • 01
    3 mm crochet hook
  • 02
    Metal ring 30 cm diameter
  • 03
    Metal ring 15 cm diameter
  • 04
    Wool needle with large eye
  • 05
    Scissors
  • 06
    Safety screwdriver
  • 07
    Wire stripper or sharp knife
  • 08
    Black electrical cord (length of your choice)
  • 09
    Flat plug in black
  • 10
    Lamp fitting in black
  • 11
    Strain relief in black
  • 12
    E27 lamp bulb (600 lumens)
  • 13
    Fabric stiffener spray (optional)

Progress Tracker

0% Complete

โ€” Lamp Construction :

Round 1 :

Crochet 40 ch, join with 1 sl st in 1st ch

Round 2 :

1 ch, 40 sc, join with 1 sl st in 1st sc

Round 3 :

3 ch, 1 dc in 1st sc, 1 ch, 1 dc in 1st sc, rep (1 dc, 1 ch, 1 dc in 4th sc), join

Round 4 :

Rep Round 3, but work around the ch of the previous round and join

Rounds 5-12 :

As Round 4

Round 13 :

As Round 4, but crochet 2 ch instead of 1

Round 14 :

As Round 13

Round 15 :

3 ch, rep (1 dc, 3 ch, 1 dc around the 2 ch), join with 1 sl st

Round 16 :

3 ch, rep (1 dc, 1 ch, 1 dc, 1 ch, 1 dc around the 3 ch), join with 1 sl st

Round 17 :

3 ch, 1 dc, 1 ch, 1 dc around each ch, join

Rounds 18-20 :

As Round 17

Round 21 :

As Round 13

Rounds 22-24 :

As Round 21

Round 25 :

As Round 21, but crochet 3 ch instead of 2 ch between the dc now

Round 26 :

As Round 16

Rounds 27-33 :

As Round 17

Round 34 :

3 ch, rep (1 dc, 1 ch, 1 dc around 1 ch, work around 2nd ch: 1 dc, 1 ch, 1 dc, 1 ch), end with 1 sl st

Rounds 35-37 :

As Round 17

Rounds 38-41 :

As Rounds 34-36

Round 42 :

Take the metal ring of 30 cm diameter and crochet in 1 ch: 1 sc on each stitch of the previous round (1 sc in 1 dc, 1 sc around the ch, 1 sc in 1 dc). Insert the hook into the stitch of the previous round, the yarn goes over the ring. Pull the yarn through the loop (like an sc) with the hook. Join with 1 sl st in the 1st ch

Round 43 :

As Round 3

Rounds 44-50 :

As Round 17. Decrease from here

Round 51 :

3 ch, rep (1 dc, 1 ch, 1 dc, crochet in the next ch: 1 dc, 1 ch, 1 dc, make 1 dc in the next ch). Join with 1 sl st

Round 52 :

3 ch, rep (1 dc, 1 ch, 1 dc in 1 ch, crochet in the next ch: 1 dc, 1 ch, 1 dc, skip 1 dc). Join with 1 sl st

Rounds 53-55 :

As Round 17

Round 56 :

Take the 15 cm diameter metal ring and work as Round 42

Round 57 :

1 ch, 1 sc on 1 sc, join with 1 sl st. Fasten off the last thread and use the wool needle to carefully weave it through a few stitches on the inside. Break the yarn

Assembly Instructions

  • Optionally reinforce the completed lamp shade with fabric stiffener spray and allow it to dry completely before proceeding
  • Attach the flat plug to one end of the electrical cord using the safety screwdriver
  • Attach the strain relief and lamp fitting to the other end of the electrical cord
  • Insert the plug end through the narrow opening of the lamp shade from the inside
  • Pull the cord through to your desired lamp hanging length
  • Cut a long strand of yarn and use it to tightly tie and wrap around the narrow part of the lamp approximately 28 centimeters from the fitting to secure it in place
  • Screw the E27 light bulb into the lamp fitting and hang or mount as desired

Important Notes

  • ๐Ÿ’กWeave in all yarn ends immediately as you work because they become nearly impossible to reach once the lamp is complete
  • ๐Ÿ’กThe lamp shade will naturally sag slightly when hung so account for this when securing the cord position
  • ๐Ÿ’กKeep tension consistent throughout all rounds to ensure the lamp shade maintains an even, symmetrical shape
  • ๐Ÿ’กConsider the weight of your chosen bulb when selecting cord length and hanging method for safety
  • ๐Ÿ’กMultiple lamps can be created in different colors and hung at varying heights for a stunning clustered effect
  • ๐Ÿ’กAlways ensure electrical components are properly installed and secure before use for safety
  • ๐Ÿ’กThe rope stitch pattern creates beautiful texture that becomes more visible when the lamp is illuminated

This elegant rustic lamp pattern transforms simple yarn into a stunning piece of functional home decor that will illuminate your space with handmade charm. The rope stitch creates beautiful texture while the tapered design offers a sophisticated chandelier aesthetic perfect for modern or rustic interiors. Whether you're creating a single statement piece or a cluster of lamps at different heights, this project combines practical lighting with artistic expression. ๐Ÿก Happy crocheting! โœจ๐Ÿงถ

You ask,

we answer.

FAQs

Can I use a different yarn weight or type for this lamp?

While the pattern specifies Katia Capri yarn, you can substitute with other worsted weight yarns. Keep in mind that different yarn fibers will affect how well the lamp holds its shape, so natural fibers with good structure work best. You may need to adjust your hook size to maintain proper tension.

Is the fabric stiffener spray really necessary?

The fabric stiffener is optional but highly recommended. It helps the lamp shade maintain its structure and prevents excessive sagging when hung. Without it, the crocheted fabric may be too soft and lose its shape over time, especially in humid environments.

How do I attach the metal rings while crocheting?

When you reach rounds 42 and 56, you crochet directly over the metal rings. Insert your hook into the previous round's stitches, bring the yarn over the ring, and pull through as you would for a single crochet. This encases the ring within your stitches for a secure hold.

Can I make this lamp larger or smaller?

Yes, you can adjust the size by starting with more or fewer chains in round 1 and using different sized metal rings. Just maintain the same increase and decrease pattern proportions. Remember that larger lamps may need heavier duty electrical cords and fittings.

What type of bulb works best with this crocheted lamp shade?

LED bulbs are strongly recommended as they produce minimal heat. The pattern specifies a 600 lumen E27 bulb. Avoid using incandescent bulbs as they generate too much heat and could potentially damage or discolor the yarn over time.

How do I clean my finished crocheted lamp?

Turn off and unplug the lamp first. Gently dust the shade regularly with a soft brush or lint roller. For deeper cleaning, carefully hand wash in cool water with mild detergent, reshape while damp, and allow to air dry completely before reinstalling the electrical components.