🧢 Beautiful ✨ Detailed πŸ’ Adorable

MarshmallowKittie Sleeping Cat Amigurumi Pattern

MarshmallowKittie Sleeping Cat Amigurumi Pattern
4.6β˜… Rating
4-5 Hours Time Needed
1.7K Made This
βœ‚οΈ

Beginner Friendly Level

Perfect for those just starting their sewing journey, with clear instructions and simple techniques

⏱️

Weekend Treat

Takes 5-7 hours, making it an enjoyable project to finish over a couple of days.

🧸

Cute Companion

An adorable friend to cherish, handcrafted with love to bring comfort and joy for years to come.

About This MarshmallowKittie Sleeping Cat Amigurumi Pattern

The MarshmallowKittie pattern brings together simplicity and charm in one cuddly package. This sleeping cat design works up continuously in spiral rounds, making it perfect for crocheters who want a relaxing project without constant round joining. The pattern features a unique color-changing technique that creates natural-looking yellow patches on the white body, giving your kitty its distinctive marshmallow appearance. With a finished size of approximately 35 cm (14 inches), this plush companion is the ideal size for hugging, displaying, or gifting to someone special who adores cats.

MarshmallowKittie Sleeping Cat Amigurumi Pattern crochet pattern - detailed view of completed project

What makes this pattern truly special is the thoughtful approach to stuffing and shaping. The designer encourages you to sculpt your amigurumi like clay, adding extra fiber fill to create fuller cheeks or a rounder belly, making each kitty uniquely yours with its own personality and character.

Why You'll Love This MarshmallowKittie Sleeping Cat Amigurumi Pattern

I absolutely love this pattern because it combines therapeutic crafting with creative freedom. Working with the plush Himalaya Velvet yarn feels like wrapping yourself in a cloud, and watching the sweet sleeping kitty take shape round by round is incredibly satisfying. What really draws me to this design is how the pattern encourages you to personalize the stuffing process, treating it like sculpting rather than just filling. It's not just about following instructionsβ€”it's about infusing your own touch into every stitch, creating a one-of-a-kind companion that reflects your creative spirit. The color changes add visual interest without complexity, making it perfect for building confidence while still producing an impressive finished piece that looks professionally crafted.

MarshmallowKittie Sleeping Cat Amigurumi Pattern step 1 - construction progress MarshmallowKittie Sleeping Cat Amigurumi Pattern step 2 - assembly progress MarshmallowKittie Sleeping Cat Amigurumi Pattern step 3 - details and accessories MarshmallowKittie Sleeping Cat Amigurumi Pattern step 4 - final assembly and finishing

Switch Things Up

I absolutely love how versatile this MarshmallowKittie pattern can be with just a few creative tweaks! While the original design uses white and yellow for that classic marshmallow look, I've experimented with different color combinations that totally transform the personality of the kitty. Try using gray and white for a sophisticated tabby look, or go bold with pastel pink and lavender for a dreamy kawaii vibe that's perfect for nursery decor.

I've also found that adding small accessories can make each kitty uniquely special. I like to crochet a tiny collar using leftover yarn, or even add a small bow between the ears for extra sweetness. Some of my favorite variations include embroidering closed sleepy eyes instead of the standard open eyes, giving the kitty an even more peaceful sleeping expression that's incredibly calming to look at.

For those who want to challenge themselves a bit more, I recommend trying different ear placements or sizes to create various cat breeds. Smaller, more upright ears give you a Siamese-style cat, while larger floppy ears create an adorable Scottish Fold look. You could even add stripes throughout the body by alternating colors every few rounds instead of just creating patches, giving you a full tabby cat effect that's stunning and eye-catching.

The stuffing technique mentioned in the pattern is pure magic, and I encourage everyone to really embrace that creative freedom. I like to add extra stuffing to the cheeks and slightly less to the body to create a super chubby-cheeked kitty that looks like it just woke up from the best nap ever. It's these small personal touches that make your amigurumi truly one-of-a-kind!

Common Mistakes & How to Fix Them

βœ— Forgetting to use a stitch marker at the beginning of rounds, causing confusion with round counts and color changes throughout the pattern βœ— Overstuffing or understuffing the body, resulting in misshapen proportions instead of the desired marshmallow softness and proper cuddly form βœ— Not changing colors smoothly between white and yellow yarn, creating visible bumps or gaps instead of clean natural-looking color transitions βœ— Pulling the yarn too tightly during decreases at the tail, making it difficult to close the final rounds neatly and creating pointed ends

MarshmallowKittie Sleeping Cat Amigurumi Pattern

Create your very own adorable sleeping kitty with this charming MarshmallowKittie pattern! This sweet amigurumi cat features a cuddly white body with yellow patches, creating a marshmallow-soft appearance that's perfect for snuggles. The pattern includes detailed instructions for crocheting the head, body, tail, and ears, with helpful tips on stuffing techniques to achieve the perfect marshmallow shape. Whether you're making this sleepy friend as a comforting companion, nursery decor, or a thoughtful gift for cat lovers, this pattern guides you through every step with clear rounds and color changes to bring your dreamy kitty to life.

Beginner Friendly 4-5 Hours

Materials Needed for MarshmallowKittie Sleeping Cat Amigurumi Pattern

β€” Main Fabric

  • 01
    Himalaya Velvet yarn in white color (#90001 - one skein)
  • 02
    Himalaya Velvet yarn in yellow color (#90033 - a quarter skein)
  • 03
    Pink yarn for nose embroidery
  • 04
    Dark brown yarn for eyes and nose embroidery (Yarnart Jeans or similar semi-cotton yarn recommended)

β€” Tools Required

  • 01
    Crochet hook 4.00mm or 4.50mm
  • 02
    Polyester fiber fill stuffing
  • 03
    Tapestry needle
  • 04
    Scissors
  • 05
    Pins
  • 06
    Stitch marker or contrast color yarn
  • 07
    Pink blush makeup powder or pink acrylic paint (for cheeks)

Progress Tracker

0% Complete

β€” HEAD :

Info :

Begin with white yarn. Ch 4, start in second chain from the hook. Working in both sides of a chain (3 first rounds)

Rnd 1 :

1 inc, 1 sc, 3 sc into the last stitch, continue the other side of the foundation chain: 2sc. (8)

Rnd 2 :

2 inc, 1 sc, 3 inc, 1 sc, 1 inc. (14)

Rnd 3 :

14 sc. (14)

Rnd 4 :

2 sc, 8 inc, 4 sc. (22)

Rnd 5 :

1 sc, 3 inc, (1 sc, inc) x 6 times, 3 inc, 3 sc. (34)

Rnd 6 :

1 sc, (1 sc, inc) x 4 times, (2 sc, inc) x 4 times, 2 sc, (inc, 1 sc) x 4 times, 3 sc. (46)

Rnd 7 :

46 sc. (46)

Rnd 8 :

white (W) 24 sc, yellow (Y) 5 sc, (W) 13 sc, 2 dec. (44)

Rnd 9 :

(W) 23 sc, (Y) 8 sc, (W) 6 sc, dec, 5 sc. (43)

Rnd 10 :

(W) 5 sc, dec, 16 sc, (Y) 9 sc, (W) 11 sc. (42)

Rnd 11 :

(W) 22 sc, (Y) 9 sc, (W) 11 sc. (42)

Rnd 12 :

(W) 22 sc, (Y) 9 sc, (W) 5 sc, dec, 4 sc. (41)

Rnd 13 :

(W) 4 sc, dec, 17 sc, (Y) 7 sc, (W) 11 sc. (40)

Rnd 14 :

(W) 3 sc, (dec, 6sc) x 2 times, dec, 2 sc, (Y) 4 sc, dec, (W) 6 sc, dec, 3 sc (35) --> cut yellow yarn.

Rnd 15-16 :

35 sc (2 rounds) (35)
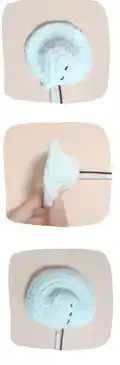
Info :

Stuff the head firmly with fiberfill. For the nose part, after being crocheted, it will be pretty point. However, we can make it sink by embroidering the nose after stuffed it

Info :

Continue to crochet the body after finishing Round 16 of the head.

β€” BODY :

Rnd 17 :

8 sc, (inc, 4 sc) x 4 times, inc, 6 sc (40)

Rnd 18 :

7 sc, (inc, 5 sc) x 4 times, inc, 8 sc (45)

Rnd 19 :

9 sc, (inc, 6 sc) x 4 times, inc, 7 sc (50)

Rnd 20 :

50 sc. (50)

Rnd 21 :

12 sc, (inc, 7 sc) x 4 times, inc, 5 sc. (55)

Rnd 22-23 :

55 sc. (2 rounds) (55)

Rnd 24 :

5 sc, (8 sc, inc,) x 5 times, 5 sc. (60)

Rnd 25 :

60 sc. (60)

Rnd 26 :

(W) 28 sc, (Y) 6 sc, (W) 26 sc. (60)

Rnd 27 :

(W) 26 sc, (Y) 10 sc, (W) 24 sc. (60)

Rnd 28-30 :

(W) 26 sc, (Y) 11 sc, (W) 23 sc. (3 rounds) (60)

Rnd 31 :

(W) 27 sc, (Y) 9 sc, (W) 24 sc. (60)

Rnd 32 :

(W) 28 sc, (Y) 8 sc, (W) 24 sc. (60) --> cut yellow yarn

Rnd 33-34 :

(W) 60 sc. (2 rounds) (60)

Info :

Start stuffing the body. Stuff the body firmly with fiberfill.

Rnd 35 :

12 sc, (dec, 6sc) x 6 times. (54)

Rnd 36 :

12 sc, (dec, 5 sc) x 6 times. (48)

Rnd 37 :

10 sc, (dec, 4 sc) x 6 times, 2 sc. (42)

Rnd 38 :

10 sc, (dec, 3 sc) x 6 times, 2 sc. (36)

Rnd 39 :

(4 sc, dec) x 6 times. (30)

Rnd 40 :

(3 sc, dec) x 6 times. (24) --> cut white yarn.

β€” TAIL :

Info :

Continue with yellow yarn.

Rnd 41 :

24 sc. (24)

Rnd 42 :

(2 sc, dec) x 6 times. (18)

Rnd 43-47 :

18 sc. (5 rounds) (18)

Rnd 48 :

2 dec, 10 sc, 2dec. (14)

Rnd 49 :

dec, 10 sc, dec. (12)

Rnd 50 :

dec, 8 sc, dec. (10)

Rnd 51 :

dec, 6 sc, dec. (8)

Rnd 52 :

dec, 4 sc, dec. (6)

Info :

Stuff the tail firmly with fiberfill. Fasten off and leave a long tail. Weave the yarn tail through the front loops of the last round and pull it tight to close the hole. Hide the yarn tail inside the body.
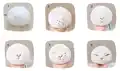
β€” EARS :

Info :

We need to make two ears, one is yellow and the other is white.

Rnd 1 :

6 sc into a MR. (6)

Rnd 2 :

6 inc. (12)

Rnd 3 :

(1 sc, inc, 1 sc) x 4 times. (16)

Info :

Fasten off and leave a long tail for sewing. Bring the ending yarn to sew the open side of the ear together. Sew the ears on the head between Rnd 11-12, the distance between 2 ears is 5 sts.

β€” FACE DETAILS :

Info :

Embroider the nose with dark brown yarn (Rnd 1-2), 2 stitches wide.

Info :

Embroider the eyes with dark brown yarn between Rnd 4-6, 3 stitches wide, the distance between 2 eyes is 8 sts.

Info :

Use pink yarn to embroider the interior of the nose. You can use semi-cotton yarn (Yarnart Jeans) for embroider the nose and the eyes.

Assembly Instructions

  • Sew the ears onto the head between rounds 11-12, ensuring the distance between the two ears is 5 stitches for proper placement
  • Embroider the nose using dark brown yarn at rounds 1-2, making it 2 stitches wide for a proportional snout appearance
  • Embroider the eyes with dark brown yarn between rounds 4-6, making them 3 stitches wide with 8 stitches distance between them
  • Add pink yarn embroidery to the interior of the nose for a realistic touch and sweetness to the face
  • Apply pink blush makeup powder or pink acrylic paint to the cheeks for an adorable blushing effect
  • Ensure all yarn ends are securely woven in and hidden inside the body for a clean professional finish

Important Notes

  • πŸ’‘Work in continuous spiral rounds without joining, using a stitch marker to track the beginning of each round
  • πŸ’‘Take your time with stuffing and treat it like sculpting clay to create fuller cheeks or belly for unique character
  • πŸ’‘Change colors smoothly by pulling the new yarn through the last two loops of the stitch for clean transitions
  • πŸ’‘The nose will appear pointed after crocheting but can be shaped by embroidering and stuffing carefully around it
  • πŸ’‘Use small amounts of stuffing at a time and adjust as you go to achieve the desired marshmallow-soft shape
  • πŸ’‘Semi-cotton yarn like Yarnart Jeans works best for embroidering facial features for crisp clean details

This delightful MarshmallowKittie pattern was designed to bring comfort and sweetness into your life through the art of crochet. With its soft plush texture and charming sleeping pose, this kitty becomes more than just a stuffed toyβ€”it's a cuddly companion that reflects the care and creativity you pour into every stitch. The unique stuffing technique allows you to personalize your creation, making each marshmallow kitty as individual as the crafter who brings it to life. Perfect for gifting to cat lovers, nursery decor, or keeping as your own stress-relief companion! 🧢 Happy crocheting and may your stitches be as soft as marshmallows! 🐱✨

You ask,

we answer.

FAQs

What yarn weight and brand works best for this pattern?

The pattern specifically calls for Himalaya Velvet yarn, which is a chenille-style plush yarn. You can substitute with other velvet or chenille yarns of similar weight, but the finished texture and size may vary slightly. Make sure to use a 4.00mm or 4.50mm hook depending on your tension.

How do I get smooth color changes between white and yellow?

To achieve clean color transitions, complete the last stitch of the old color until you have two loops on the hook, then pull the new color yarn through both loops. When color changes are spread out, you can cut the old yarn and tie the ends together neatly, weaving them in later.

Can I make the kitty bigger or smaller than 35cm?

Yes! To make a larger kitty, use a bigger hook size and thicker yarn. For a smaller version, use a smaller hook and thinner yarn. Just keep in mind that changing the size will also affect the amount of yarn needed and the final proportions.

What's the best technique for stuffing to get that marshmallow shape?

The pattern encourages treating stuffing like sculpting clay. Add small amounts of fiberfill at a time, focusing on areas you want fuller like cheeks or belly. Shape and adjust continuously as you stuff, rather than filling everything at the end. This creates the characteristic marshmallow softness and rounded appearance.

Do I need to make one yellow ear and one white ear?

Yes, the pattern specifically instructs to make two ears with different colorsβ€”one yellow and one white. This adds to the unique patchwork charm of the marshmallow kitty design and creates asymmetrical cuteness.