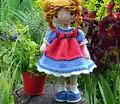
Create your own enchanting Eliza doll with this comprehensive crochet pattern! Standing at 32cm tall, this adorable companion features beautifully crafted details including a charming dress with layered ruffles, delicate shoes with laces, and a gorgeous curly wig. Perfect for intermediate crocheters looking to expand their amigurumi skills, this pattern guides you through creating a fully poseable doll complete with a floral accessory. Each stitch brings Eliza to life, from her expressive safety eyes to her carefully designed wardrobe.
Progress Tracker
0% Complete
— ARMS (Make 2) :
R 1 :
6 sc in magic ring (6)
R 3 :
1 sc in each st around (12)
R 4 :
(3 sc, inc)*3 times (15)
R 5 :
1 sc in each st around (15)
R 7 :
1 sc in each st around (17)
R 8 :
2 dec, 3 sc, dec, 3 sc, dec, 3 sc (13)
R 9 :
dec, 5 sc, 1 dec, 4 sc (11)
R 10 :
6 sc, 1 inc, 4 sc (12)
Info :
Stuff the ready part of the arm tightly
R 11-32 :
12 sc (22 rounds total) (12)
Left arm R 33 :
5 sc, slst. Cut off and fix the yarn
Right arm R 33 :
1 sc, slst. Cut off and fix the yarn
— SHOES (Make 2) :
Info :
Starting at sole with 2.0mm hook. Work in spiral rounds. Make 2 soles for each shoe in beige yarn
Starting chain :
Ch 8, work starting from 2nd ch from hook
R 1 :
1 inc, 5 sc, 3 sc in one st, 6 sc (16) - crochet on other side of chain
R 2 :
2 inc, 5 sc, 3 inc, 5 sc, 1 inc (22)
R 3 :
2 inc, 1 sc, 1 inc, 5 sc, 1 inc, 1 sc, 2 inc, 1 sc, 1 inc, 5 sc, 1 inc, 1 sc (30)
R 4 :
1 inc, 2 sc, 1 inc, 1 sc, 1 inc, 7 sc, 1 inc, 1 sc, 1 inc, 2 sc, 1 inc, 1 sc, 1 inc, 7 sc, 1 inc, 1 sc (38)
Info :
Move beginning of row to middle of sole by crocheting 3 sc. Mark this stitch. Fasten off invisibly
Infos :
Cut two pieces of cardboard or plastic in size of sole (R 1-5). Put two soles on top of each other, wrong side against wrong side. Connect soles together with 38 slst around using yellow yarn
R 1-4 (blue yarn) :
1 ch (not count as st), 1 sc into base of ch, 37 sc, slst to 1st st to join (38)
R 5 :
1 ch, 1 sc into base of ch, 13sc, (sc2tog, 1 sc)*3 times, sc2tog, 13 sc, slst to 1st st to join (34)
Info :
Do not break blue yarn, shift to front side. Attach white yarn
R 6 (blo) :
1 ch, 1 sc into base of ch, 8sc, (sc2tog, 1 sc)*5, sc2tog, 8 sc, slst to 1st st to join (28)
Info :
Continue crocheting spiralwise
R 7 :
7 sc, 7 sc2tog, 7 sc (21)
R 8 :
8 sc, 2 hdc, 1dc2tog, 1hdc, 8 sc (20)
R 9 :
(1 dec, 3 sc)*4 times (16)
R 10 :
7 sc, 1 dec, 7 sc (15)
R 14 :
1 sc, inc, 14 sc (17)
Info :
Do not break white yarn, shift to front side. Attach skin yarn
R 16 :
2 sc, inc, 14 sc (18)
R 18 :
3 sc, inc, 14 sc (19)
R 20 :
4 sc, inc, 14 sc (20)
R 22 :
5 sc, inc, 14 sc (21)
Info :
Postpone crochet of leg and make lace of sock and shoe-laces
Right shoe laces :
Attach blue yarn to R 5 in center of back. Crochet flo: 8 slst, 25 ch, 26 slst (34). Finish with slst, cut and fix
Left shoe laces :
Attach blue yarn to R 5 in center of back. Crochet flo: 26 slst, 25 ch, 8 slst (34). Finish with slst, cut and fix
Sock lace :
Attach white yarn to R 14 in center of back. Crochet flo: (1 slst, 2 ch). Finish with slst, cut and fix
Info :
Continue crocheting legs with skin yarn. Stuff leg in process
R 25 :
1 sc, dec, 6 sc, dec, 10 sc (19)
R 26 :
3 sc, 2 dec, 5 sc, 5 inc, 2 sc (22)
R 28 :
3 sc, 2 inc, 5 sc, 5 dec, 2 sc (19)
R 30 :
1 sc, inc, 8 sc, inc, 8 sc (21)
R 32 :
6 sc, inc, 14 sc (22)
R 34 :
7 sc, inc, 14 sc (23)
R 36 :
8 sc, inc, 14 sc (24)
R 38 :
9 sc, inc, 14 sc (25)
Info :
Put stitch marker to mark new beginning. Attach light pink yarn. Crochet 1 round 25 slst (not counted in pattern)
R 41 :
25 sc (insert hook through center of slip stitches and into body color stitches of 39th round) (25)
Left leg R 43 :
Crochet 19-20 sc after R 42 (end of row in internal part of leg), slst, cut and fix yarn
Right leg R 43 :
Crochet 32-33 sc (add 7-8 sc to finish in middle of inner leg). Do not cut yarn
— BODY :
Info :
Join legs and begin crocheting body. Turn legs with heels facing you. On right leg make 2 ch and attach to left leg
R 44 :
25 sc on left leg, 2 sc on chain, 25 sc on right leg, 1 sc on other side of chain (53)
Info :
Place marker. You can stop controlling marker and crochet floating stitches
R 45 :
1 sc on chain, (inc, 2 sc)*4 times, 28 sc, (2 sc, inc)*4 times, 1 sc (62)
R 47 :
19 sc, dec, 20 sc, dec, 19 sc (60)
R 50 :
19 sc, dec, 18 sc, dec, 19 sc (58)
R 52 :
8 sc, dec, 7 sc, dec, (8 sc, dec)*2 times, 7 sc, dec, 8 sc, dec (52)
R 54 :
2 sc, dec, 4 sc, dec, 7 sc, dec, 14 sc, dec, 7 sc, dec, 4 sc, dec, 2 sc (46)
Info :
Cut light pink yarn, attach skin yarn
R 57 :
(dec, 7 sc)*5 times, 1 sc (41)
R 61 :
4 sc, (dec, 6 sc)*4 times, dec, 3 sc (36)
R 63 :
8 sc, inc, 18 sc, inc, 8 sc (38)
R 69 :
9 sc, inc, 18 sc, inc, 9 sc (40)
Info :
Attach arms - make sure top of arm is level with R 71 when arms are down. Make sure thumbs point correct direction
R 72 :
9 sc on back of body, 3 sc in 3 stitches of left arm and 3 stitches of body at same time, 17 sc on front of body, 3 sc in 3 stitches of right arm and 3 stitches of body at same time, 8 sc on back of body (40)
R 73 :
9 sc on back, 9 sc in stitches of 1st arm, 17 sc on front, 9 sc in stitches of 2nd arm, 8 sc on back (52)
Info :
Optional: Cut wire 32cm long, bend ends and wrap with tape. Insert into arms. Lightly stuff arms
R 75 :
3 sc, dec, 17 sc, dec, 5 sc, dec, 17 sc, dec, 2 sc (48)
R 76 :
6 sc, dec, 9 sc, dec, 11 sc, dec, 9 sc, dec, 5 sc (44)
R 77 :
4 sc, dec, 11 sc, dec, 7 sc, dec, 11 sc, dec, 3 sc (40)
R 78 :
2 sc, dec, 5 sc, dec, 6 sc, dec, 3 sc, dec, 6 sc, dec, 5 sc, dec, 1 sc (34)
R 79 :
1 sc, dec, 2 sc, dec, 3 sc, dec, (2 sc, dec)*3 times, 3sc, dec, 2sc, dec, 1sc (26)
R 80 :
(1 sc, dec)*2 times, 2 sc, dec, (1 sc, dec)*3 times, 2 sc, dec, 1 sc, dec (18)
R 81 :
(4 sc, dec)*3 times (15)
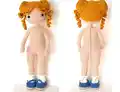
— HEAD :
Info :
Make sure marker stays in center of back of head. Crochet extra sc if needed and move marker
R 3 :
(1 sc, inc)*6 times (18)
R 4 :
1 sc, inc, (2 sc, inc)*5 times, 1 sc (24)
R 5 :
(3 sc, inc)*6 times (30)
R 6 :
2 sc, inc, (4 sc, inc)*5 times, 2 sc (36)
R 7 :
(5 sc, inc)*6 times (42)
R 8 :
3 sc, inc, (6 sc, inc)*5 times, 3 sc (48)
R 9 :
(7 sc, inc)*6 times (54)
R 10 :
4 sc, inc, (8 sc, inc)*5 times, 4 sc (60)
R 11-21 :
60 sc (11 rounds) (60)
R 22 :
17 sc, (inc, 1 sc)*5 times, 7 sc, (1 sc, inc)*5 times, 16 sc (70)
R 23-26 :
70 sc (4 rounds) (70)
Info :
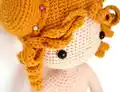
Place eyes between R 21 and R 22. Distance between eyes should be 12 stitches
R 27 :
(4 sc, dec)*3 times, 34 sc, (dec, 4 sc)*3 times (64)
R 29 :
(2 sc, dec)*16 times (48)
R 30 :
3 sc, dec, (6 sc, dec)*5 times, 3 sc (42)
R 31 :
(5 sc, dec)*6 times (36)
R 32 :
2 sc, dec, (4 sc, dec)*5 times, 2 sc (30)
R 33 :
(3 sc, dec)*6 times (24)
R 34 :
1 sc, dec, (2 sc, dec)*5 times, 1 sc (18)
R 35 :
(4 sc, dec)*3 times, slst (15)
Info :
Stuff head firmly and shape. Cut yarn leaving long tail for sewing. Mark nose 2 rows down from eyes
Assembly :
Place head onto body so eyes look forward. Sew head to neck. Add stuffing in neck to strengthen before finishing
— WIG :
Info :
Use 2mm hook and mustard yarn. Crochet in spiral rounds
R 3 :
(1 sc, inc)*6 times (18)
R 4 :
1 sc, inc, (2 sc, inc)*5 times, 1 sc (24)
R 5 :
(3 sc, inc)*6 times (30)
R 6 :
2 sc, inc, (4 sc, inc)*5 times, 2 sc (36)
R 7 :
(5 sc, inc)*6 times (42)
R 8 :
3 sc, inc, (6 sc, inc)*5 times, 3 sc (48)
R 9 :
(7 sc, inc)*6 times (54)
R 10 :
4 sc, inc, (8 sc, inc)*5 times, 4 sc (60)
R 13 :
(9 sc, inc)*6 times (66)
R 17 :
16 sc, inc, 32 sc, inc, 16 sc (68)
Info :
Crochet turning rows instead of rounds
R 21 :
33 sc, ch 1, turn (33) - leave remaining stitches unworked
R 22 :
Start in 3rd st from hook, skip (ch1 + 1 st), 66 sc, ignore marker, ch 1, turn (66)
R 23 :
Skip (ch1 + 1 st), 63sc, ch 1, turn (63)
R 24 :
Skip (ch1 + 1 st), 60 sc, ch 1, turn (60)
R 25 :
Skip (ch1 + 1 st), 49 sc, 37ch, start in 3rd ch from hook, hdc in next 35 ch, sc in next 10 st, 3 sc along edge, 1 slst, 37 ch (start in 3rd ch, hdc in 35 ch), slst in same st, 37 ch (start in 3rd ch, hdc in 35 ch), slst in next st, slst, 37 ch (start in 3rd ch, hdc in 35 ch), slst in same st, 37 ch (start in 3rd ch, hdc in 35 ch), 3 sc, 10 sc, 37 ch (start in 3rd ch, hdc in 35 ch), slst
Info :
Cut and fix yarn. Curl up the curls
— KNOT :
R 3 :
(1 sc, inc)*6 times (18)
R 4 :
1 sc, inc, (2 sc, inc)*5 times, 1 sc (24)
R 5 :
(3 sc, inc)*6 times (30)
R 6 :
2 sc, inc, (4 sc, inc)*5 times, 2 sc (36)
R 7 :
(5 sc, inc)*6 times (42)
R 13 :
(5 sc, dec)*6 times (36)
R 14 (FLO) :
((1 sc, 1 dc, 1 sc) in one stitch, skip 1 stitch)*18 times. Slst at end
Info :
Cut yarn leaving long end for sewing. Stuff balls
— FLOWER (Make 2 leaves) :
Info :
Use 2.5mm hook and green yarn
R 1 :
5 ch, work starting from 2nd st from hook - 1 sc, 2 hdc, 1 sc, 5 ch, starting from 2nd st - 1 sc, 2 hdc, 1 sc, slst into last loop of first leaf, 5 ch, starting from 2nd st - 1 sc, 2 hdc, 1 sc, slst into last loop of first leaf
Info :
Leave thread to tie to bunch
Roses (Make 2) :
Use 2.5mm hook and red yarn. R 1: 6 sc in MR. Sew leaves on
— DRESS :
Info :
Use 2.5mm hook and light blue yarn. Crochet by turning rows starting from neck. Ch 1 and ch 2 at beginning do not count as stitch
Starting chain :
Ch 33, work starting from 2nd st from hook
R 2 :
1 ch, 2 sc, inc, (3 sc, inc)*3 times, 2 sc, (inc, 3 sc)*3 times, inc, 2 sc, turn (40)
R 3 :
1 ch, 3 sc, inc, (4 sc, inc)*3 times, 2 sc, (inc, 4 sc)*3 times, inc, 3 sc, turn (48)
R 4 (blo) :
1 ch, 4 sc, inc, (5 sc, inc)*3 times, 2 sc, (inc, 5 sc)*3 times, inc, 4 sc, turn (56)
R 5 :
1 ch, 8 sc, 4 ch (skip 12 sc), 16 sc, 4 ch (skip 12 sc), 8 sc, turn (40)
Info :
Cut light blue, attach coral yarn
R 9 (blo) :
2 ch, 40 inc dc, turn (80)
R 10 :
2 ch, (2 dc, inc)*26 times, 2 dc, turn (106)
Info :
Start crocheting in the round. 1 ch, 2 ch at beginning and slst to join do not count as first dc/sc
R 11 :
2 ch, 106 dc, slst to 1st dc to join (106)
R 12-16 :
2 ch, 106 dc, slst to 1st dc to join (106)
R 17 (flo) :
(3 ch, skip 1 st, 1 sc)*53 times, slst to 1st ch to join
Info :
Cut coral, attach light blue. Join with slst to back loop of R 16 on back of dress. All crochets in R 18 in remaining back loops
R 18 :
2 ch, 26 dc, inc, 52 dc, inc, 26 dc, slst to 1st dc to join (108)
R 19-21 :
2 ch, 108 dc, slst to 1st dc to join (108)
R 22 (flo) :
2 ch, 108 dc, slst to 1st dc to join (108)
Info :
Cut light blue, attach blue yarn
R 23 :
(3 ch, skip 1 st, 1 sc)*54 times, slst to 1st ch to join
Info :
Cut blue, attach white. Join with slst to back loop of R 21 on back of dress. All crochets in R 24 in remaining back loops
R 24 :
2 ch, 108 dc, slst to 1st dc to join (108)
R 25 :
(3 ch, skip 2 st, 1 sc)*36 times, slst to 1st ch to join
R 26 :
((1 ch, dc into 1st Ch Sp)*5 times, 1 ch, 1 sc into next Ch Sp)*18 times, slst to 1st ch to join
R 27 :
(1 ch, skip 1 st, sc into Ch Sp) repeat around. Cut and fasten off
— SLEEVES (Make 2) :
R 1 :
2 ch in corner, (1 hdc, inc)*9 times, slst to 1st hdc to join (27)
R 2-6 :
2 ch, 27 hdc, slst to 1st hdc to join (27)
R 7 :
1 ch, 13 dec, 1 sc, slst to ch to join (14)
R 8-9 :
1 ch, 14 sc, slst to ch to join (14)
R 10 (flo) :
1 ch, (1 sc, 2 ch)*14 times, slst to 1st st to join
Info :
Cut light blue, attach white. Join with slst to back loop of R 9 on back. All crochets in R 11 in remaining back loops
R 11 :
2 ch, (1 dc, 2 ch)*14 times, slst to 1st dc to join. Cut and fasten off
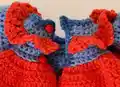
— RUFFLE :
Info :
Use 2.5mm hook and coral yarn. Join with slst to front loop of R 3 on back of dress
R 1 :
2 ch, (1 dc, 1 ch) repeat until end, turn
R 2 :
(3 ch, 1 sc into 1st Ch Sp) repeat until end. Cut and fasten off
— FINISHING NECK :
Instructions :
Attach blue yarn at back of dress. Crochet around with simple crochets into upper part of rows. Then (1 slst, 1ch) in each st of neck. Then simple crochets. Cut and fasten off
Button holes :
8 sc, 3 sc in one st, turn clockwise and crochet (1 slst, 1ch)*30 times, (2 sc in one st, 5 ch, 1 sc) in same st for 1st button hole, turn clockwise, 8 sc, 5 ch, slst in same st for 2nd button hole. Cut and fasten off. Attach buttons
This charming Doll Eliza pattern brings together traditional amigurumi techniques with beautiful clothing design to create a truly special handmade treasure. With her expressive eyes, curly golden hair, and beautifully detailed dress with ruffled layers, Eliza is designed to become a cherished companion for years to come. The pattern includes everything you need to create a complete doll from head to toe, including removable clothing and adorable accessories. Whether you're creating her as a gift or for yourself, this project offers a rewarding journey through various crochet techniques that result in a stunning finished piece. 🧶 Happy crocheting! 🧵✨