🧢 Beautiful ✨ Detailed πŸ’ Adorable

Phone Pouch with Back Pocket Crochet Pattern

Phone Pouch with Back Pocket Crochet Pattern
4.0β˜… Rating
4-5 Hours Time Needed
3.3K Made This
βœ‚οΈ

Intermediate Level

Ideal for those with basic knitting experience, featuring slightly more advanced stitches and techniques to expand your skills.

⏱️

Weekend Treat

Takes 5-7 hours, making it an enjoyable project to finish over a couple of days.

🧣

Snug Essential

Everyday comfort with practical charm, designed for both functionality and style through changing seasons.

About This Phone Pouch with Back Pocket Crochet Pattern

This phone pouch pattern combines practicality with beautiful design elements. The main body features an elegant shell stitch pattern created with chain spaces, while the contrasting color trim adds visual interest. The back pocket provides functional storage space, and the Romanian cord strap ensures comfortable carrying. The decorative flower detail with its handcrafted center adds a charming finishing touch to this versatile accessory.

Phone Pouch with Back Pocket Crochet Pattern crochet pattern - detailed view of completed project

Measuring approximately 16cm in height and 11cm in width, this pouch is perfectly sized for most smartphones. The pattern uses hard cotton or polyester yarn to maintain its shape and prevent stretching over time.

Why You'll Love This Phone Pouch with Back Pocket Crochet Pattern

I absolutely love this pattern because it perfectly balances beauty and functionality. The textured shell stitch creates such an elegant look while being surprisingly simple to master once you get into the rhythm. I appreciate how the back pocket adds genuine utility without compromising the design, and the Romanian cord technique is a wonderful skill to learn. The flower embellishment gives it that special handmade charm that makes each piece unique. It's rewarding to create something so practical that also looks gorgeous, and the ability to customize colors means you can match it to any style or outfit.

Phone Pouch with Back Pocket Crochet Pattern step 1 - construction progress Phone Pouch with Back Pocket Crochet Pattern step 2 - assembly progress Phone Pouch with Back Pocket Crochet Pattern step 3 - details and accessories Phone Pouch with Back Pocket Crochet Pattern step 4 - final assembly and finishing

Switch Things Up

I love experimenting with different color combinations for this phone pouch - the contrast between the main body and trim really makes the shell stitch pattern pop. Try using jewel tones like emerald and gold for an elegant look, or go bold with black and neon pink for something edgy.

If you want to add more personalization, consider using variegated yarn for the main body to create a beautiful ombre effect. You could also make the flower embellishment in multiple colors or add beads to the center for extra sparkle.

For a more minimalist approach, skip the flower entirely and use a simple button closure instead of the magnetic snap. I've also experimented with making a longer strap to wear it crossbody style - just continue the Romanian cord technique until you reach your preferred length.

The back pocket is perfect for customization too. Add a small zipper for extra security, or create multiple smaller pockets by dividing the space with additional seams. Some makers I know have added their initials using surface crochet or embroidery on the front flap.

You can also transform this into a wallet by making it slightly wider and adding card slots inside. The shell stitch pattern works beautifully at any size, so don't be afraid to scale it up for tablets or scale it down for a glasses case. The possibilities are truly endless!

Common Mistakes & How to Fix Them

βœ— Using stretchy yarn instead of hard cotton or polyester, which causes the pouch to lose its shape and stretch when carrying a phone βœ— Forgetting to mark the first stitch of each round, leading to confusion about where rounds begin and end throughout the pattern βœ— Not maintaining consistent tension in the chain spaces, resulting in uneven shell stitches that affect the overall appearance of the pouch βœ— Rushing through the color change process without properly securing yarn ends, causing loose connections and potential unraveling at transition points βœ— Sewing the back pocket through front loops only instead of back loops, making the attachment less secure and visible from the front

Phone Pouch with Back Pocket Crochet Pattern

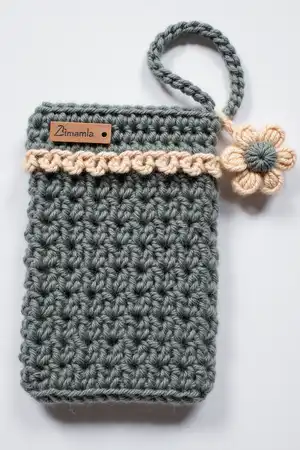
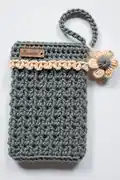
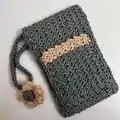
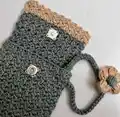
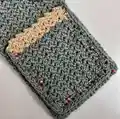
Create a stylish and functional phone pouch with a convenient back pocket using this detailed crochet pattern. This versatile accessory features a beautiful textured stitch pattern, a contrasting color trim, and a decorative flower embellishment with a Romanian cord strap. Perfect for keeping your phone secure while adding a handmade touch to your everyday style. The back pocket provides extra storage for cards or cash, making this an ideal on-the-go companion.

Intermediate 4-5 Hours

Materials Needed for Phone Pouch with Back Pocket Crochet Pattern

β€” Main Fabric

  • 01
    Worsted weight hard cotton or polyester yarn in main color, approximately 150 meters
  • 02
    Worsted weight hard cotton or polyester yarn in contrast color

β€” Tools Required

  • 01
    Crochet hook 3mm
  • 02
    Tapestry needle
  • 03
    Stitch markers
  • 04
    Magnetic button (2 pieces)
  • 05
    Sewing pins
  • 06
    Scissors
  • 07
    Leather label (optional)

Progress Tracker

0% Complete

β€” Pouch Body

Starting Chain :

CH 31 with main color yarn

Row 1 :

HDC into 3rd CH from hook, skip 1 ST, *SC, CH2, SC* into the next ST. [Skip 2 STS, *SC, CH2, SC* into the next ST] x 8 times, skip 1 ST, HDC into last CH. CH 1, turn.

Row 2 :

HDC into next ST, [*SC, CH2, SC* into CH 2 SP from last row] x 9 times, HDC into last ST. CH 1, turn.

Rows 3-62 :

Repeat row 2 for 60 times or until piece measures about 38 cm long

Info :

Change to contrast color yarn. Before finishing HDC of the last row, lay the new strand of contrast color yarn over the hook, hold the yarn end to the back of the work, then pull the contrast color through the 3 loops on the hook to complete the stitch, then CH 1, turn. Fasten off and cut the main color yarn and hide the yarn end. Continue with contrast color.

Rows 63-65 :

Repeat row 2 for 3 more times. Fasten off, cut the yarn, and hide the yarn end. Total length is about 40cm.

β€” Back Pocket

Starting Chain :

CH 25 with main color yarn

Row 1 :

HDC into 3rd CH from hook, skip 1 ST, *SC, CH2, SC* into the next ST. [Skip 2 STS, *SC, CH2, SC* into the next ST] x 6 times, skip 1 ST, HDC into last CH. CH 1, turn.

Row 2 :

HDC into next ST, [*SC, CH2, SC* into CH 2 SP from last row] x 7 times, HDC into last ST. CH 1, turn.

Rows 3-14 :

Repeat row 2 for 12 times for a total of 14 rows or until piece measures 8.5cm long

Info :

Change to contrast color (refer to color change instructions in pouch body)

Rows 15-17 :

Repeat row 2 for 3 more times. Fasten off, cut the yarn, and hide the yarn end. Total length is about 10.5cm.

Edging :

Use new strand of main color yarn, join at top side of the piece. CH1, 15 SC along the side, INC at the corner, 14 SC along the bottom, INC at the corner, 15 SC along another side. Fasten off, cut the yarn, and leave a long yarn about 50cm to sew the pocket into the pouch.

β€” Strap (Romanian Cord)

Info :

Leave 20 cm long yarn before beginning the CH for attaching the handle to the bag. Start with a slip knot.

Starting :

CH 2, 1SC in 2nd CH from hook, turn your work from right to left and you will work in the one loop on the bottom ST.

Continuing :

1 SC through the one loop on the bottom of ST. Turn your work from right to left again, this time you need to work through 2 loops in the next row. 1 SC through 2 loops. Repeat until 25cm long or your desired length. Leave two loops on the hook at the strap's end because you will need to connect the other end. Leave a yarn tail, cut the yarn but do not fasten off.

β€” Flower Petal (Contrast Color)

Round 1 :

MR, CH 1, 5 SC into the MR. SLST into the top of CH 1. (5)

Round 2 :

CH 1, INC x 5 times (10), SLST into CH 1 from the beginning.

Round 3 :

*CH 3, yarn over and insert hook into same stitch, yarn over and pull up a loop as tall as your beginning CH 3 to form a long loop. [Yarn over, insert hook into same stitch, yarn over and pull up a long loop] x 2 times. Yarn over, insert hook into next stitch, yarn over and pull up a long loop, [Yarn over, insert hook into same stitch, yarn over and pull up a long loop] x 2 times. Yarn over and pull through all loops on hook. CH 2, SLST into next stitch*. Repeat pattern from * to * 4 more times. SLST into CH of the 1st petal, continue CH 10, SLST into the base of CH 10 to form a loop. Fasten off, cut the yarn, and hide the yarn end.

β€” Flower Center (Main Color)

Info :

Make 2 pieces for front and back

Instructions :

CH 3, yarn over and insert the hook into the 1st CH and pull up a loop as tall as your CH 3 to form a long loop, repeat for another 8 times, yarn over and pull through all the loops on your hook, CH 1. Fasten off, leave a yarn tail to sew it into both sides middle of the flower.

Assembly Instructions

  • Fold the pouch body piece about 15.5cm toward the upper portion to create the pouch shape.
  • Cut a piece of yarn about 25cm long, thread it through a tapestry needle, and sew the two right sides of the pieces together using a running stitch. Fasten off, cut the yarn, and hide the yarn end. Repeat on the other side.
  • Place the back pocket piece on the lower back of the pouch. Use sewing pins to secure the piece in position.
  • Sew the pocket to the pouch through the back loops of the pocket stitches. For extra strength, stitch through from front to back to create a secure seam.
  • Thread the Romanian cord strap through the flower's loop, then pass it through the side of the pouch.
  • Put your hook through two loops on one end of the strap, then insert it through the other end. Yarn over, pull the yarn through the loops. Use the yarn ends to tie the two pieces together securely. Weave the ends in opposite directions.
  • Sew the magnetic button pieces inside the flap and on the bag body so they align and close properly.

Important Notes

  • πŸ’‘Use hard cotton or polyester yarn instead of stretchy acrylic to prevent the pouch from losing its shape when carrying a phone
  • πŸ’‘Place stitch markers at the beginning of each row to keep track of your pattern repeat and maintain consistency
  • πŸ’‘When changing colors, make sure to properly secure and hide all yarn ends to prevent them from working loose over time
  • πŸ’‘Test the magnetic button placement before permanently sewing it to ensure proper closure alignment
  • πŸ’‘The Romanian cord strap technique may feel awkward at first, but becomes easier with practice - work slowly at the beginning
  • πŸ’‘Pin all pieces in their final positions before sewing to ensure proper placement and symmetry
  • πŸ’‘Leave the long yarn tail when finishing the back pocket as specified - you'll need it for secure attachment

This elegant phone pouch pattern combines practical design with beautiful handcrafted details. The textured shell stitch creates visual interest while the back pocket adds functional storage space. The Romanian cord technique introduces you to a unique strap-making method, and the delicate flower embellishment adds a charming finishing touch. Perfect for gifting or treating yourself to a stylish accessory that keeps your phone safe and accessible! 🧢✨

You ask,

we answer.

FAQs

What type of yarn works best for this phone pouch pattern?

Hard cotton or polyester yarn is recommended rather than stretchy acrylic. This ensures the pouch maintains its shape and doesn't stretch out when carrying your phone. Worsted weight yarn with approximately 150 meters total is needed.

Can I adjust the size to fit larger phones?

Yes! Simply add more chain stitches to the starting chain (in multiples of 3 plus 4) and add more rows until you reach your desired length. The pattern is easily customizable for different phone sizes.

I've never made a Romanian cord before. Is it difficult?

The Romanian cord technique may feel unusual at first, but it's quite simple once you understand the turning motion. Work slowly through the first few inches, and it will become more natural. The pattern includes detailed photo instructions to guide you.

How do I prevent the color change from looking messy?

The key is to change colors mid-stitch as described in the pattern - pull the new color through the final loops of the last stitch. Make sure to securely fasten off the old color and weave in ends properly on the wrong side of the work.

Is the back pocket large enough for cards and cash?

The back pocket measures approximately 10.5cm long, which is perfect for credit cards, ID cards, or folded cash. It's designed to be functional while maintaining the pouch's compact profile.

Can I skip the flower embellishment?

Absolutely! The flower is decorative and optional. You can attach the strap directly through the side of the pouch if you prefer a simpler look, or substitute with a button or other embellishment.